![]() One management tool for all smartphones to transfer files between PC & iOS/Android devices.
One management tool for all smartphones to transfer files between PC & iOS/Android devices.

![]() > How-To > How to Transfer Voice Memos from iPhone/iPod to PC?
> How-To > How to Transfer Voice Memos from iPhone/iPod to PC?
One of the frequently used feature of iPod/iPhone is recording voice memos because the iPod touch and iPhone's built-in Voice Memo app can be handy for recording lengthy thoughts or instructions on the go. If you have recorded any voice memos on your iPhone/iPod, you may want to transfer voice memos from your iPhone/iPod to PC for backup. However, if you’re new to iPhone/iPod, you may find it is tricky about how to transfer voice memo from the iOS devices to computer. Basically, you have 3 ways to achieve the goal. In this article, we’ll walk you through the methods to transfer voice memos on iPhone/iPod back to your PC via Syncios Transfer, iTunes and even Email/Message.
If you want to transfer voice memos that recorded over 8 minutes long from iPhone/iPod to your computer freely , it's time to look at some other iPhone/iPod apps that better suit your purposes. The fastest way to transfer voice memos is to use Syncios iPhone Transfer, it offers a brand new intuitive transfer wizard for your voice memos of iPhone/iPod. For voice memos with large file size, you would better use Syncios. Besides, Syncios iPhone manager also features the functions as transferring Apps(iOS 9 and above version are not supported), Photos, Music, Videos, Ebooks, etc.
Step 1: Download and install Syncios iPhone Transfer on your computer.
Step 2: Connect your iPhone/iPod Touch to PC with USB and launch Syncios Transfer.
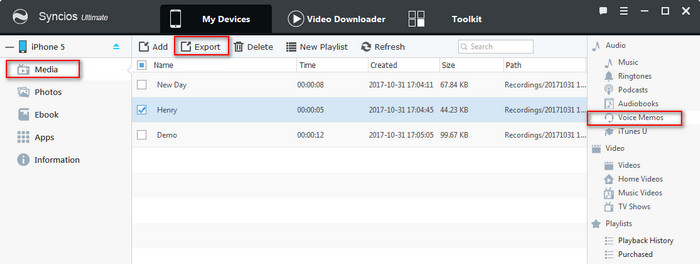
Step 3: Go to My Device module, click Media on the left panel and highlight Voice Memos icon on the right column.
* You will see media files list on the right panel: Music, Videos, Ringtones, Podcasts, TV Shows, Audiobooks, Music Videos, Voice Memos, iTunes U and Playlists. Highlight Voice Memos, then you will find those options: Add, Export, Delete, New Playlist and Refresh, which enable you to manage your voice memos freely and quickly!
1) Click Add, you can add new voice memos from PC to your iOS devices.
2) Click Export, you can transfer voice memos from iPhone/iPod to PC for backup.
3) Click Delete, you can delete any unwanted voice memos on your iPhone/iPod.
4) Click New Playlist, you can create a new playlist to categorize your recorded voice files
Note: You can also transfer your voice memos from Android devices to computers now!
iTunes is also a suitable choice for you to transfer voice memos from iPhone/iPod Touch to your computer. Just follow the simple step-by-step instructions given below to learn how to to backup your voice memos with iTunes!
Step 1: Download and install iTunes on your PC.
Step 2: Dock your iPhone/iPod via USB and launch iTunes.
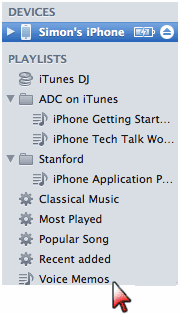
Step 3: Click the name of your iPhone under Devices in the left column.
Step 4: Select Music tab and click the check box next to Include voice memos.
Step 5: Click the Sync button and iPhone voice memos will copy over to your PC.
Once sync is done, they will be stored in a special sub-folder called "Voice Memos" of your iTunes . You'll also be able to view the recordings in the "Voice Memos" playlist that will appear under the playlist menu in iTunes.
If the size of your voice memo is not too large, the easiest way is to send voice memos via Email or Message. After finishing voice memo, you can freely share it with someone else via email or message. Once they receive it, they'll be able to play it directly. If you only have a few short voice files, emailing them is the best choice.
Step 1: Tap on the Voice Memo you'd like to share.
To share voice memo via email, you can tap the lower-right button in Voice Memo app. This will take you to a list of your voice memos. Select the voice memo you want to share and press the large blue share button at the bottom right of the screen.

Step 2: Tap the Share button in the bottom left corner and then choose Email or Message.
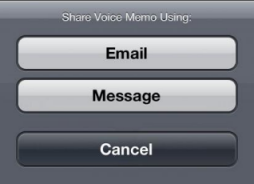
Step 3: Type in the recipient's email address and then tap the Send button.
The recipient will receive an iMessage or text just like they normally would but the file will be attached on its way.