Syncios iOS & Android Manager
Quickly Backup and Restore Samsung Galaxy S25
Like mostly mobile users, Samsung Galaxy S25 users also store their personal and important data in their device. So if the phone is damaged, lost or performed a reset, all data may be erased without recovery. And for some users, they will switch to another phone one day, then a full backup of the old device plays a critical role at that time. Thankfully, there are different ways to backup your Samsung phone. In this article, I will share some best ways to backup and restore WhatsApp, contacts, messages, video, pictures, music, call logs, apps and etc on Samsung Galaxy S25.
- Solution 1. 1-Click to Backup and Restore Samsung Galaxy S25
- Solution 2. Selectively Backup and Restore Samsung Galaxy S25
- Solution 3. Backup and Restore Samsung Galaxy S25 via Google Backup
- Solution 4. Backup and Restore Samsung Galaxy S25 via Samsung Cloud
- Solution 5. Backup and Restore WhatsApp on Samsung Galaxy S25
Solution 1. 1-Click to Backup and Restore Samsung Galaxy S25
At first of all, you will learn a best solution to backup and restore phone data. Syncios Data Transfer provides professional ways to backup, restore and transfer phone data. Just follow a few steps below to check necessary details.
Syncios Data Transfer
- Backup and restore apps contacts, photos, SMS, music, videos and more easily
- Transfer apps contacts, photos, SMS, music, videos and more between devices
- Restore iTunes backup to mobile devices quickly without overwriting
- Get music and videos from iTunes Library to phones simply
- Works perfectly with iOS and Android smartphones and tablets
Step 1: Start Syncios Data Transfer
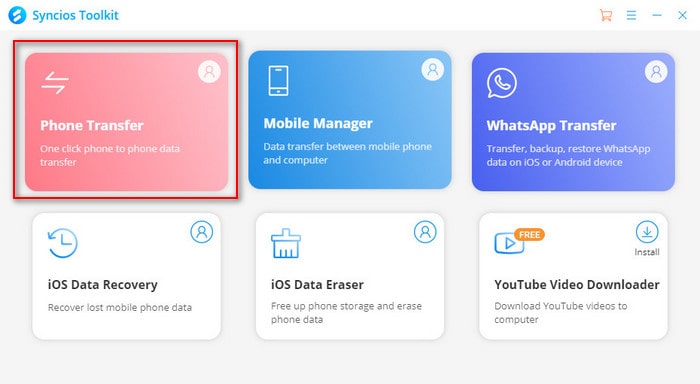
Windows version and Mac version are provided for users. Download the right version on your computer then launch this program. On the main interface, you will see multiple Syncios toolkit, just direct to Phone Transfer. Tap "Phone Transfer" module to initiate it. Now we enter the start-up interface of Syncios Data Transfer.
Step 2: Connect Samsung Galaxy S25 to Computer
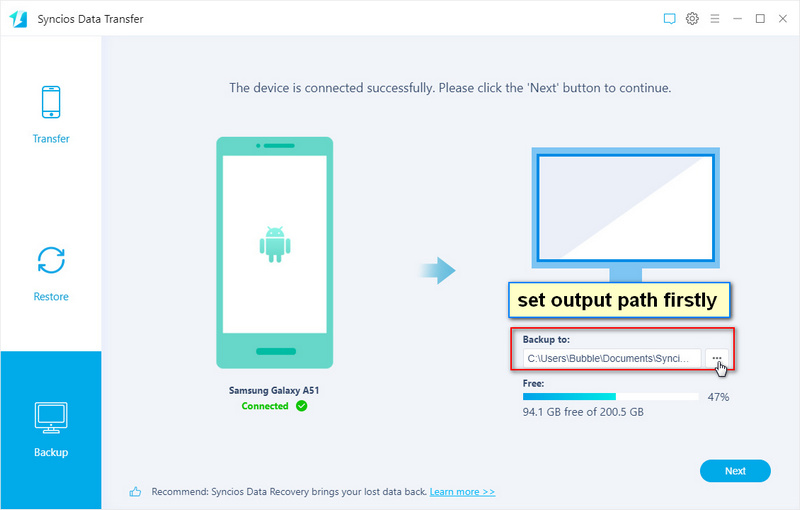
Connect your Samsung Galaxy S25 to computer via USB cable. Otherwise, you could not click any button. As soon as you connect the phone, check its connection mode on "Notification Center" of your phone. The connection mode should be Transfer File. And follow instructions to open USB debugging mode when asked.
Step 3: Backup Samsung Galaxy S25 data to PC
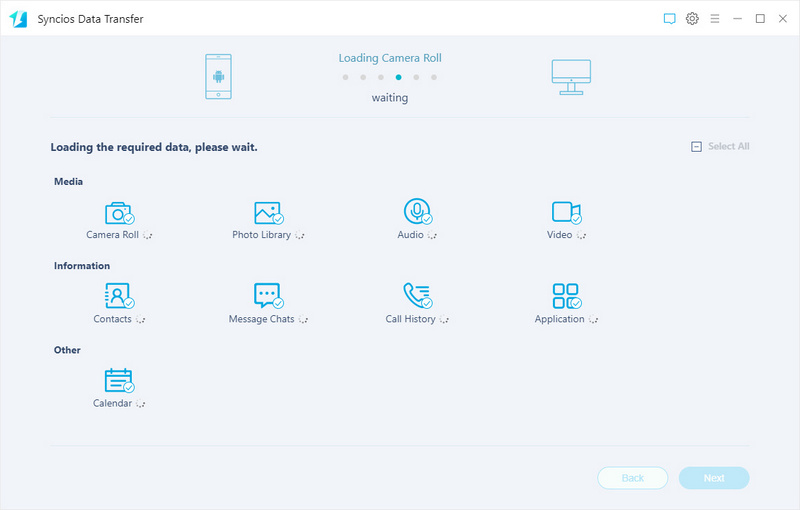
Navigate to Backup column. On the lower-right corner, you can check the storage information of your computer. You need to change the output path when there is no enough space. After that, simply click Next. Here you are allowed to select files to backup, such as contacts, messages, video, pictures, music, call logs, apps and etc. Makes a selection then click Next to load data from your phone. To start the backup process, you need to tap the Next button again. After a while, Syncios will create a full backup from your Samsung Galaxy S25 data to PC. The backup folder will pop up automatically, check if all selected contents are backed up successfully.
Step 4: Restore backup to Samsung Galaxy S25 whenever you need
Now you can restore the created backup to Samsung Galaxy S25 if you need. Just navigate to Restore mode on the main interface. Then tap Local Backup. A pop-up backup list appears. You can choose a backup according to its size, date and device name from all enlisted backups. Then go to the next step to select items from the backup. Tick off contents you need then click Next to start loading data. After that, to initiate the recovery process, just tap Next again. Syncios will restore the backup to your Samsung Galaxy S25 without any data loss.
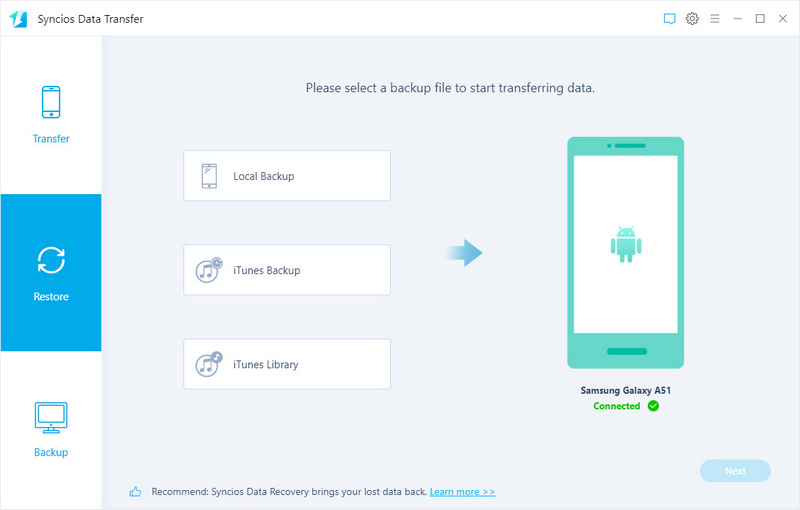
Notes:
- If you need to restore the Samsung backup to other iOS or Android devices, just connect the target device to computer, then restore the previous backup to the connected phone.
- The device is not limited when backing up and restoring. You can backup any iOS or Android device then restore the Syncios backup to any other iOS or Android device. But note, some types of contents are limited to transfer between iOS and Android. You can check the supported contents on its official website.
Solution 2. Selectively Backup and Restore Samsung Galaxy S25
Here is another solution to backup and restore your Samsung Galaxy S25 provided by another tool, Syncios Mobile Manager. It provides selectively transfer. That means, you can check all details of all contents by using Syncios Mobile Manager. Then choose files you need to backup and restore. Just follow a few steps below, then you will know how it works.
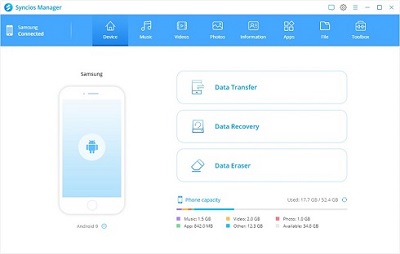
Syncios Mobile Manager
- Support to transfer, edit, backup, manage, view mobile data such as contacts, apps, photos, music, ringtone, videos, SMS messages, eBooks and more.
- Preview and export SMS, Call History & Contacts to readable format on computer.
- Handy tools: 1-click backup, 1-click restore.
- Fully compatible with latest Android and iOS devices.
Step 1: Start Syncios Mobile Manager
Syncios Mobile Manager Windows version or Mac version needs to be installed on your PC. Choose the compatible version to download and install. After the installation, on the start-up interface of Syncios, choose Mobile Manager module. This step is important. Then connect your Samsung Galaxy S25 to computer with a USB cable. Choose Transfer File as the connection mode. Turn on USB debugging mode on your phone when asked. After your phone is connected well, let's move to the next step.
Step 2: Backup Samsung Galaxy S25 to computer
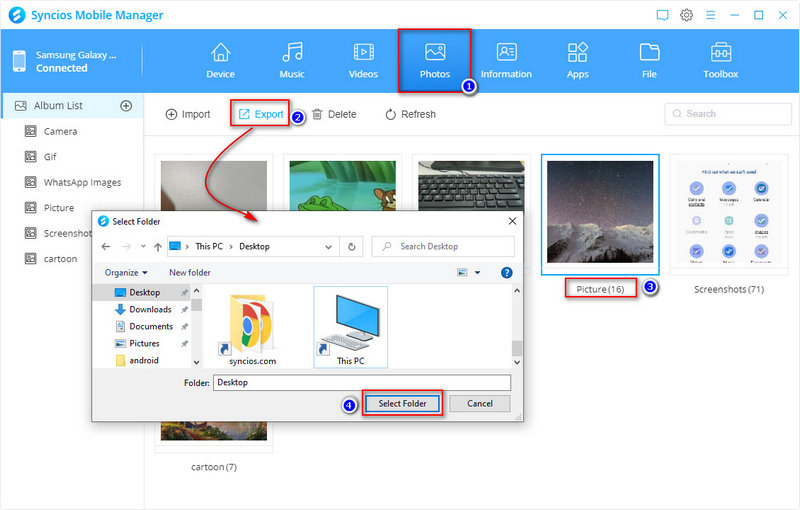
- You can find "Music", "Video", "Photos", "Information"(contacts, messages, call history), "Apps", "Files", "Toolbox" on the menu bar. Navigate to the content you need to backup, tap it. Then view all details and select files. Click Backup/Export button to copy them to computer.
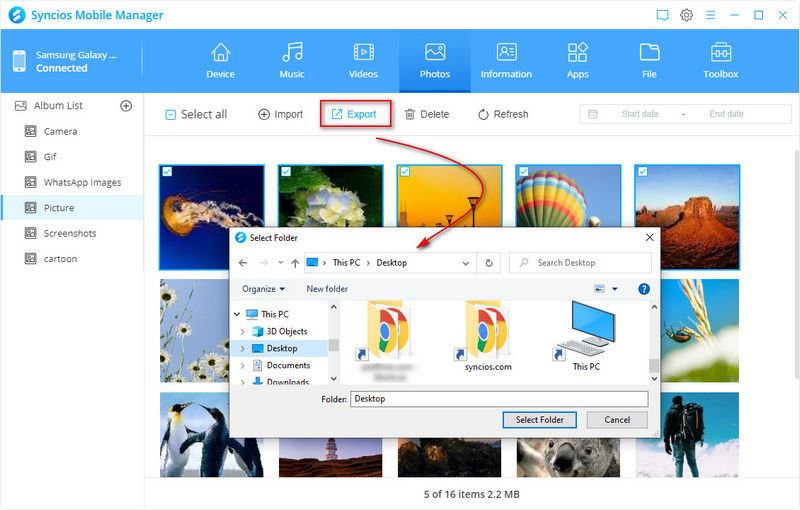
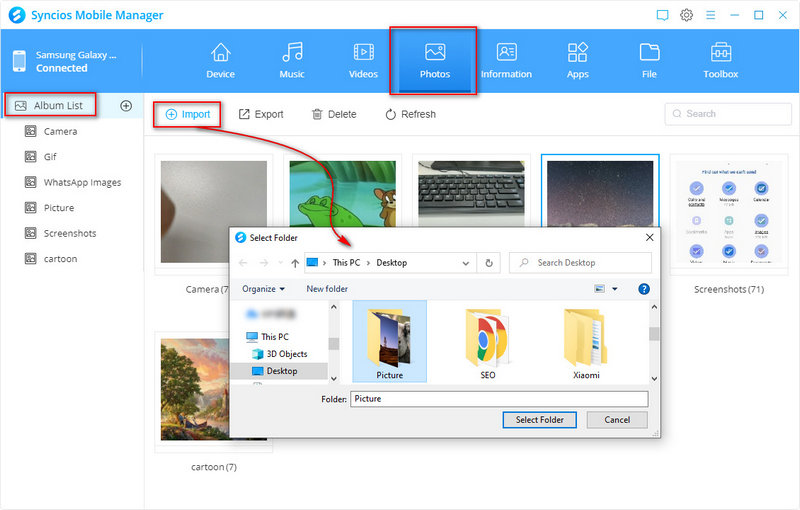
- Here we take "Photos" as an example. Go to the photo tab and you will see all photo albums on your phone. Select a photo album then click Export to save the photo folder to computer. Or enter a photo album, select photos you need, then click Export to save the selected photos to computer.
Step 3: Restore the backup to Samsung Galaxy S25
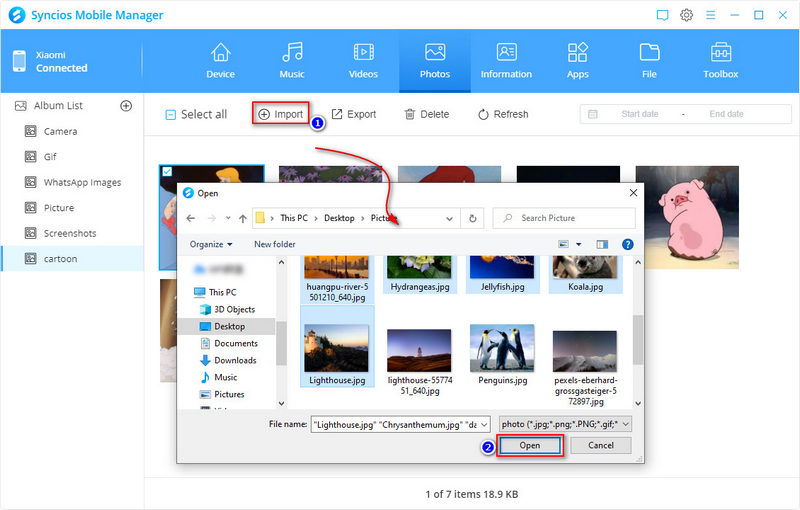
- To restore the backup, just go to the corresponding tabs and click Recover/Import button to retrieve them from computer. In addition, without any Syncios backup, you can also import media files, such as music, videos, photos, from computer to your phone.
- Here we take "Photos" as an example. Go to the photo tab. Then click Import to select a photo folder from computer to import as a photo album. Or enter a photo album, click Import button. Select photos you need from computer and import photos to this opened photo album.
Solution 3. Backup and Restore Samsung Galaxy S25 via Google Backup
Most users know that Google Drive offers backup and restore service. Google Drive cloud storage service enables you to store your data including documents, call history, photos, videos, music, messages, and many others. After the backup is completed, users can also use it to restore the backed up data to the Samsung device. If you've installed Google Drive on your Samsung Galaxy S25, follow our steps below to start.
Notes:
Please keep in mind that Backups cannot be restored from a higher version of Android onto a phone having lower Android version.
Step 1: Unlock your Samsung Galaxy S25, then go to its Settings > Accounts and backup > Backup and restore. Here you can see the Google account section. You can turn on Back up my data. Make sure that you select the correct account once you’ve done the above process. Tap "Backup account" to select the preferred account. Choose or change which Google account your backups are saved to. With all steps done, your data will be backed up to Google cloud. Don't forget to check the network connection when the backup is failed.
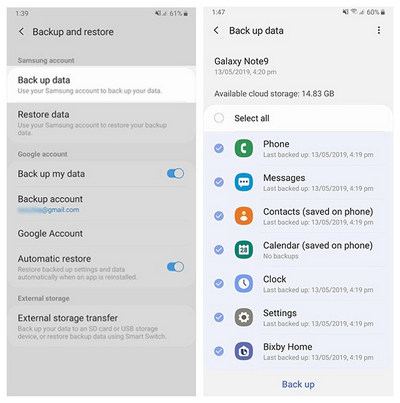
Step 2: To restore the backup, just tap Automatic restore to turn on when you need. Then the previous backup will be restored to your Samsung Galaxy S25. If you reset your phone or want to restore the backup to another phone, just make sure you’ve added the Google account to your target phone.
Solution 4. Backup and Restore Samsung Galaxy S25 via Samsung Cloud
Samsung computer also gives its official solution to backup and restore Samsung phones. Samsung cloud is designed for ll Samsung users. With registered Samsung account then you are able to get upload your phone data to its cloud storage.
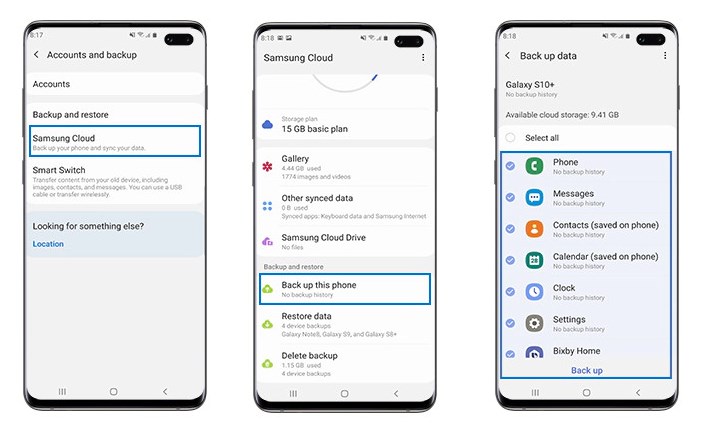
Step 1: Unlock your Samsung Galaxy S25 and open the Settings, tap Accounts & Backup.
Step 2: Then choose Samsung Cloud.
Step 3: Scroll down to find an option Back up this phone, tap it.
Step 4: Just switch on the button behind the content you wish to backup, after your selection, then tap BACK UP.
Step 5: To restore the backup data from Samsung Cloud to Samsung Galaxy S25 or to another Samsung device, unlock the target phone, open Settings, go to Accounts and backup > Samsung Cloud > Restore data. Follow its on-screen instruction to select the device you wish to restore data to, and then select the content you want to restore. Next, tap Restore. With a stable network connection, Samsung Cloud will restore the backup data to your Samsung phone after a while.
Note: Any users who create or recreate a Samsung Cloud will be provided with only 5GB free storage, you need to pay for extra storage. Content that can be backed up to your Samsung Cloud may vary depending on the device, software and Cloud storage available.
Solution 5. Backup and Restore WhatsApp on Samsung Galaxy S25
We provide this method as a supplement. WhatsApp is one of the most used social app among phone users. To backup and restore WhatsApp, you may suffer a lot. Here we select a most convenient way to help you to backup WhatsApp chats, photos and videos offered by Syncios WhatsApp Transfer. And actually, without any help, it's difficult to backup and restore WhatsApp easily.
Why Syncios WhatsApp Transfer is necessary:
- 🍄 1. Backup and Restore WhatsApp data without restrictions.
- 🍄 2. Preview the backup content and restore only the data you want.
- 🍄 3. No need to link with the same WhatsApp account on both source device and target device.
- 🍄 4. Be able to print WhatsApp chats you select directly.
- 🍄 5. Export WhatsApp backup to HTML and CSV files.
- 🍄 6. Fully compatible with Android and iOS devices.
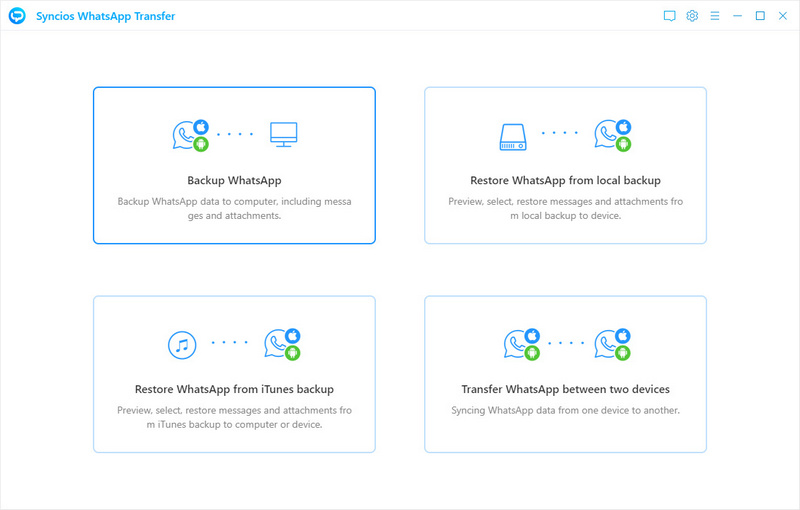
Step 1: Choose "Backup" mode on the main interface
Start Syncios WhatsApp Transfer on your computer, Windows version or Mac version are available. From the start-up interface, choose "WhatsApp Transfer", open it after its downloading. Then choose Backup WhatsApp.
Step 2: Backup Samsung Galaxy S25 WhatsApp to PC
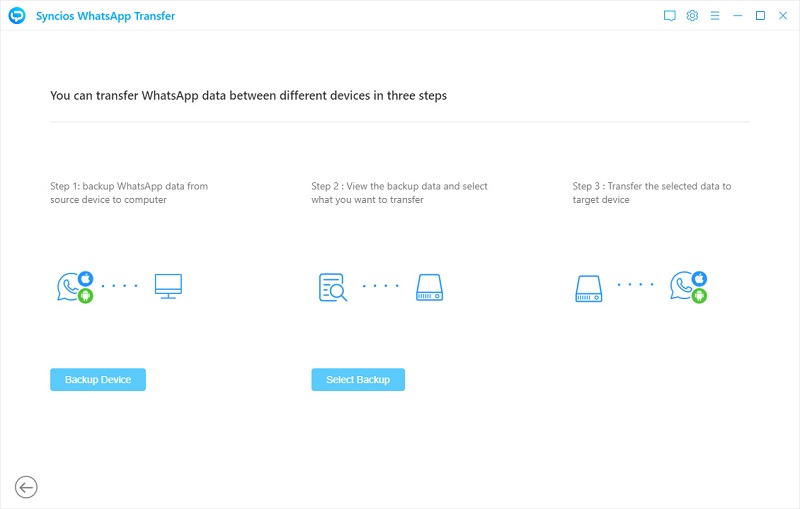
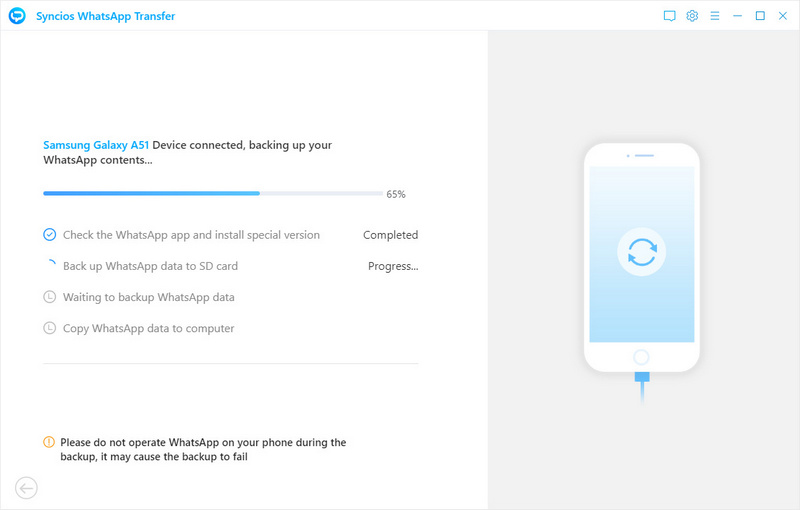
Connect your Samsung Galaxy S25 to computer via a USB cable. Syncios will start backing up your WhatsApp data. Unlock your phone and keep a well connection. You will see a prompt when it finishes the backup process.
Step 3: Choose a backup to check details
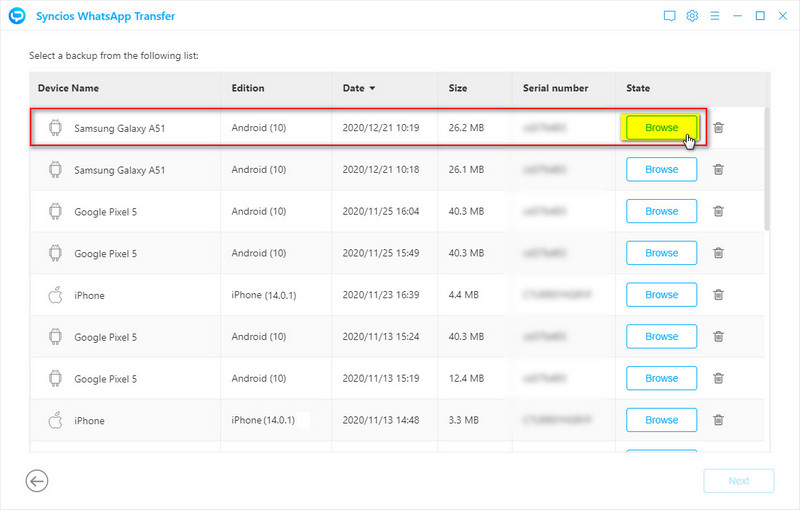
If you need to restore WhatsApp data later to Samsung Galaxy S25 or other iOS or Android device, just choose Restore WhatsApp from local backup on the main interface. Then you can select the previous backup among all enlisted backups according to its device name, size and date. Click Browse, all WhatsApp chats and attached photos, videos are displayed.
Step 4: Select WhatsApp conversations to restore to Samsung Galaxy S25
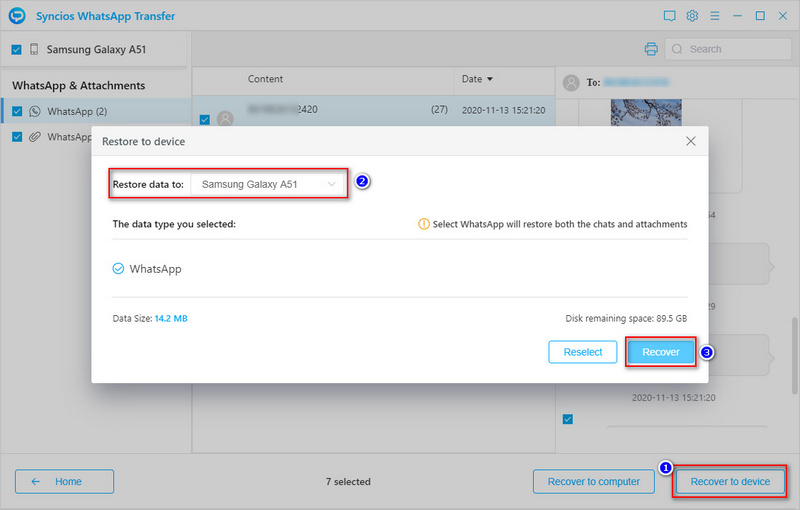
To restore WhatsApp conversations to your phone, go to WhatsApp Chats. Select conversations you need. Then go to the lower right, tap Recover to device. And choose Recover to Samsung Galaxy S25 or other target device you wish to restore WhatsApp to. Tap Recover to launch the recovery process. Wait till it's completed. Afterwards, check WhatsApp on your phone.
Conclusion:
Keep this article in case you need it later. If this guide helps, don't forget to share it with your friends. If you need tools we listed above, you can download now!
How can I identify which tool is the best for me?
- Syncios Data Transfer: Directly backup and restore contents on iOS and Android devices with one click.
- Syncios Mobile Manager: Selectively backup a phone with a detailed preview then restore the backup to a phone.
- Syncios WhatsApp Transfer: 1-click to backup WhatsApp conversations of a phone. Selectively restore the WhatsApp to a phone with a preview.


