


How to Transfer Photos from Google Pixel 9a to Computer
I insist a regular backup to my photos because I believe photos taken by camera are most important files in my mobile phone. I can't lose photos which are part of my life. But getting photos and pictures from a phone to computer can be a daunting task if you have no idea where to start. But you’ll undoubtedly want to get those pictures onto your PC at some point. Fortunately, you are in the right place, I will share the way I back up photos. If you are a Google Pixel 9a uses, in this post, you will know it’s pretty straightforward to save photos from Google Pixel 9a to computer.
![]()
Transfer Photos from Google Pixel 9a to Computer
It's a time consuming job to copy photos from Google Pixel 9a to computer if you don't know how to use a mobile tool. Syncios Mobile Manager can get access to contacts, apps, photos, songs, messages and more on iOS & Android devices. It aims to manage, organize, edit, backup and restore contents on iOS & Android devices. With the help of Syncios Mobile Manager, you can easily backup and restore Google Pixel 9a photos without data loss.
What do you need: Google Pixel 9a, an USB cable, Syncios Mobile Manager.

Syncios Mobile Manager
- Support to transfer, edit, backup, manage, view mobile data such as contacts, apps, photos, music, ringtone, videos, SMS messages, eBooks and more.
- Download videos from 100+ video sharing sites.
- Handy tools: Audio/video converter, ringtone maker, etc.
- Fully compatible with latest Android and iOS devices.
Step 1: Launch Syncios Mobile Manager after its installation. Get your USB cable to connect Google Pixel 9a with computer. Change the connection mode to Transfer File or MTP on Google Pixel 9a. Then follow instructions prompted by Syncios to establish a successful connection. The USB debugging mode needs to be enabled on Google Pixel 9a. It takes a longer time to detect and analyze your phone when the first time using Syncios. But it would be a short connection after the first time.
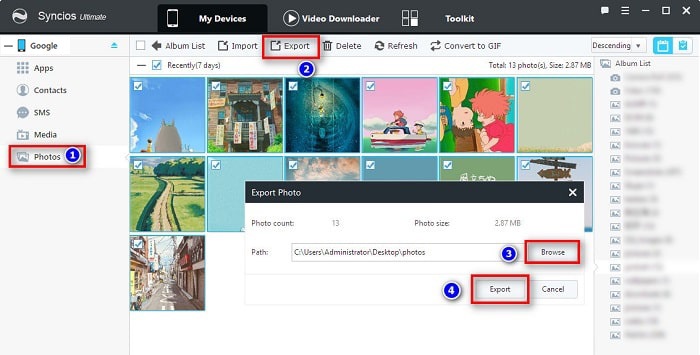
Step 2: When your Google Pixel 9a is detected successfully, you can see all contents are categorized on the left sidebar. To export Google Pixel 9a photos to computer, just go to Photos and click it. Syncios will start loading all photos and photo album on your Google Pixel 9a.
Step 3: Once all photos are loaded from Google Pixel 9a, you can view photos and select photos you need to backup. If you want to export photo albums, just choose a photo album at once then click on Export to save the photo album to computer. If you need to select a few photos from a photo album, just open that photo album and select photos you like, then click on Export to save photos to computer. Set a proper saving path to make sure there is enough space to store your exported photos.
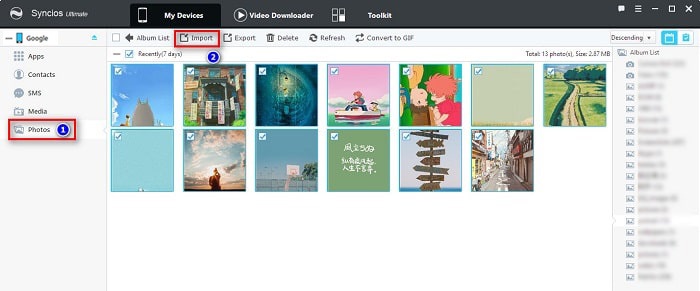
Step 4: If you also want to import some photos from computer to Google Pixel 9a, just click on Add to import a photo folder as a photo album. Or enter a photo album then click on Import to get photos and pictures from computer. It's similar to backup and restore other contents on Google Pixel 9a.
Why Choose Syncios Mobile Manager
- You can preview, manage, delete every photo easily by using Syncios before transfer.
- It saves a lot of time without browsing for photo folders among dozens of files.
- All photo albums are synced with your phone for ease of viewing.
- It supports to delete unwanted photos before performing a backup.
- It supports to restore photos to Google Pixel 9a after performing a backup.
Summary: Make a regular backup for photos or other contents on your mobile device is the best way to avoid data loss. Especially for photos, they are best witnesses of your life. you may want to remove some photos to free up space on your phone, but you need to make a backup of the old pictures before removing them. Only one solution we provide in this tutorial, and we believe it's the most effective one. If this guide helps, don't forget to share it with your friends.