![]() One management tool for all smartphones to transfer files between PC & iOS/Android devices.
One management tool for all smartphones to transfer files between PC & iOS/Android devices.

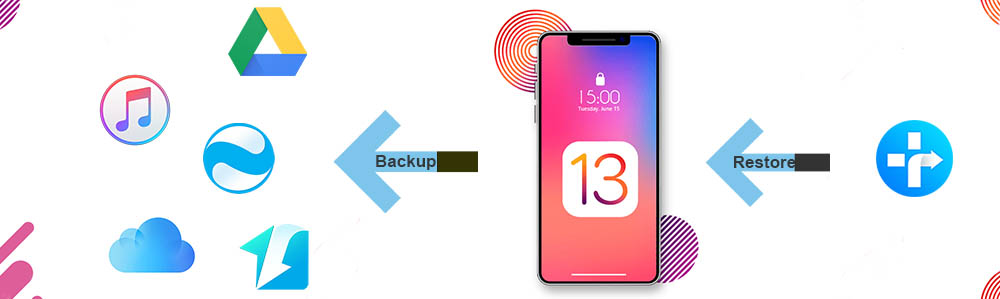
iOS 13 introduces a dramatic new look for iPhone with Dark Mode, new ways to browse and edit photos, and a private way to sign in to apps and websites with just a tap. It is faster and more responsive with optimizations across the system that improve app launch, reduce app download sizes and make Face ID even faster.
You may have been hearing these a lot about upgrading your iPhone to iOS 13 but end up doing nothing for fear of data loss. It is common to have this concern that updating to the latest version sounds great but what if I lose my significant data during the process? No worries. This article is going to give you 5 ways to backup your iPhone before you are planning to upgrade to iOS 13.
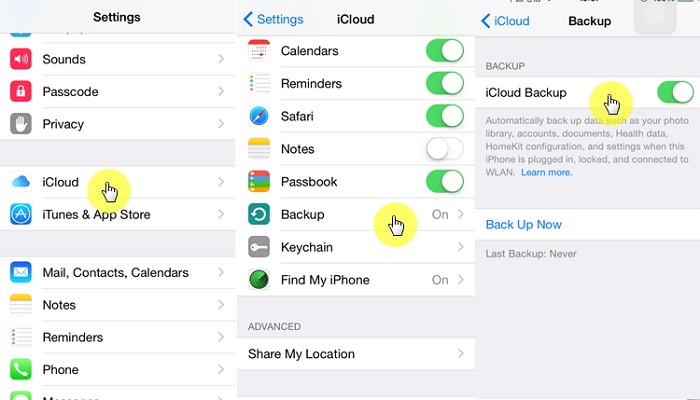
iCloud is an included feature on every iPhone with at least iOS 5, which can back up your iPhone data automatically once you turn it on. Simply follow the steps below to turn on the iCloud Backup.
Step 1 : Connect your device to a Wi-Fi network.
Step 2 : Tap Settings > iCloud > Backup.
Step 3 : Turn on iCloud Backup if it isn't already turned on.
Step 4 : Make sure you are on a WiFi connection and tap Back Up Now.
Step 5 : Check your backup by tapping Settings > iCloud > Storage > Manage Storage, and then select your device. You should see your latest backup listed.
iCloud Backup charges nothing for the first 5GB of files. Otherwise, you’ll have to pay a monthly fee. For 50GB, you'll pay $0.99 per month. For 200GB, the cost is $2.99 per month. And for 1TB, Apple charges $9.99 per month. These prices might not seem steep, but they're still significantly higher than the prices of most online data storage services.
Photos and videos can fill up your free 5GB fast. If you take a lot of pictures and still opt for iCloud Backup, you can choose to back up your most recent 1,000 photos in My Photo Stream, and they won't count against your storage limit. Today's iPhones store up to 128GB of data so even with a 1,000 photos in My Photo Stream and 5GB of free iCloud storage you can easily run out of free storage.
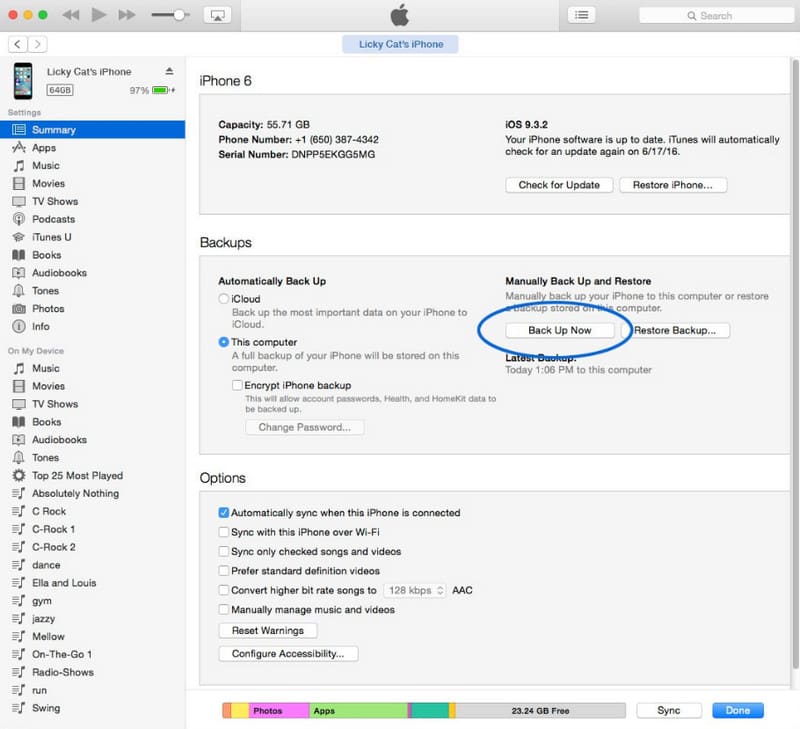
To backup using iTunes, a computer running iTunes is needed. Then you need to allow your phone to communicate with your computer—either through Wi-Fi or by connecting the devices with a USB cord. Backing up via iTunes to your computer is pretty straight forward. Just follow these steps:
Step 1 : Open iTunes.
Step 2 : Connect your iPhone to your computer.
Step 3 : Click File > Devices > Backup or click Backup Up Now from Summary page.
Using this method you can backup everything from your iPhone - photos, videos, text messages, application data, etc., from your iPhone to your computer as often as you wish. Since iTunes is free your backup is free. Still there are a couple of things to remember when using this method.
You have to remember to do the backup. It is a manual operation, not automatic. It only takes a few minutes, but your initiative is required. You can make this automatic, but most people find that this uses a lot of network bandwidth (think LTE, 3G and 4G) at the wrong times and end up turning it off.
You need to have enough free space on your computer's hard drive to store the iPhone backup. Again with up to 128GB of storage on your iPhone, that could be an issue.
There is a permission for iOS user to install Google Drive on their iPhone or iPad. You can backup photos on Google Photos, and contacts to Google Contacts. Moreover, your files could be backed up on Google Drive.
Step 1 : Firstly install Google Drive on your iOS phone and open it.
Step 2 : In the top left, tap on Menu bar.
Step 3 : At the top of Menu, tap Settings > Backup.
Step 4 : And than tap to Start Backup.

You can see all your files across all devices after your backup . Photos will be backed up with the original quality, after that you can see and edit the photos with the Google Photos.
To restore your contacts backup on your iPhone, move to your iPhone settings > Accounts & Passwords > Add Account > Google. Sign-in to your Google account together with your login credentials. Tap Next. currently switch Contacts possibility on. As for calendar events, merely install your Google Calendar app for your new device.
![]() Syncios Data Transfer
Syncios Data Transfer
Syncios Data Transfer is a professional iOS & Android synchronizing tool, which enables you to backup or transfer messages, contacts, call logs, music, video, audio and other files between iOS & Android devices and computer with only few clicks or directly phone-to-phone transfer.
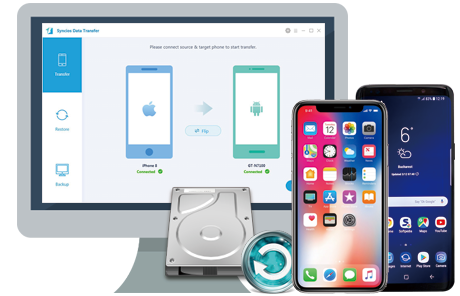
Syncios Data Transfer is a professional tool to backup your iPhone data to computer which includes Contacts, Messages, Videos, Audios and more. Simply follow the steps below will get the job done.
Step 1 Download and install Syncios Data Transfer on your computer and run it. Launch it and connect your iPhone to computer via USB cable. Follow the on-screen wizard to turn on USB debugging mode to permit the detection of your device. If you encounter any problems during the detection, please refer to How to Fix the iOS Device Detection Problem?
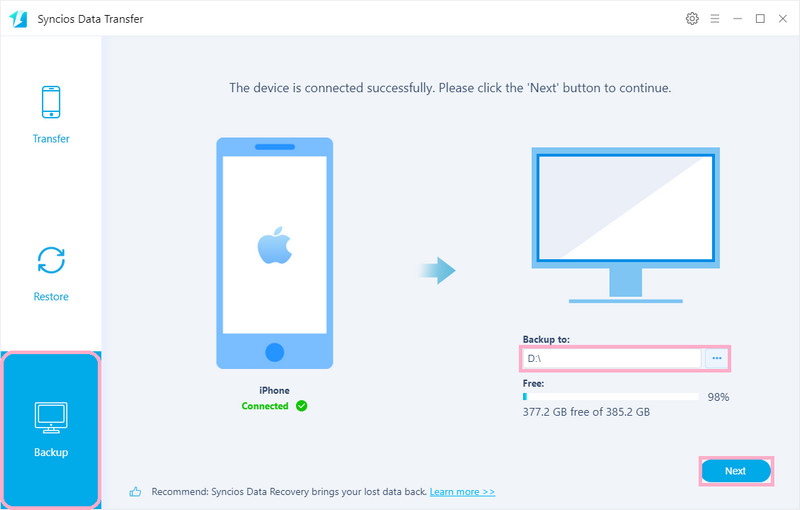
Step 2 After you launch Syncios, there are 3 modes on the left panel which are Transfer, Restore and Backup. Simply go to Backup, choose storage location of the computer and then enter Next to further your step.
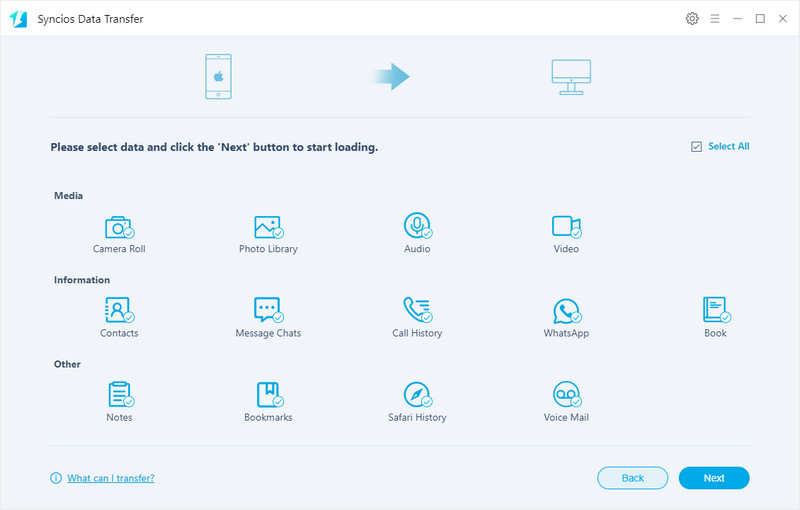
Step 3 After that, you will notice that all transferrable data are displayed on the interface. You can choose the data you want to backup and then tap on Next to start backing up them from iPhone to your computer.
Step 4 The duration of transferring process will simply depend on the size of your data, please wait patiently till they are completely transferred. After that, you can check in your computer.
![]() Free Syncios Mobile Manager
Free Syncios Mobile Manager
Free Syncios Mobile Manager is an easy-to-use and powerful iOS & Android Mobile manager, which is well-designed for users who want to manage device contents on PC. It allows you to export contacts, apps, photos, music, ringtone, videos, SMS messages, eBooks and more for free.

Syncios Ultimate also offers you One-click Backup and One-click Restore. Simply go to Toolkit and you will find them. But in this part, we mainly focus on its selectively backup. Now follow our steps below to learn more.
Step 1 Download and install Syncios Manager on your computer and run it. Launch it and connect your iPhone to computer via USB cable. Follow the on-screen wizard to turn on USB debugging mode to permit the detection of your device.
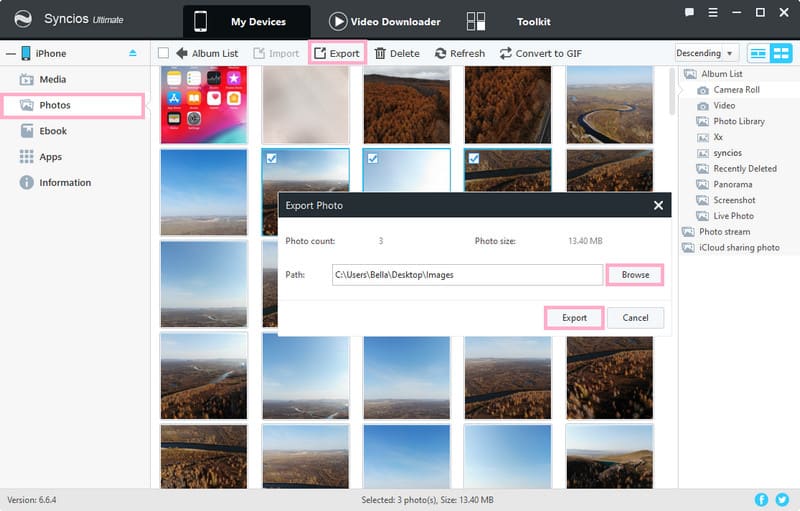
Step 2 Take photos for example. If you want to selectively backup photos from iPhone to comptuer, please navigate to Photos on the left panel after you launch Synicos Manager. Select the ones, click on Export. A pop-up windows will come out which enables you to choose storage location of computer and then enter Export to confirm.
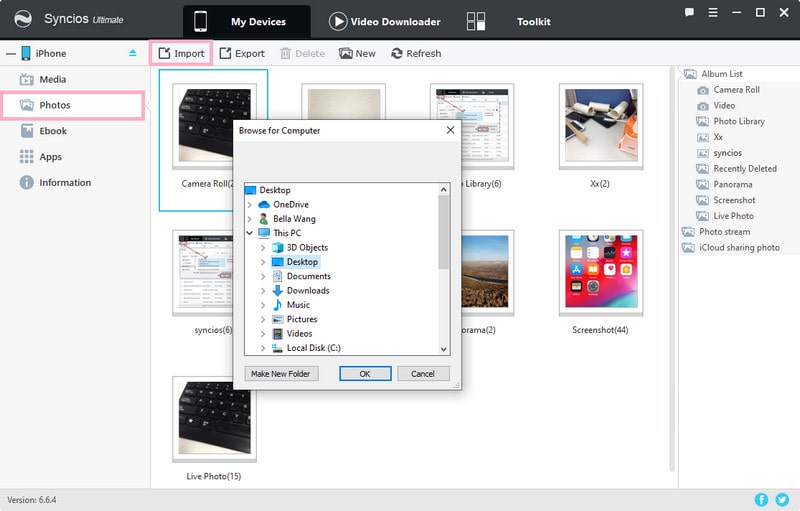
Step 3 After upgrading your system to iOS 13, if you want to transfer photos previously backed up in comptuer to your iPhone, simple go to Photos>Import will achieve it.
Above you've already acquired 5 different ways to bakcup you iPhone before upgrading to iOS 13. Now follow us to master how to restore your iPhone from backup file. Let's turn to Syncios Data Transfer again.
Download
Win Version
Download
Mac Version
Step 1 Download and install Syncios Data Transfer on your computer and run it if you haven't done that yet. Launch it and connect your iPhone to computer via USB cable. Follow the on-screen wizard to turn on USB debugging mode to permit the detection of your device.
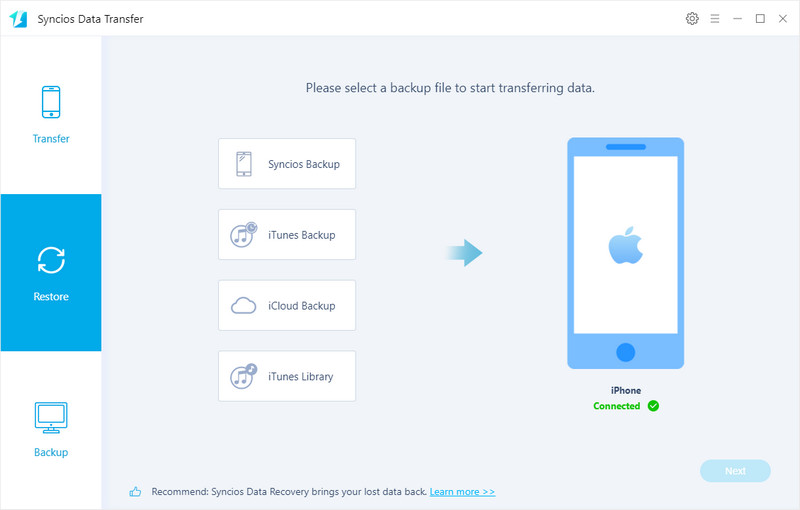
Step 2 Simply go to Restore which enables you to restore from Synicos Backup, iTunes Backup, iCloud Backup, iTunes Libray.
Things will happen that we mistakently delete data from iPhone without backup. But with Syncios Data Recovery, you don't have to worry about it any more. Follow the steps below to get it.
Download
Win Version Download
Mac Version
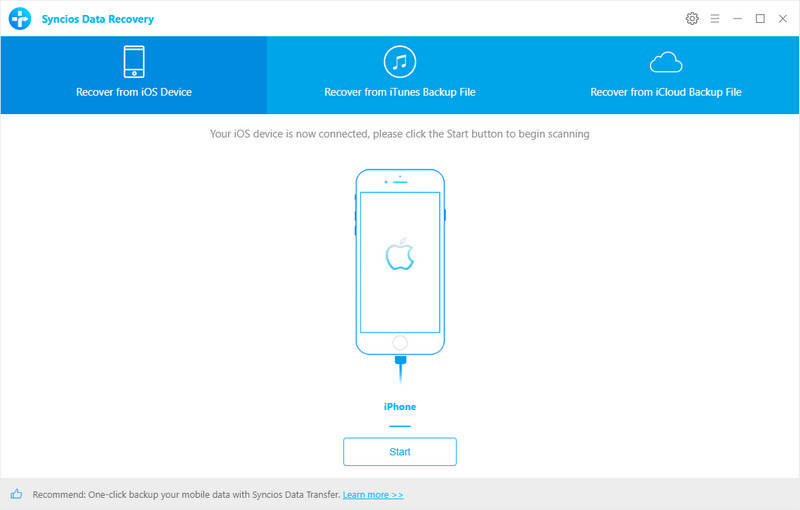
Step 1 Download and install Syncios Data Recovery on your computer and run it. Launch it and connect your iPhone to computer via USB cable. Still follow the on-screen wizard to turn on USB debugging mode to permit the detection of your device. There are 3 modes on the top of the interface which are Recover from iOS Device selected by default, iTunes Backup File, iCloud Backup File. Click on Start to scan your iPhone.
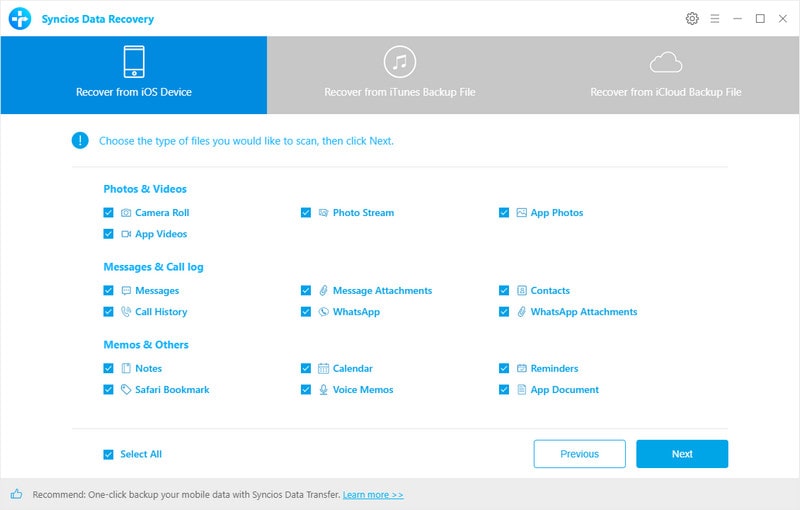
Step 2 After that, you can choose data to scan and then your lost data will be displayed on the interface which gives you opportunity to select and recover them either to your device or computer.
Above we list 5 approaches to backup iPhone in case of any error when upgrading to iOS 13 as well as corresponding ways to restore your backup file to your iPhone. With this guide, you will get the whole picture of how to backup and restore your iPhone without worry about system upgrades or any other cases.