Stop Windows 10 from Upgrading to Windows 11

 >
How to >
PC Recovery >
>
How to >
PC Recovery >
9 Ways to Stop Windows 10 from Upgrading to Windows 11
With the grand debut of Windows 11, many old Windows 10 users are caught in a dilemma. On the one hand, they are curious about the new system and eager to experience the new features that are eye-catching; on the other hand, the uncertainty of new things and the habitual dependence on the existing system make them reluctant to upgrade. What's more difficult is that Windows 10 does not seem to let go easily. The constantly pushed Windows 11 update prompts are like a tireless salesman, always reminding you of the existence of the new system. For those users who are firmly waiting for the Windows 10 position, how to effectively prevent this "unexpected" upgrade has become an urgent problem to be solved.
This article will explore the upgrade dilemma faced by Windows 10 users in depth, and provide a series of practical methods to help everyone stand firm in this "tug-of-war" of system upgrades, while ensuring that after upgrading to Windows 11 as a last resort, you can quickly restore lost files and minimize losses. Next, let's embark on this exploration journey to stop Windows 10 from upgrading to Windows 11!
- Part 1: Can't Stop Windows 10 from Upgrading to Windows 11
- Part 2: How to Stop Windows 10 from Upgrading to Windows 11
- Method 1: Adjust Windows Update settings
- Method 2: Disable Windows Update service
- Method 3: Block through Group Policy
- Method 4: Block via Registry
- Method 5: Disable TPM 2.0 and Secure Boot
- Method 6: Uninstall Windows Updates
- Method 7: Delete Upgrade Package
- Method 8: Use Disk Cleanup tool
- Method 9: Roll Back to Windows 10
- Part 3: How to Recover Lost Files After Upgrading to Windows 11
Part 1: Can't Stop Windows 10 from Upgrading to Windows 11
While the new features and improvements brought by operating system updates are undoubtedly appealing. However, for some users, the automatic upgrade process from Windows 10 to Windows 11 may not be entirely voluntary. But the process of blocking Windows 11 updates is not an easy one, and many users have encountered some challenges. Below we list some common scenarios and provide corresponding solutions.
Q1: Receiving constant Windows 11 update prompts
Windows 10 often automatically downloads Windows 11 upgrade packages and frequently pops up upgrade prompts.
How to Fix:
Q2: Unable to turn off or bypass upgrade notifications
Even if updates are paused, Windows 10 may still prompt you to upgrade through other channels, such as the Windows Update Assistant.
How to Fix:
Q3: Pause updates setting is ineffective
Some users have tried to block upgrades using the "Pause Updates" feature in Windows Update, but have found that the pause option only works in the short term and does not prevent upgrades long term.
How to Fix:
- Disable Windows Update service
- Block through Group Policy
- Uninstall Windows Updates
- Delete Upgrade Package
Q4: Upgrade package downloaded but do not want to install
Windows 10 has downloaded the Windows 11 upgrade package, but the user does not want to install it.
How to Fix:
Q5: Need to revert an ongoing Windows 11 upgrade
The user found that the Windows 11 update package was being installed and wanted to stop the unfinished update.
How to Fix:
Q6: Concerned about missing important security updates
By blocking upgrades, users fear they will miss out on important security patches and other critical updates.
How to Fix:
Q7: Encountered issues after upgrade, want to roll back to Windows 10
Despite all efforts to prevent it, the user accidentally upgraded to Windows 11 and had problems with the system. So he wanted to roll back to Windows 10.
How to Fix:
Part 2: How to Stop Windows 10 from Upgrading to Windows 11
Although the above situation seems frustrating, as if an inevitable upgrade storm is sweeping in, there are some practical ways to help you effectively block those unnecessary upgrades. Next, we will analyze and explore several practical and efficient strategies to help you find a quiet place in this complex upgrade wave.
Method 1: Adjust Windows Update settings
Changing the default behavior of Windows Update can provide users with more control. By fine-tuning these settings, users can better manage when and how updates are received. Doing so will not only help delay upgrades, but also improve overall system controllability and stability. If you want to stop Windows 10 from upgrading to Windows 11, just follow these steps:
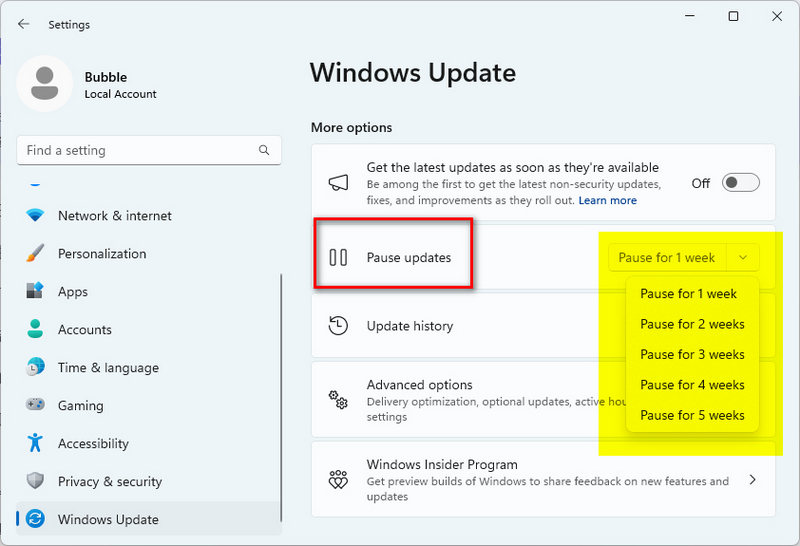
- Step 1: Open "Settings" and go straight to "Update & Security".
- Step 2: Find and click "Windows Update" on the left.
- Step 3: Find "Pause updates" and choose a time to pause it, up to 5 weeks. Choose the longest pause period possible and buy yourself some time.
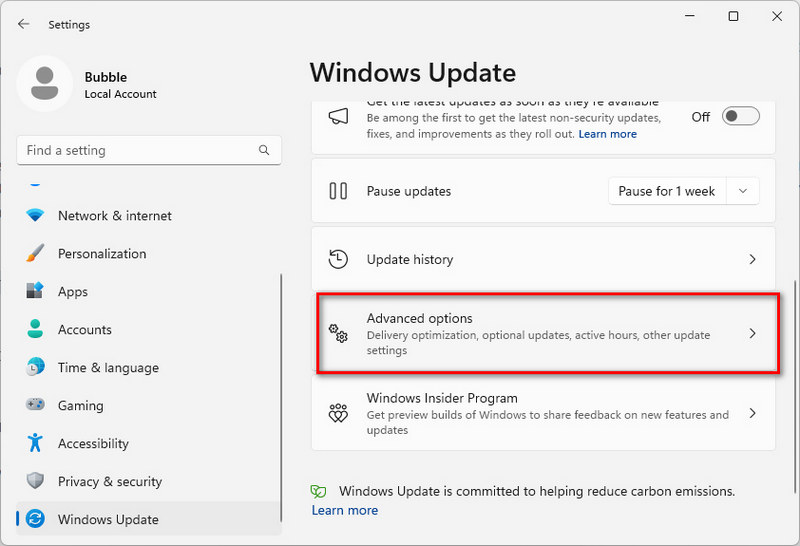
- Step 4: Select "Advanced options" where you can find more options for controlling updates.
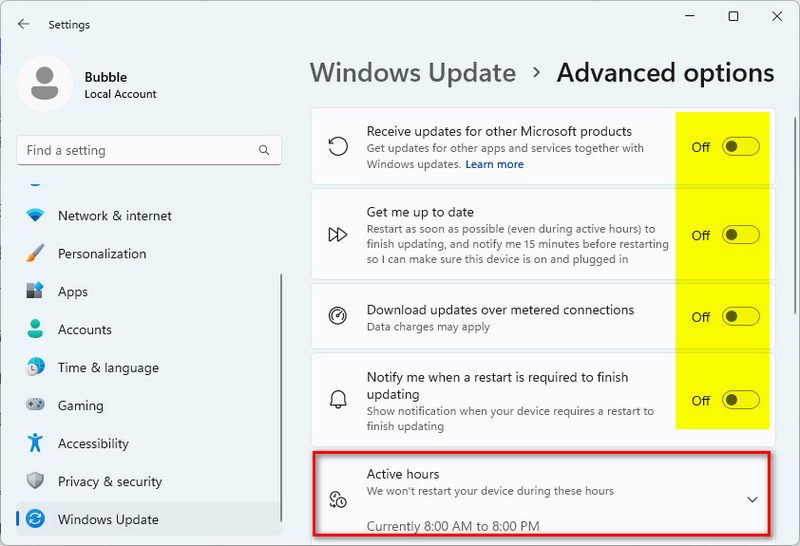
- Step 5: Turn off all update notifications to ensure you are not disturbed.
- Step 6: Check "Active hours" to set a time period when you won't be disturbed.
- Step 7: Finally, go to "Optional updates" and make sure the Windows 11 upgrade package is not checked.
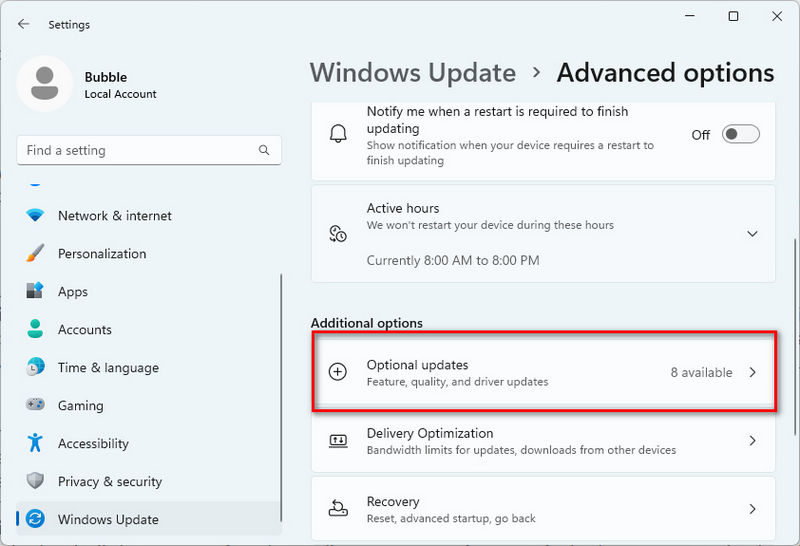
In this way, your Windows 10 can temporarily stay away from the "harassment" of Windows 11.
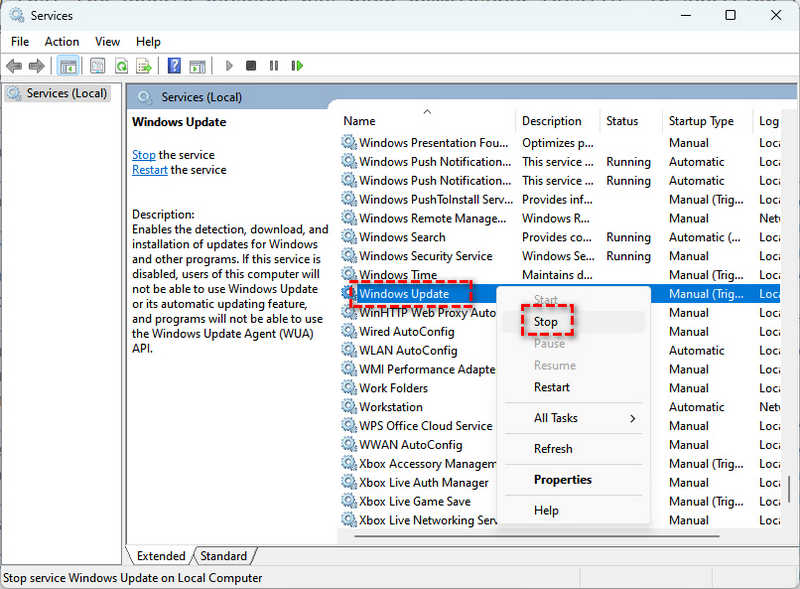
Method 2: Disable Windows Update service
To completely prevent unwanted updates from being automatically installed, disabling the Windows Update service is a radical but effective measure. This operation cuts off the direct connection between the system and Microsoft's servers, thus preventing accidental upgrades from occurring. However, this also requires users to take responsibility for maintaining the security of their systems.
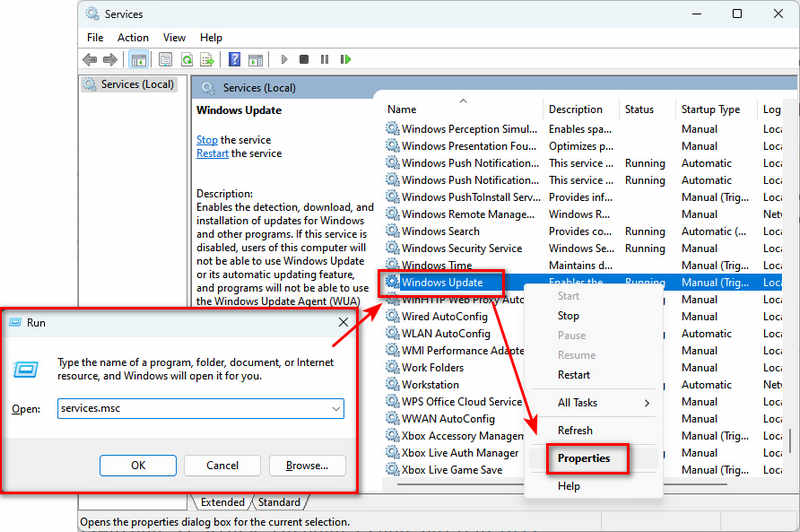
- Step 1:Press Win + R to open the Run dialog box, then type services.msc and hit Enter.
- Step 2:Find Windows Update in the list of services. This may require a little patience as the list is long.
- Step 3:Right-click Windows Update and select Properties to enter the properties window.
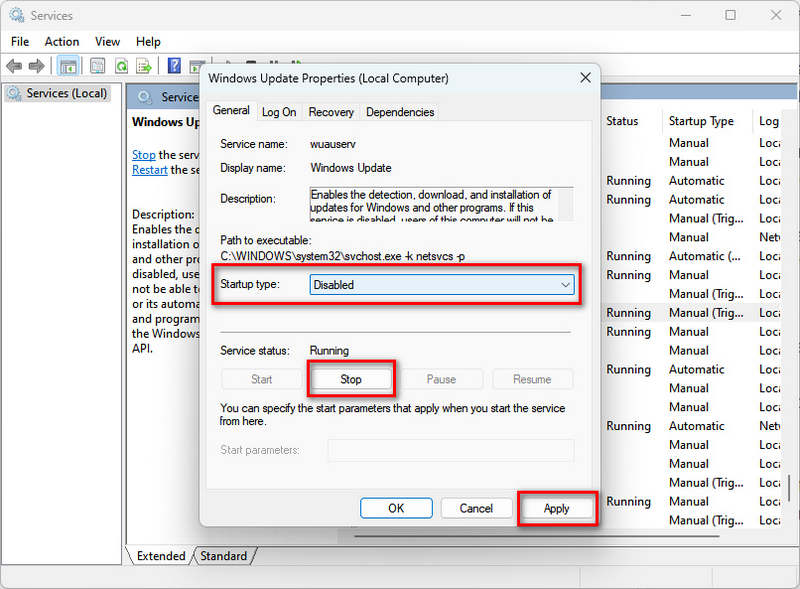
- Step 4:Select Disabled from the Startup type drop-down menu to completely prevent it from starting.
- Step 5:Click the Stop button to stop the currently running service and ensure it no longer works quietly in the background.
- Step 6:Click Apply and then OK to save your changes. Windows Update is now disabled.
- Step 7:Remember to restart your computer to ensure that the settings take effect, so you can rest assured that you don't accidentally upgrade to Windows 11.
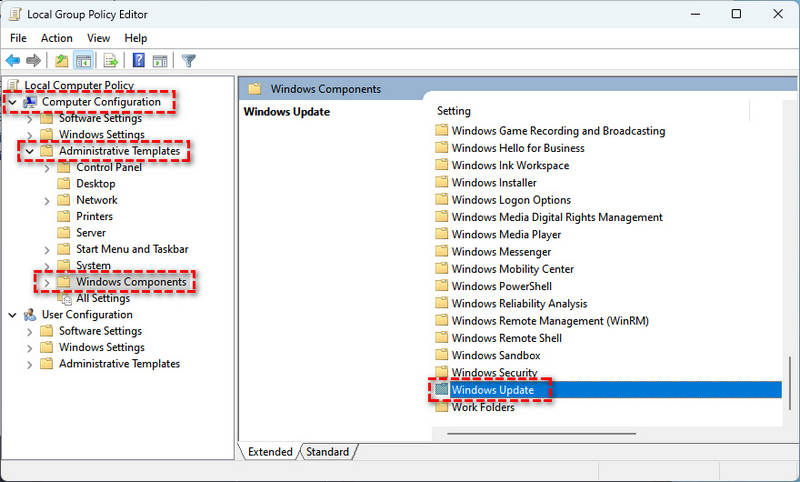
Method 3: Block through Group Policy
For users who are familiar with group policies, using group policies to block Windows 10 from upgrading to Windows 11 will be an efficient and reliable choice. By configuring specific group policy settings, we can precisely control the behavior and scope of updates, thereby ensuring that the system is updated as we wish. Next, we will introduce in detail how to achieve this goal through group policies.
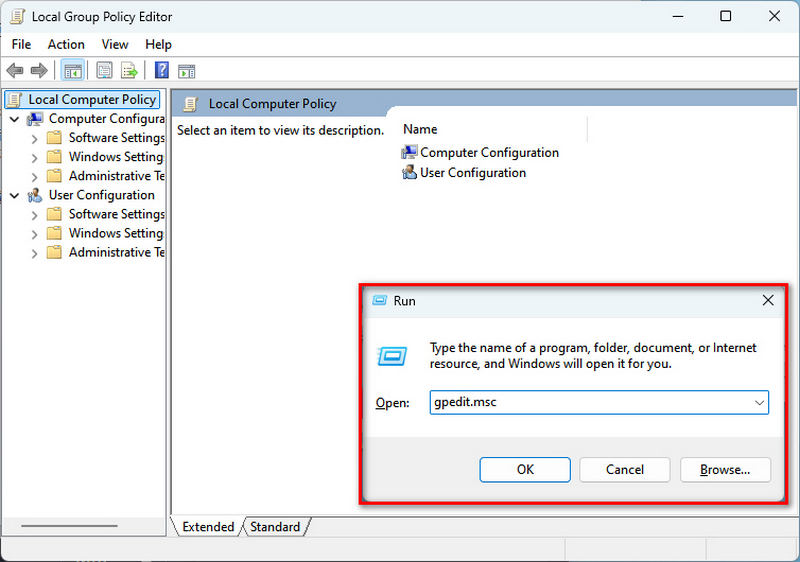
- Step 1: Press "Win + R", type "gpedit.msc", and hit Enter to open the Group Policy Editor.
- Step 2: Navigate to "Computer Configuration" > "Administrative Templates" > "Windows Components" > "Windows Update".
- Step 3: Find "Manage end user experience" and click it to see more options
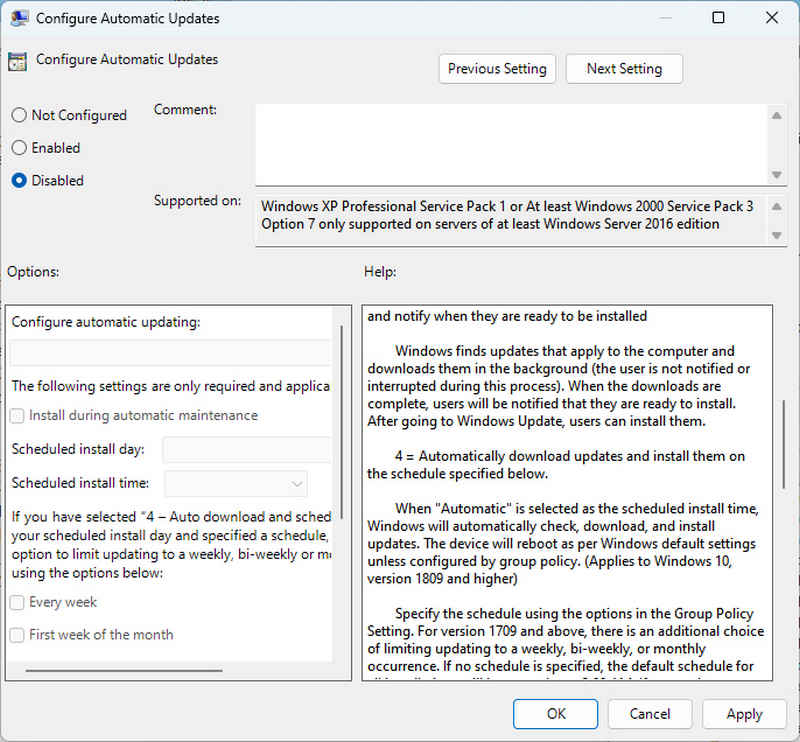
- Step 4: On the right, find and double-click "Defer Windows 10 upgrades" or a similar option for more recent versions. Select "Enabled" and set a reasonable deferral time to pause the upgrade schedule.
- Step 5: If this option is not available, find other update-related options. For example, "Allow updates to be downloaded automatically over metered connections" and "Configure Automatic Updates".
- Step 6: Double-click the option, and select "Disable" to ensure that updates are not automatically downloaded and installed.
- Step 7: Look for other automatic update related options, and if so, set them to "Disable" to prevent surprises caused by sudden updates.
- Step 8: Click "Apply" and "OK" to save your changes. Now you can rest assured that the system will not decide to upgrade without your permission.
Please note that the method of blocking Windows 10 from upgrading to Windows 11 through Group Policy is mainly applicable to those who have Professional, Enterprise, or Education editions of Windows 10. This is because the Group Policy Editor is usually only available in these versions of the operating system, which provides more granular control over the behavior of the operating system.
Method 4: Block via Registry
In addition to group policies, the registry is also an important tool to prevent Windows 10 from upgrading to Windows 11. By modifying specific key values in the registry, we can change the system's update behavior and prevent unnecessary upgrades. However, since registry modifications have certain risks, be sure to back up the registry before operating and act with caution.
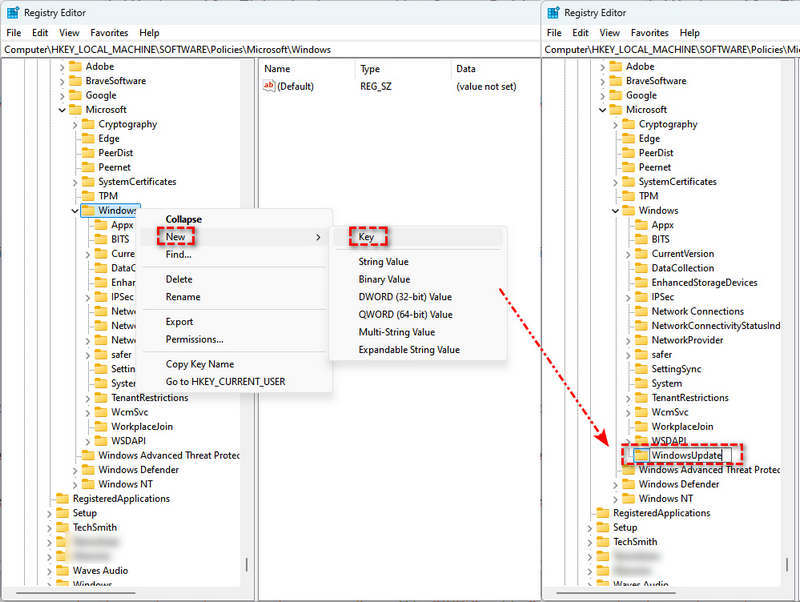
- Step 1: Press "Win + R" keys, enter "regedit" in the Run dialog box that pops up, and then press Enter to open the Registry Editor.
- Step 2: In the Registry Editor, expand
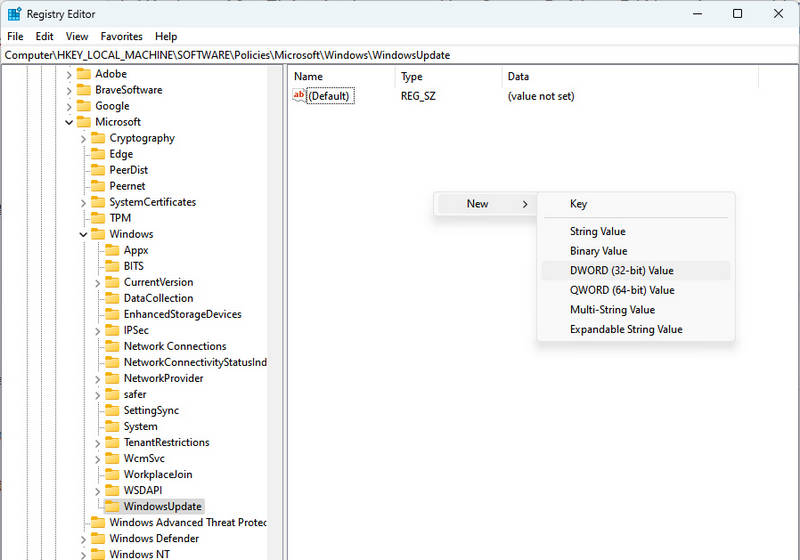
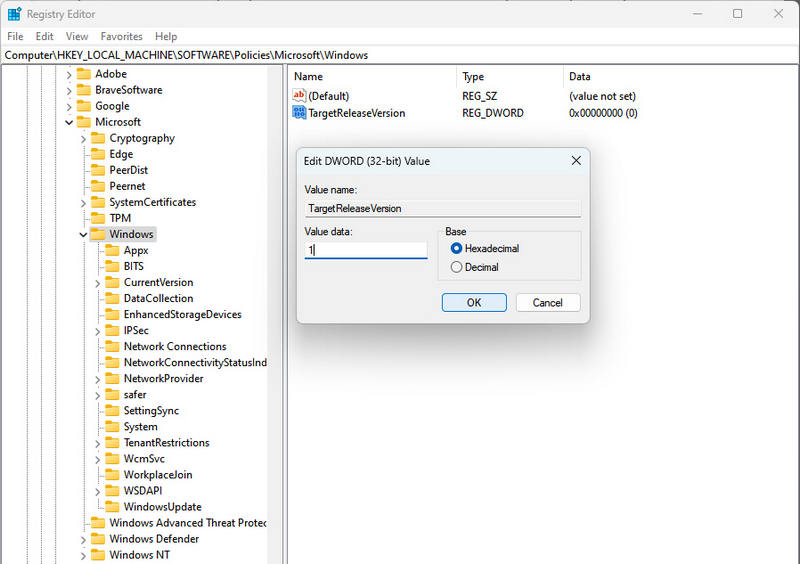
HKEY_LOCAL_MACHINE\SOFTWARE\Policies\Microsoft\Windows\WindowsUpdate. If there is no "WindowsUpdate" folder, right-click the Windows folder, select "New > Key", and name it "WindowsUpdate". - Step 3: In the "WindowsUpdate" folder, right-click a blank area, select "New > DWORD (32-bit) Value", and name it "TargetReleaseVersion".
- Step 4: Double-click "TargetReleaseVersion", set the value data to "1" in the pop-up window, and then click "OK".
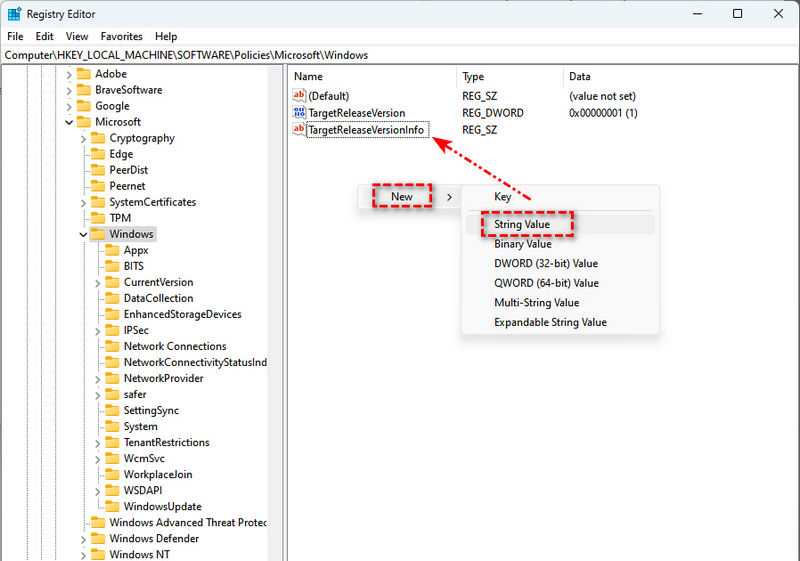
- Step 5: Right-click the blank space again, select "New > String Value", and name it "TargetReleaseVersionInfo".
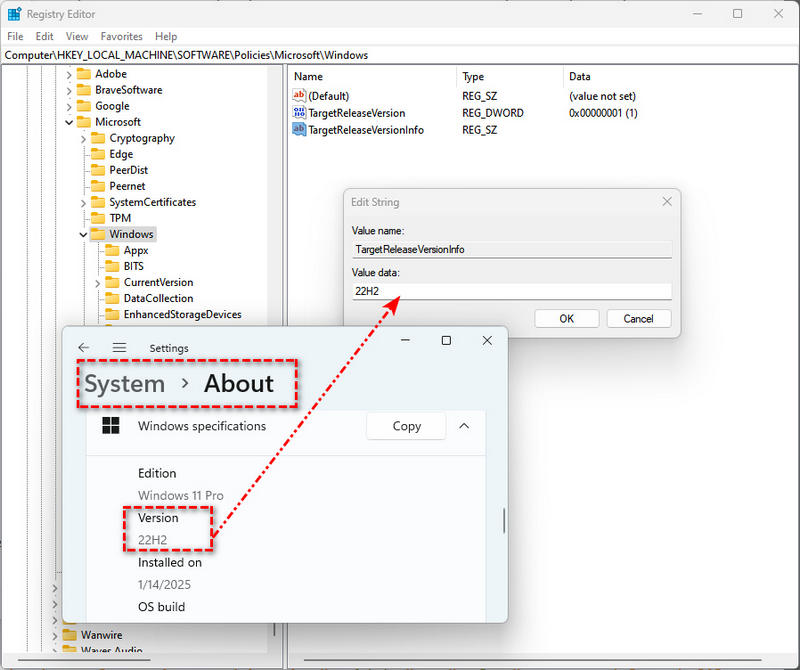
- Step 6: Double-click "TargetReleaseVersionInfo", set its value data to your current Windows 10 version number, such as "22H2", and then click "OK". If you can't remember the system version, you can check it through the "Windows Settings > System > About", then scrll down to find the Windows "Version" info.
- Step 7: Close the Registry Editor and click "Yes" to save the changes. And restart the computer for these changes to take effect. If you need to undo these operations, just delete the newly created folder and files. But be careful not to delete other existing registry files.
After following these steps, your Windows 10 system will no longer receive Windows 11 upgrade prompts. However, before modifying the registry, it is recommended to back up the current registry state or create a system restore point to prevent system instability caused by operational errors.
Method 5: Disable TPM 2.0 and Secure Boot
The launch of Windows 11 has put forward higher requirements for hardware, among which TPM 2.0 and secure boot are two important hardware conditions. By disabling these two features, we can make the system unable to meet the upgrade requirements of Windows 11, thereby preventing the upgrade process. However, it should be noted that disabling these features may affect the security and stability of the system.
- Step 1: Restart your computer and enter the BIOS setup. This varies by brand, but is usually done by pressing "F2", "Del", or "Esc" during boot.
- Step 2: Find the "Security" or similar tab in the BIOS setup. This may require a bit of exploration.
- Step 3: Look for the "TPM" (Trusted Platform Module) setting and change its status to "Disabled", which will prevent Windows 11 from installing.
- Step 4: Next, find the "Secure Boot" option and, again, select "Disabled" to turn off Secure Boot.
- Step 5: Once you've made your changes, save your settings. This is usually done by pressing the "F10" key and confirming the save, depending on your computer model.
- Step 6: Exit the BIOS setup and let the computer restart. Now that you've removed two critical requirements, you can temporarily block the Windows 11 upgrade.
It should be emphasized that directly disabling TPM 2.0 and Secure Boot may reduce the security of the system, and not all computers allow these features to be disabled in BIOS/UEFI. In addition, Microsoft may change the upgrade policy in future updates, making it impossible to completely block Windows 11 upgrades even if these features are disabled. Therefore, the more recommended method is to use Group Policy or third-party tools to limit Windows 10 version updates rather than directly disabling TPM 2.0 and Secure Boot.
Method 6: Uninstall Windows Updates
Sometimes, the simplest solution can be the most immediate and effective. For example, manually uninstalling an already installed update can stop the upgrade process from moving forward. This method is suitable for users who want to solve the problem quickly without digging deep into the system.
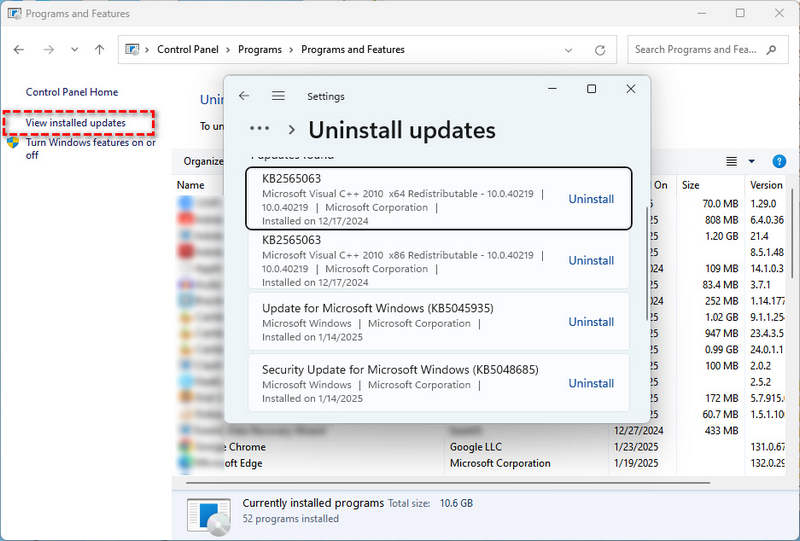
- Step 1: Click the Start button in the lower-left corner of the screen, type "Control Panel" in the search box, and click it to open it.
- Step 2: In the Control Panel, find and click "Programs and Features" under the Programs" category.
- Step 3: In the Programs and Features window, click "View installed updates" on the left.
- Step 4: In the list of installed updates, scroll to find an update entry similar to KB5005463, which is usually labeled "Windows 10, version XXXX, Cumulative Update for Windows 10".
- Step 5: If you find KB5005463 or a related update, right-click it and select "Uninstall". Follow the on-screen prompts to complete the uninstall process.
- Step 6: After the uninstall is complete, restart your computer for the changes to take effect.
However, it should be noted that even if you successfully uninstall KB5005463 or other updates related to the Windows 11 upgrade, Windows 10 may still automatically download and install these updates in the future, or prompt you to upgrade Windows 11 through other channels.
Method 7: Delete Upgrade Package
Now that the update package has been downloaded locally, in addition to deleting specific update files, we can also directly delete the entire update package to prevent Windows 10 from upgrading to Windows 11. This step can help users regain control of their own systems while avoiding the risks of automatic installation. Of course, this also means that you need to check regularly for new update packages.
- Step 1: Press the "Win + R" keys to open the Run dialog box, type "services.msc" and press Enter to open the Service Manager.
- Step 2: Find the "Windows Update" service, right-click it, and select "Stop". This step is to prevent conflicts with the Windows Update service when deleting the upgrade package.
- Step 3: Usually, the Windows 11 upgrade package is downloaded to the "C:\Windows\SoftwareDistribution\Download" folder. But please note that sometimes the upgrade package may also be saved in other locations, such as the "$WINDOWS.~BT" folder (this is a hidden folder, and you may need to enable the "View hidden folders" option in File Explorer to see it).
- Step 4: Go to these possible folder locations and search for files related to the Windows 11 upgrade. These files may have specific names or extensions, but it is usually difficult to determine which one is the upgrade package by name alone. Therefore, a safer approach is to delete the entire Downloads folder or the contents of the $WINDOWS.~BT folder (make sure no important files are accidentally selected before deleting).
- Step 5: Sometimes, even after deleting the contents of the Downloads folder, the Windows Update service may still retain some old or corrupted update files. To completely clean up these files, you can rename the "SoftwareDistribution" folder. Doing so will force Windows Update to re-download all necessary files the next time it checks.
- Step 6: Right-click the "SoftwareDistribution" folder, select "Rename", and give it a new name (such as "SoftwareDistribution.old").
- Step 7: Back in Services Manager, find the "Windows Update" service, right-click it, and select "Start". This will restore Windows Update to normal operation, but it should no longer try to install Windows 11 updates (since you've deleted them).
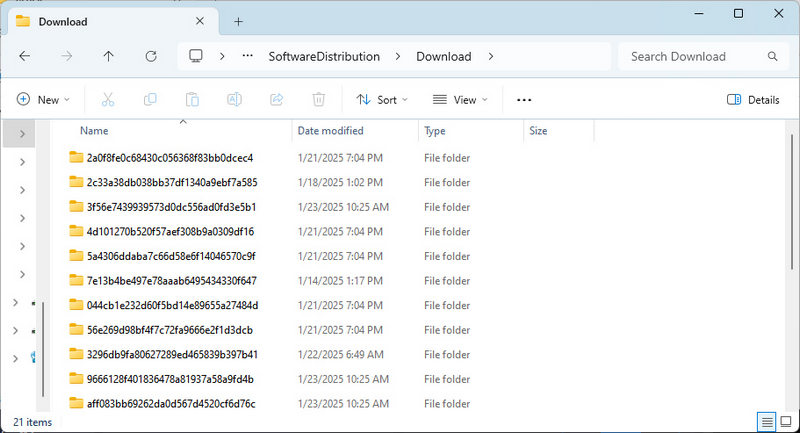
Please note that while this method will prevent Windows 10 from upgrading to Windows 11 at the current moment, Microsoft may continue to push updates, including upgrade prompts for Windows 11.
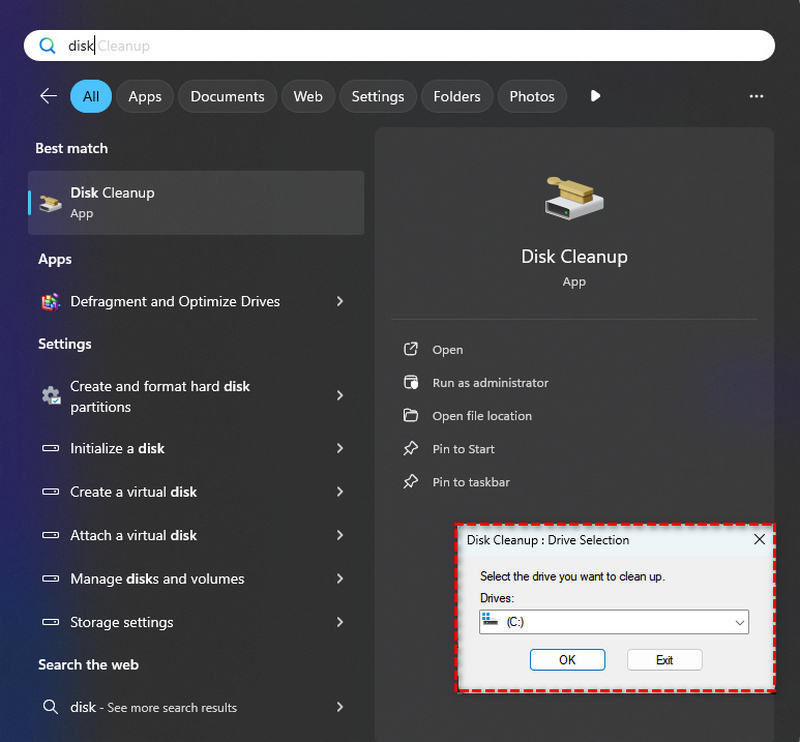
Method 8: Use Disk Cleanup tool
By using the built-in disk cleanup tool, you can not only free up valuable storage space, but also eliminate those potential upgrade threats. By cleaning up no longer needed files, including old update packages, users can maintain a more tidy and efficient system environment.
- Step 1: Press Win + S, type "Disk Cleanup", and click to open the Disk Cleanup tool and prepare to give your system a big cleanup.
- Step 2: Select the system drive, usually the C: drive, and click "OK" to start scanning for files that can be cleaned.
- Step 3: After the scan is complete, check "Previous Windows installation(s)" and "Windows Update Cleanup", which are specifically for old versions and update files.
- Step 4: Click "OK", and then click "Delete Files" in the confirmation window that pops up to decisively delete those unnecessary files.
- Step 5: The cleanup process may take some time, so please be patient. This step is like giving your computer a deep clean, making it look brand new.
- Step 6: When you are done, close the Disk Cleanup tool. Now, not only has the space been freed up, but the Windows 11 upgrade package has also been prevented from sneaking in. Restart your computer and enjoy a cleaner system without the trouble of unexpected upgrades.
Method 9: Roll Back to Windows 10
Finally, if all efforts fail to stop the upgrade, rolling back to the previous version becomes the last straw. This not only tests the user's technical ability, but also challenges their patience. Fortunately, as long as it is done properly, the rollback process can be completed smoothly in most cases.
- Step 1: Click the Start menu and select "Settings".
- Step 2: In Settings, click "System", then find and click "Recovery".
- Step 3: Scroll down to the "Go Back" section, where there will be a note telling you how many days you have left to roll back. (Note that this option is only available for a short time after the upgrade, and only if you have not manually deleted the Windows.old folder.)
- Step 4: Follow the on-screen prompts to confirm that you really want to roll back. This process may take some time, as it will restore your system to the state it was in before the upgrade. Wait for the rollback to complete, and your computer may automatically restart a few times during this time, which is normal.
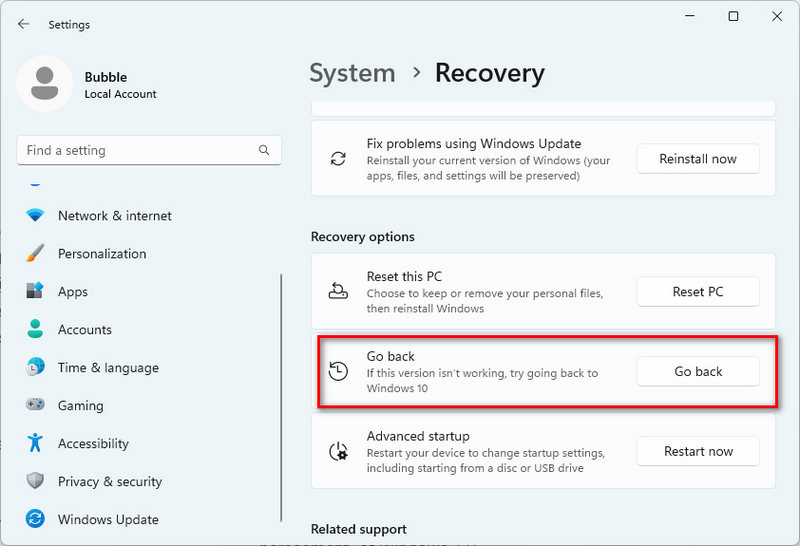
Once it's finished, you'll find yourself back in the familiar Windows 10 environment, with all your troubles gone. Now you can breathe a sigh of relief, knowing that you have successfully blocked this upgrade attempt to Windows 11.
If you have exceeded the time limit of the recovery window or the Windows.old folder has been deleted, you will not be able to roll back to Windows 10 using this method. In this case, you may need to reinstall Windows 10.
Part 3: Recover Deleted Files from USB Flash Drive with Syncios D-Savior
Upgrading to a new operating system version always comes with certain risks, especially the issue of data loss. If you find that important files are missing, don't panic. With some effective methods and tools, we still have a chance to recover these lost files.
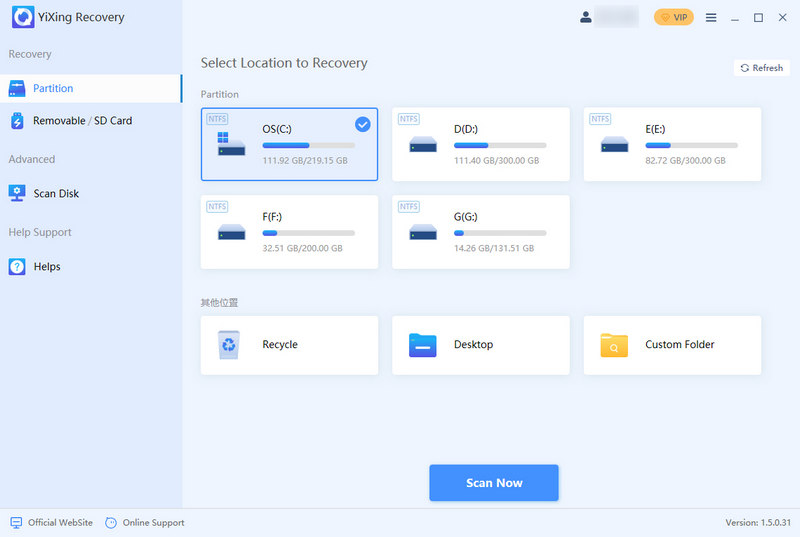
Your emergency helper, Syncios D-Savior is here. It is specially designed for Windows PC data recovery and supports recovery of more than a thousand data types. After scanning, you can accurately determine whether you need to recover your lost data based on the file's preview, type, path, modification date, size and other information, and then recover your lost data in time. You can specify any partition, disk, recycle bin, desktop, or any folder to scan and retrieve lost files. Even formatted disks can be recovered.
 Syncios D-Savior
- Recover data from a formatted disk, hard drive, lost partitions, emptied recycle bin, etc.
- Recover data from an SD card, TF card, SSD card, USB flash drive, other storage media.
- Recover 1,000+ formats of images, videos, audio, folders, archives, documents, etc.
- Save recovered data to any desired location, including external drives.
- Provide detailed file preview prior to recovery.
- Support recovering data while scanning.

- Step 1: After installing Syncios D-Savior, launch this data recovery tool and navigate to its main interface.
- Step 2: On the main interface, you'll see all available partitions, including the target one. Locate your desired partition. Once found, click the "Scan" button to initiate the scanning process.
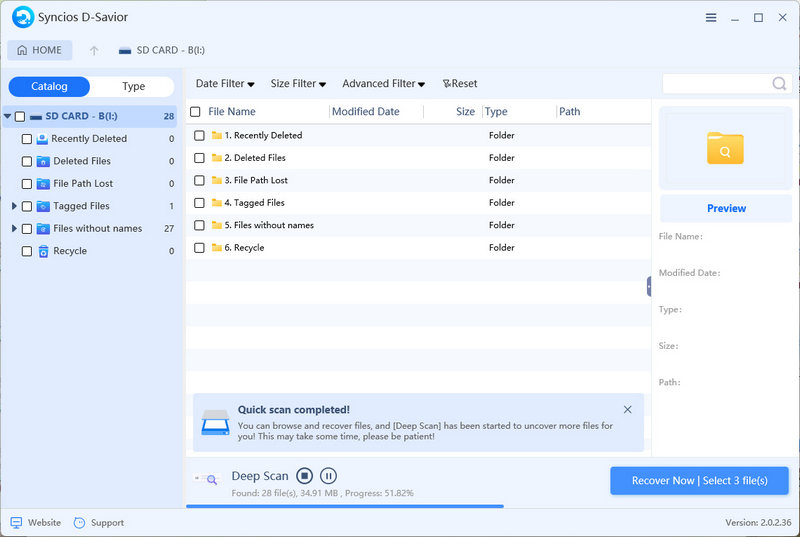
- Step 3: Following a quick scan, you can search for previously deleted data by file path or type. As soon as the lost files appear, you have the option to recover them instantly, without waiting for the full scan to complete.
- Step 4: Select the files you wish to recover and click "Preview" on the right-hand panel to confirm their accuracy. You can still identify files based on their name, size, type, modification date, and original location.
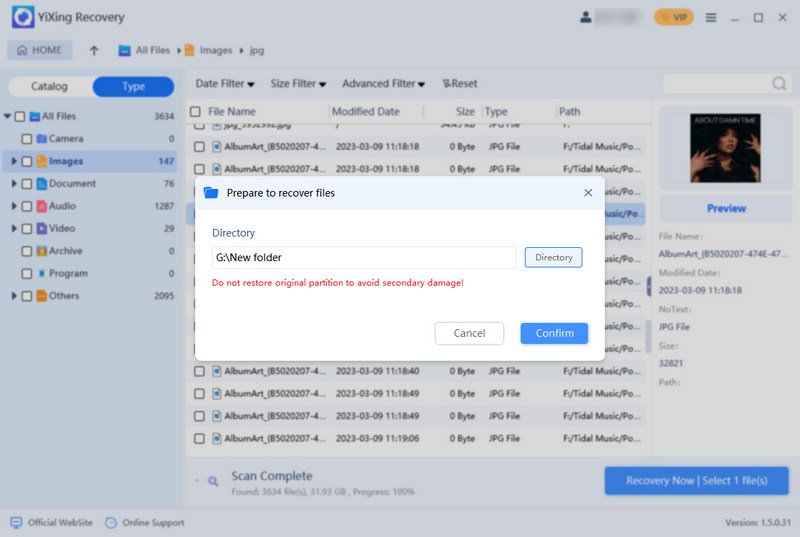
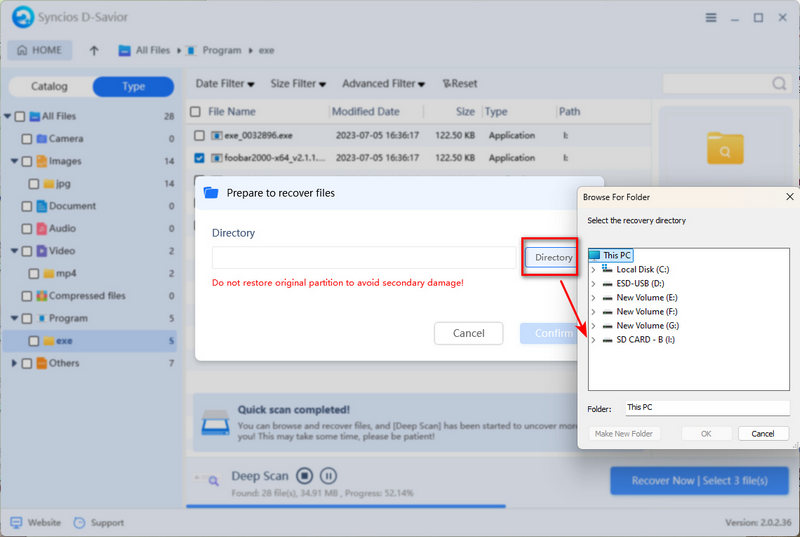
- Step 5: After selecting the necessary files, click "Recover Now". Subsequently, click "Directory" to specify a folder for saving the recovered files. Press "Confirm" to start the recovery.
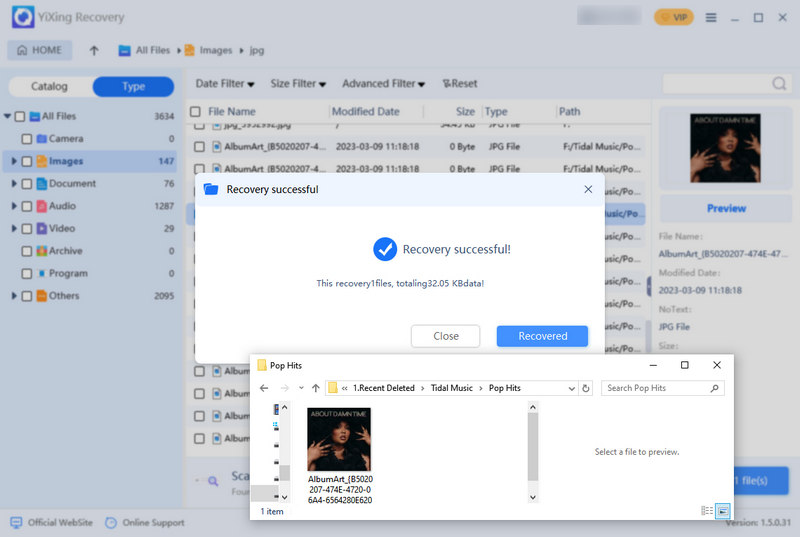
- Step 6: Upon completion of the recovery, you'll receive a confirmation. Click the "Recovered" button to open the folder and verify that the files have been successfully restored and are accessible.

Conclusion
After exploring various ways to prevent Windows 10 from upgrading to Windows 11, as well as strategies for recovering lost files after an inadvertent upgrade, it is not difficult to find that we are not helpless in the face of the challenges of system upgrades. Whether it is by adjusting update settings, disabling services, using group policies or registry, or by deleting update files and upgrade packages, or even using disk cleanup tools and rollback functions, each method provides us with different levels of control and protection.
However, if risks are unavoidable, we must be smart and adaptable. For example, if important files are lost during the upgrade process, in addition to crying, you can also get help from Syncios D-Savior as soon as possible. The sooner the recovery, the greater the chance of success. To avoid irreversible loss of data, download and scan as soon as possible to see if there are important files that need to be recovered.
What's next? Download Syncios D-Savior now!
Ethan Mercer | Senior Writer
Related Articles
Related Solutions
Recover permanently 1000+ types of deleted files from both PC and 2000+ external devices.