Best Data Recovery Tool
Everything About Windows 10/11 Startup Folder: FAQs & Fixes
Though smartphones and tablets are now ubiquitous, most crucial tasks still get done on a computer. It's not just about the larger screen, the power and flexibility of the Windows system also play a vital role. Over time, our computers end up with numerous programs installed, either for personal use or work. We want to run some of these programs automatically at startup to boost our productivity. But others just slow down the boot process, and it's a real pain to close those unwanted tabs one by one after turning on the computer. This article helps you quickly locate the Startup Folder on Windows 10 or Windows 11, manage startup programs, and effectively troubleshoot issues when the Windows Startup Folder fails to work.
- Part 1: Startup Folder Location in Windows 10/11
- Part 2: Quick Access Startup Folder in Windows 10/11
- Part 3: Add / Remove Apps to Startup Folder in Windows 10/11
- Part 4: Manage Startup Folder Using Registry Editor in Windows 10/11
- Part 5: Fix Startup Folder Not Working in Windows 10/11
- Part 6: Restore Startup Folder in Windows 10/11
- Part 7: Speed Up Startup Programs in Windows 10/11
- Part 8: What Programs Should I Run at Startup?
- Part 9: Advanced Tip: Use Task Scheduler in Windows 10/11
Part 1: Startup Folder Location in Windows 10/11
Some essential components and programs on a Windows PC need to automatically start up during boot to create a proper operating environment. Additionally, you can choose to enable or disable certain auto-start programs according to your needs. These auto-start programs are all listed in Windows' Startup Folder. Managing this folder can help simplify your daily routines or adjust which programs launch automatically.
Thus, first, let's find where it's located. Generally speaking, there are two ways to find the Startup Folder in Windows 10 or Windows 11.
- C:\Users\[user name]\AppData\Roaming\Microsoft\Windows\Start Menu\Programs\Startup
- C:\ProgramData\Microsoft\Windows\Start Menu\Programs\StartUp


Part 2: Quick Access Startup Folder in Windows 10/11
The previous section detailed the precise location of the Windows Startup Folder, but it requires navigating through the file path step-by-step. If you're looking for a smarter way, here are four quick and clever methods to access the Startup Folder in Windows 10 or Windows 11.
Method 1: Locate Windows Startup Apps via Start Menu
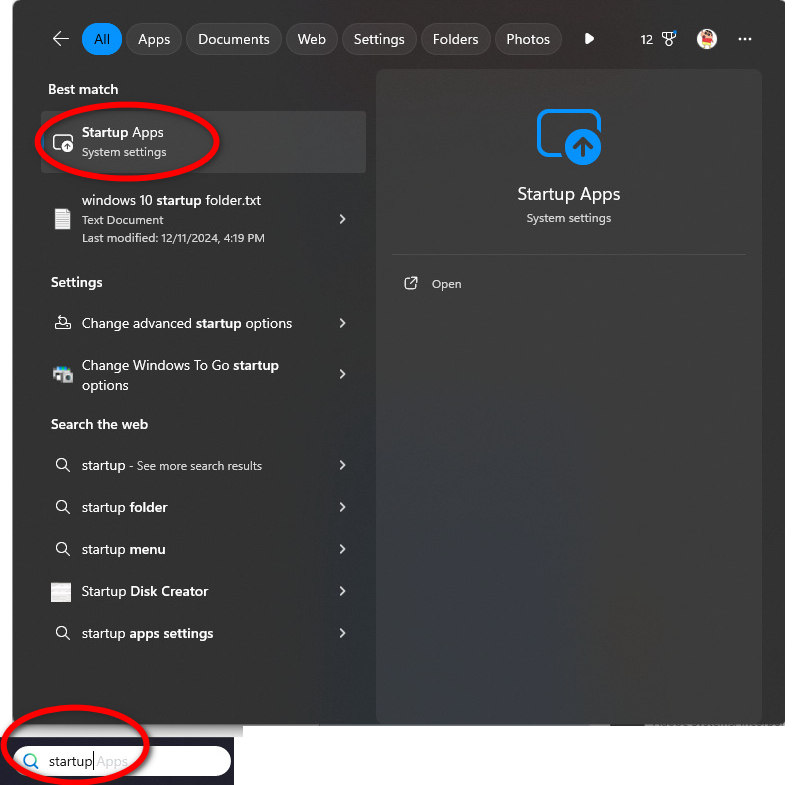
- Step 1: In the bottom left corner of your computer's desktop, type "startup" into the "Search box", and a shortcut entry for "Startup Apps" will pop up. Click on it.
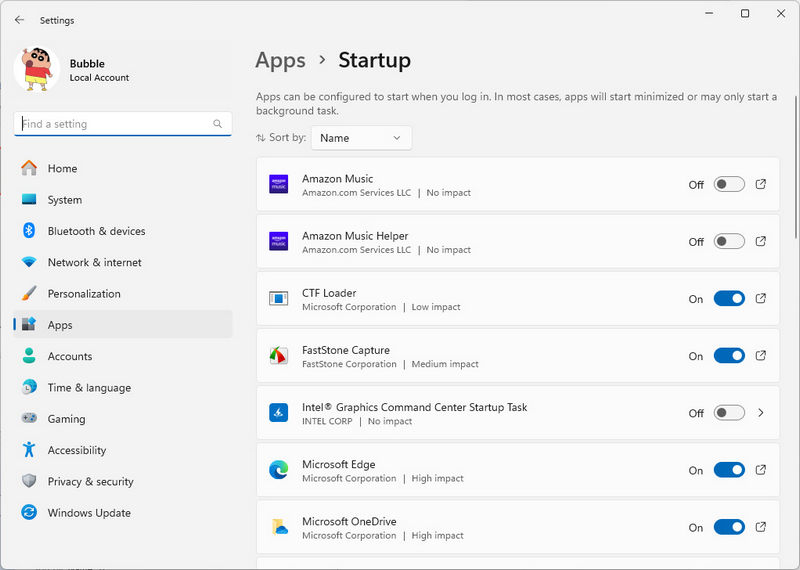
- Step 2: In the app list, you can see all the programs in the Startup Folder, and you can choose to disable or enable their auto-start function.
Method 2: Locate Windows Startup Apps via System Settings
- Step 1: Navigate to the "start icon" in the bottom left corner of Windows PC.
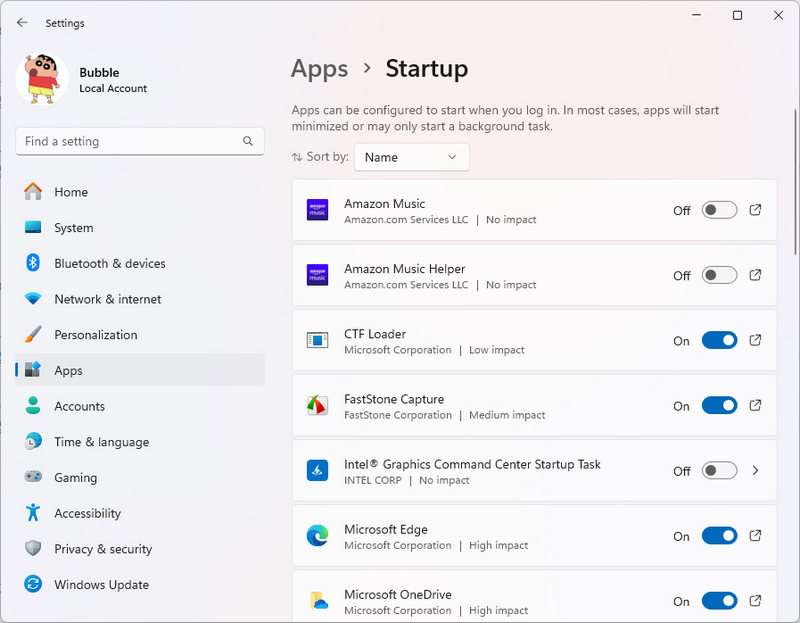
- Step 2: Go to "Settings > Apps > Startup" to see the startup apps.
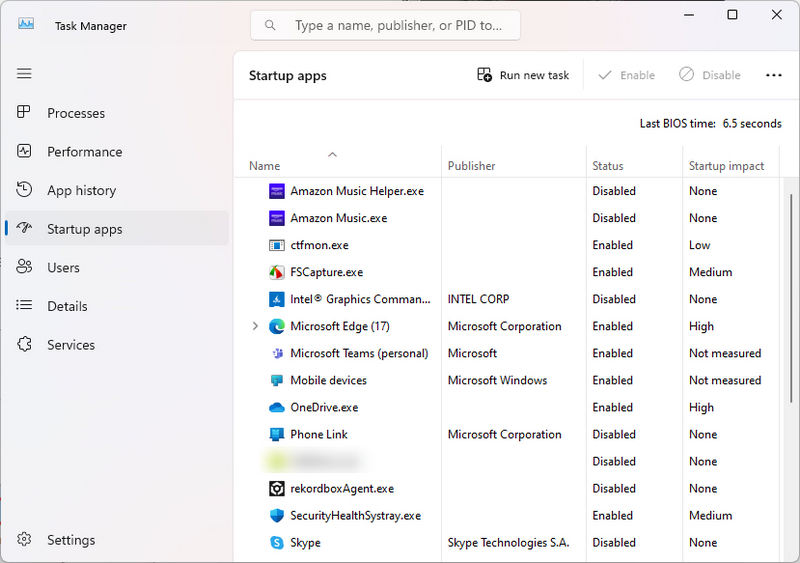
Method 3: Locate Windows Startup Apps via Task Manager
- Step 1: There are two quick and easy ways to launch the Task Manager in Windows 10 or 11. Simply right-click an empty spot on your Desktop and pick "Task Manager". Or, for a keyboard shortcut, press "Ctrl + Shift + Esc" all at once.
- Step 2: Click on "Startup apps" to check the status of each app nestled in your Startup Folder.
Method 4: Locate Windows Startup Apps via Run
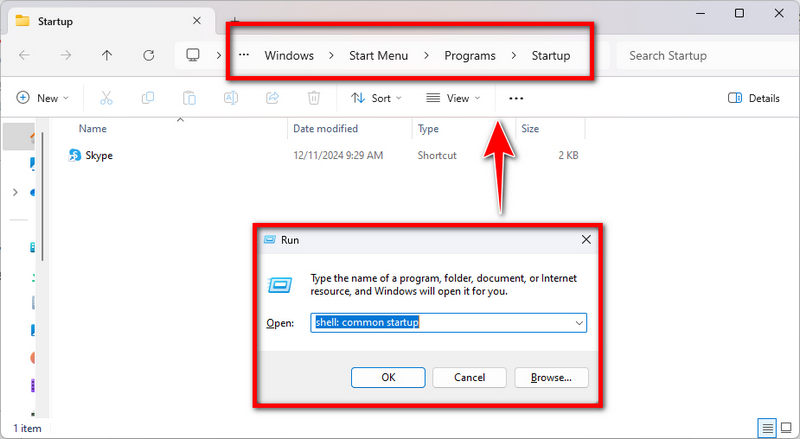
- Step 1: Press the "Window button + R" and a dialog box will pop up, then enter "shell:common startup". Please copy and paste the text and do not add extra blanks.
- Step 2: You are directly taken to the startup page, where you can manage the enable or disable settings for startup items.
Part 3: Add / Remove Apps to Startup Folder in Windows 10/11
Using the methods above, you can easily locate the startup folder and manage the programs already in it. But if you need to add or remove certain software, we'll need a few more tricks up our sleeve.
Method 1: Add / Remove Apps to Startup Folder via Program Settings
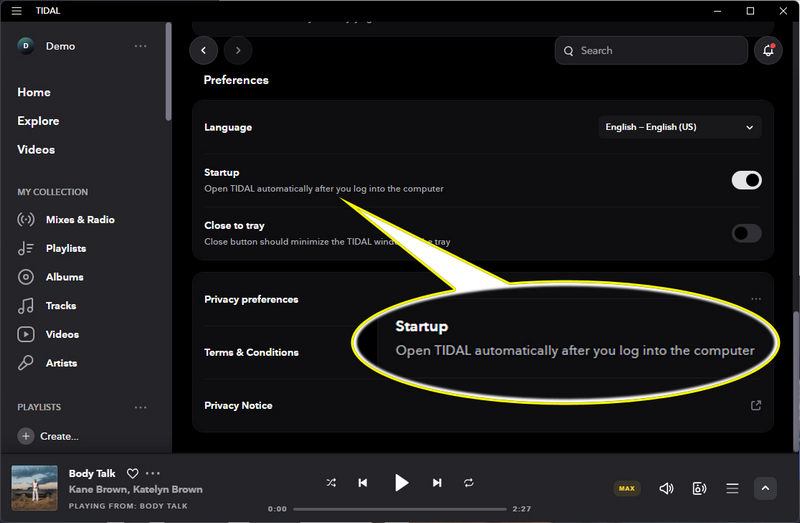
If you want to enable a program to start automatically when your computer boots up, there's a simple way: just find the program's settings menu and locate the option for automatic startup. Many programs offer this feature, and let's take TIDAL as an example.
- Step 1: Launch the TIDAL Music app on your desktop, then go to the top left, and click the "three dot".
- Step 2: Choose "Settings" to see more options.
- Step 3: Scroll down to "Startup" to configure it to open automatically after you log into your computer.
- Step 4: When the option is disabled, the program won't start automatically when you log into your computer.
Method 2: Add / Remove Apps to Startup Folder via Program Settings
The imperfect truth is, that not all programs come with an option to start automatically on boot. If you don't find such a setting, you'll need to manually add the program's shortcut to the Startup Folder.
- Step 1: Dive right into the startup folder by pressing "Windows key + R". In the dialogue box that pops up, paste "shell:common startup" and hit Enter.
- Step 2: Locate the app you're eager to make a part of your startup routine. Right-click on it and choose to create a shortcut.
- Step 3: Drag and drop this shortcut into the Startup folder. The next time you boot up your computer, it'll be ready and waiting for you.
- Step 4: Removing an app's shortcut from the Startup folder means it will no longer start automatically when you log into your computer.

Method 3: Add / Remove Apps to Startup Folder via Task Manager
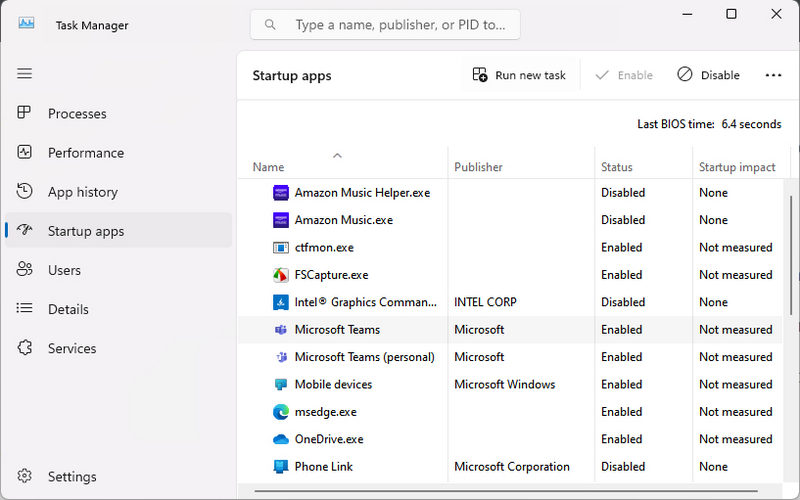
If there are some existing apps in the Startup folder, you can use Task Manager to enable and disable them.
- Step 1: Press "Ctrl + Shift + Esc" at the same time, and open "Task Manager".
- Step 2: Click "Startup apps", then select an app from the list.
- Step 3: In Windows 10, click "Enable" or "Disable" in the bottom-right corner.
- Step 4: In Windows 11, adjust the status by clicking "Enable" or "Disable" in the top-right corner. If the Disable option is not visible, expand the interface to reveal it. Alternatively, click the "three dots" (...) and choose Disable from the dropdown menu.
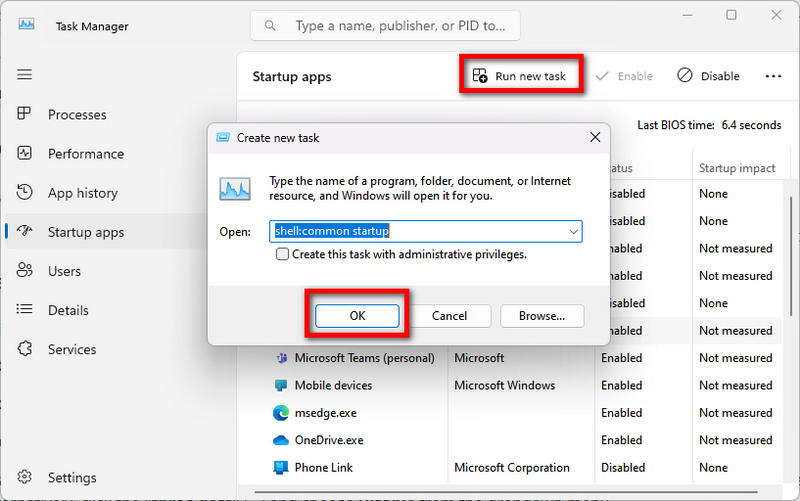
- Step 5: To add more apps to the Startup folder, simply click "Run new task", and in the Run dialog that appears, select "OK". Next, place the shortcuts of the apps you want to start automatically into this Startup folder. It's a straightforward method to ensure your essential programs launch right when you need them.
Part 4: Manage Startup Folder Using Registry Editor in Windows 10/11
Before diving into this section, take it slow if you're not too familiar with computers! If you have some tech knowledge under your belt, feel free to proceed with confidence. Editing the registry requires caution because one wrong move can mess up your system. If you still want to give it a shot, make sure to follow the steps below closely and avoid making random changes.
- Step 1: Press "Win + R" to open the "Run" dialog.
- Step 2: Type "regedit" and click "OK" or press "Enter".
- Step 3: User Account Control will prompt you if you want to continue. Select "Yes".
- Step 4: The registry is complex, with two locations storing startup item information. Under these paths, there are a series of names and corresponding value data. Each entry corresponds to a startup app or service.
- HKEY_CURRENT_USER\Software\Microsoft\Windows\CurrentVersion\Run
- HKEY_LOCAL_MACHINE\SOFTWARE\Microsoft\Windows\CurrentVersion\Run
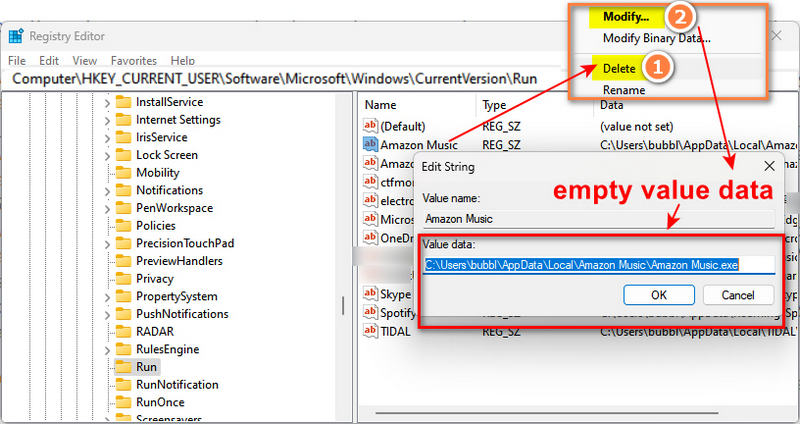
- Step 5: To disable a startup item, right-click the item and choose to "Delete" the entry. "Modify", then empty its value data.
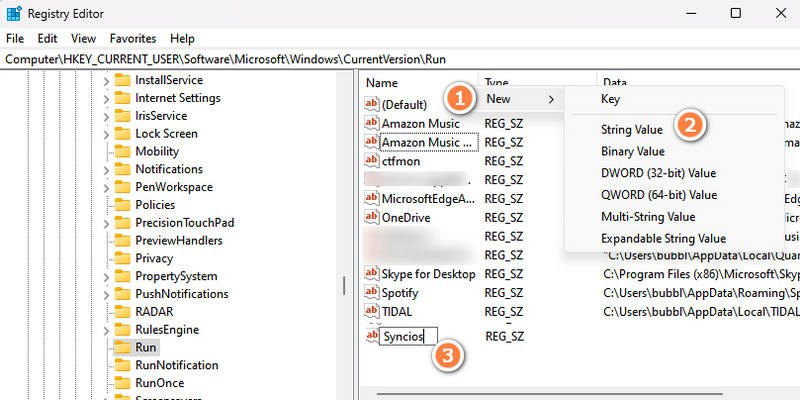
- Step 6: To add a new startup item, right-click the blank space on the right, select "New > String Value", enter the app name as the key, and paste the full executable path for the program you want to run as the value data.
- Step 5: Besides managing startup items as above, you can also navigate to these paths for further management.
- - For 32-bit apps on a 64-bit system:
- HKEY_LOCAL_MACHINE\SOFTWARE\Wow6432Node\Microsoft\Windows\CurrentVersion\Run
- - To set delayed startup intervals:
- HKEY_CURRENT_USER\Software\Microsoft\Windows\CurrentVersion\Explorer\StartupDelays
- - To debug or affect the behavior of certain programs:
- HKEY_LOCAL_MACHINE\SOFTWARE\Microsoft\Windows NT\CurrentVersion\Image File Execution Options
- Step 6: After making changes, ensure they are saved, close the Registry Editor, and restart your computer for the changes to take effect.
CAUTIONS!
- 1. Before making any modifications, it's highly recommended to create a backup of the entire registry using "File > Export" in the Registry Editor. This allows easy restoration if issues arise.
- 2. Avoid deleting or modifying keys whose functions you are unsure of. Incorrect actions may lead to system failures or other issues.
- 3. Ensure the paths and commands you enter are completely accurate, especially when manually adding startup items.
- 4. If you're unsure, seek professional help or use the method in Part 3 to add or remove apps from the startup folder.
Part 5: Fix Startup Folder Not Working in Windows 10/11
After adding or removing certain startup items, they may not take effect. At this point, we have several common solutions to help resolve the issue.
Fix 1: Re-add / Remove Auto-start Programs
If after restarting your computer, you find that the program you added to the startup folder did not start, or the app you removed opened automatically again, it's best to recheck the startup folder. You can refer to the methods in Part 3 of this article to repeat the operations, and then restart your computer to see if it has been successfully resolved.
Fix 2: Add Auto-start Programs Using A Batch File
To guarantee that a specific program initiates during system startup, consider creating and deploying a batch file.
- Step 1: Right-click on the blank area on the desktop, and choose "+New > Text Document" to create a blank text document.
- Step 2: Right-click on an app and select "Open file focation". Copy and paste the subsequent lines into the document, ensuring you replace the file path with the accurate location of your desired program.
-
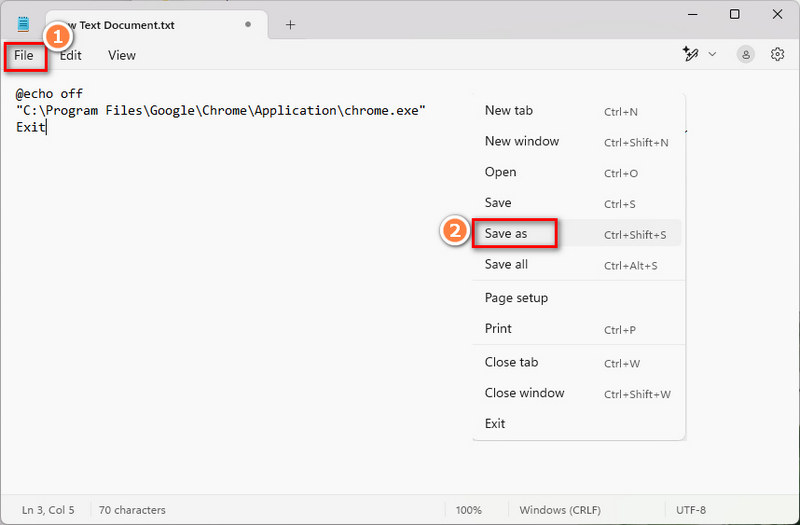
@echo off
"C:\Program Files\Google\Chrome\Application\chrome.exe"
Exit - Step 4: Select "File > Save As" to save this text document.
- Step 5: Rename the file extension from .txt to .bat.
- Step 6: Activate the batch file by double-clicking it. From this point onward, the specified program will launch automatically whenever the system boots up.

Fix 3: Manage Auto-start Programs Using Windows Registry
In Part 4 of this article, we provided a detailed explanation of how to manage startup programs through the Windows Registry. You can refer to the steps outlined in that section to add or remove apps from the startup process.
Part 6: Restore Startup Folder in Windows 10/11
If you accidentally delete some necessary startup items and want to restore the data in the Startup Folder, your first step might be to check the Recycle Bin. But if you find no trace there, your ultimate resort will be seeking help from professional computer data recovery software. Most importantly, you need to scan with the software as soon as possible, because if too much time passes, the data might be overwritten, reducing the likelihood of successful recovery.
In situations where data recovery is critical, Syncios D-Savior emerges as an indispensable tool. As a powerful PC recovery solution, it specializes in retrieving data from a variety of sources, including formatted disks, RAW or lost partitions, crashed systems, and external storage devices such as SD cards and USB drives. With Syncios D-Savior, you can preview your lost files in detail before selectively restoring only the data you need.
 Syncios D-Savior
- Recover data from formatted disk, hard drive, lost partitions, recycle bin, etc.
- Recover data from SD card TF card, SSD card, USB flash drive.
- Recover 1,000+ formats of images, videos, audio, folders, archives, documents, etc.
- Repair and restore various types of corrupted files.
- One-click scan with file preview before recovery.
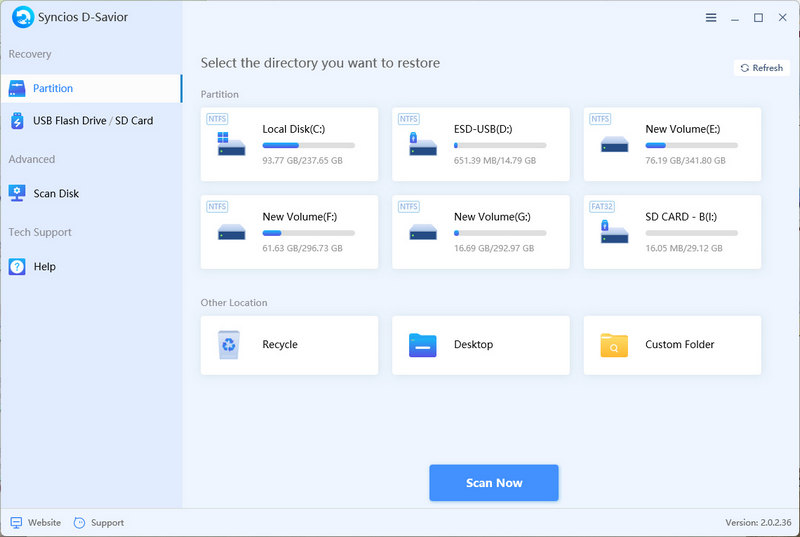
- Step 1: Start Syncios D-Savior after its installation, then choose to recover files from a custom folder.
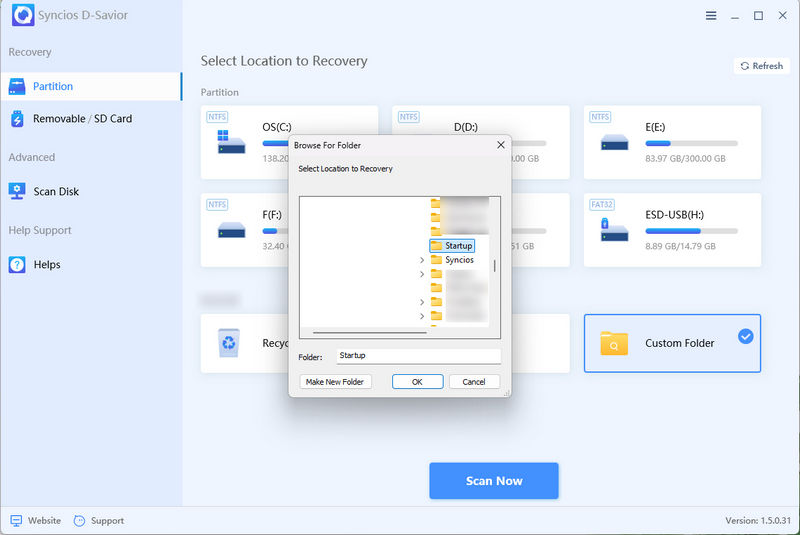
- Step 2: Select the Startup folder within the Explore window and start scanning.
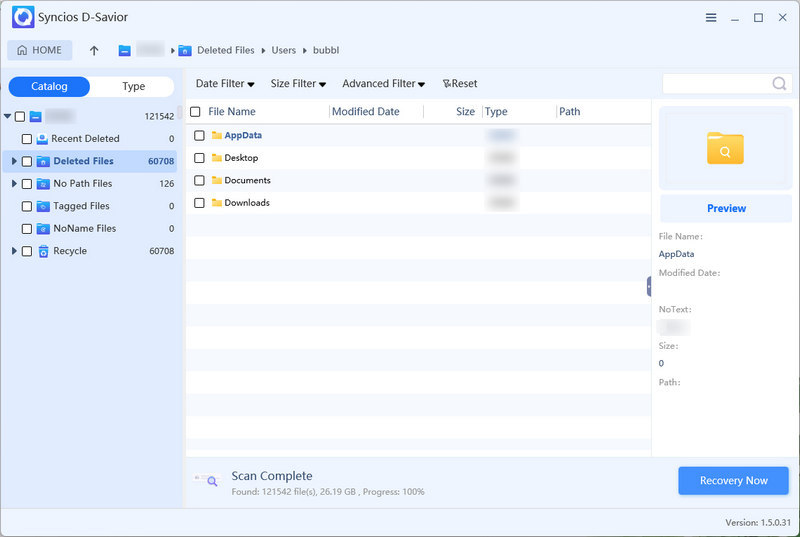
- Step 3: After a quick scanning, locate the startup apps you deleted before via the file path or file type.
- Step 4: Select the files you need and choose a proper place to recover. When the startup apps are recovered, move them to your Startup folder.
Part 7: Speed Up Startup Programs in Windows 10/11
There is an interval between turning on the computer and launching a program, akin to not abruptly waking up a sleeping person but allowing them to gradually adjust to the process of starting work. This delay can be adjusted according to your needs.
- Step 1: To adjust it, press "Win + R" and then enter "regedit" in the pop-up dialog box to open the Registry Editor.
- Step 2: In the Registry Editor, navigate to the following path:
- HKEY_CURRENT_USER\SOFTWARE\Microsoft\Windows\CurrentVersion\Explorer\
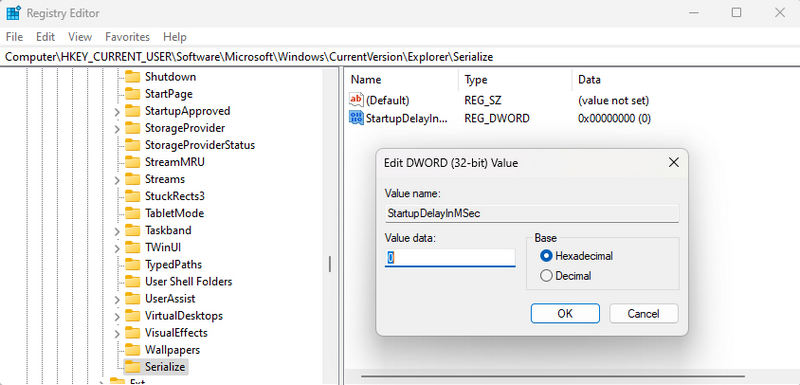
- Step 3: On this interface, right-click on the black area and choose to create a new "Key" named Serialize.
- Step 4: Under it, right-click on the black area and choose to create a new "32-bit DWORD" named StartupDelayInMSec. Right-click on this item to Modify its value to 0.
- Step 5: This means the delay during the program's startup is eliminated.
Part 8: What Programs Should I Run at Startup?
When choosing which programs to kick off right at boot-up, weigh your daily needs, system performance, and cybersecurity.
Programs That Should Auto-Start:
- Security Software: Antivirus, firewall, etc., to protect your system from malicious attacks.
- System Management Tools: If they offer scheduled tasks or maintenance, consider enabling them to start with Windows.
- Frequently Used Apps: Such as email clients and instant messaging software.
- Drivers and Services: Essential for ensuring hardware devices function properly.
- Sync Services: Like cloud storage, to keep your files automatically up-to-date.
Programs That Should Not Auto-Start:
- Infrequently Used Software: They consume resources, slow down boot times, and may pose security risks.
- Adware or Spyware: These can compromise privacy and drain system resources.
- Outdated Programs: Likely to cause error messages.
- Resource-Intensive Apps: May lead to system sluggishness or crashes.
You can manage the startup status of certain system .exe files by opening Task Manager with Ctrl + Shift + Esc. Here’s a list of common .exe files you might consider not setting to auto-start, along with brief descriptions:
Note: If unsure about a .exe file, research its role and decide if it's needed at startup. Be cautious, as every tweak impacts Windows performance. If issues arise, you can easily revert settings via Task Manager or System Configuration.
System .exe That Should Auto-Start:
- Infrequently Used Software: They consume resources, slow down boot times, and may pose security risks.
- Adware or Spyware: These can compromise privacy and drain system resources.
- Outdated Programs: Likely to cause error messages.
- Resource-Intensive Apps: May lead to system sluggishness or crashes.
Common .exe Files to Should Auto-Start:
svchost.exe: This process runs multiple Windows services and shares a process space instead of each service having its own.lsass.exe: Handles login requests and enforces security policies.services.exe: Manages the starting, stopping, and controlling of all Windows services.wininit.exe: Initializes Windows processes and services, including startingservices.exeand other key processes.winlogon.exe: Manages the user login and logout processes.explorer.exe: The main process for the Windows Shell, responsible for the desktop, taskbar, and File Explorer.System (smss.exe): The session manager subsystem that creats environment variables and handles other early startup tasks.csrss.exe(Client/Server Runtime Subsystem): Supports user-mode components of the Windows subsystem, including graphics and window management.conhost.exe: Console window host that manages input and output for command-line interface applications.spoolsv.exe: Print Spooler service that manages and schedules print jobs.dllhost.exe: Hosts COM+ applications and services.RuntimeBroker.exe: Manages app permissions and helps apps communicate with the Windows system.
Common .exe Files to Consider Not Auto-Start:
SearchApp.exe: Windows search functionality. Disable if rarely used.ShellExperienceHost.exe: Manages modern UI elements like the taskbar. Disabling may affect the interface.RuntimeBroker.exe: Handles app permissions. Important but can reduce its runtime frequency.OneDrive.exe: Microsoft cloud storage. Disable if not in use.SkypeHost.exe: Skype background processes. Set to manual if rarely used.WmiPrvSE.exe: WMI provider host. Critical, but set to manual if no WMI dependencies.MicrosoftEdgeUpdate.exe: Updates Microsoft Edge. Switch to periodic manual checks.Cortana.exe: Voice assistant. Disable if not needed.Teams.exe: Microsoft Teams. Set to manual if rarely used.AcroUpdate.exe: Third-party update tools. Typically can be started manually.
Part 9: Advanced Tip: Use Task Scheduler in Windows 10/11
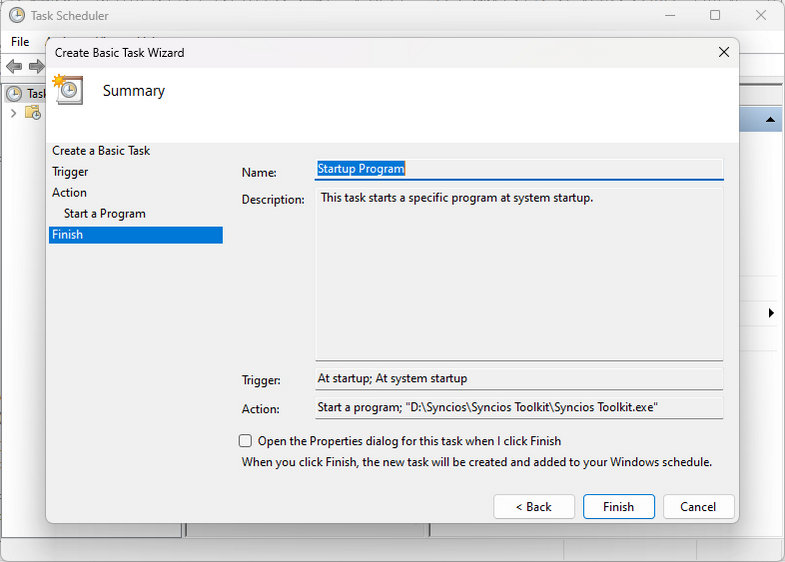
When setting up a Basic Task, enabling a program to start automatically on boot isn't a default option in the wizard. However, you can create a basic task and choose the right trigger to make it run at system startup, achieving a similar effect. For more complex controls or special needs, consider using "create Task" instead, which offers more configuration options. Here's how to configure a task to ensure it runs automatically when your system boots up, indirectly enabling the "startup program" feature.
- Step 1: Press Win + S to open the search box, type "Task Scheduler" and click to open it.
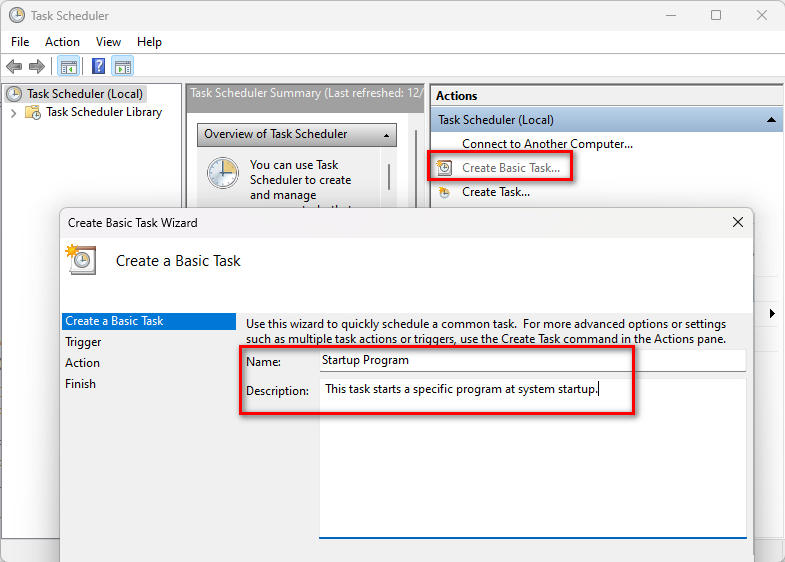
- Step 2: In the right-hand panel of Task Scheduler, click on "create Basic Task".
- Step 3: Enter Task Information.
-
- Name: For example, "Startup Program".
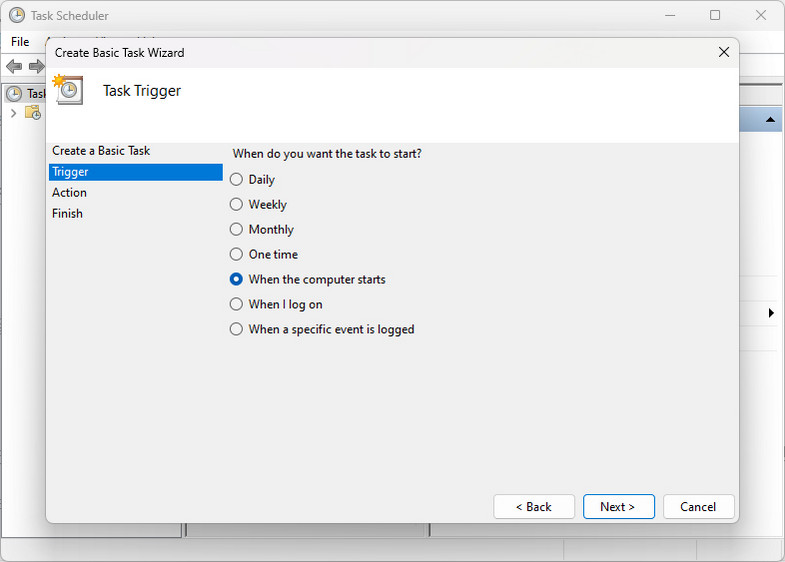
- Description (Optional): For example, "This task starts a specific program at system startup.". - Step 4: In the Trigger options, select "When the computer starts" to ensure the task runs each time the computer boots up.
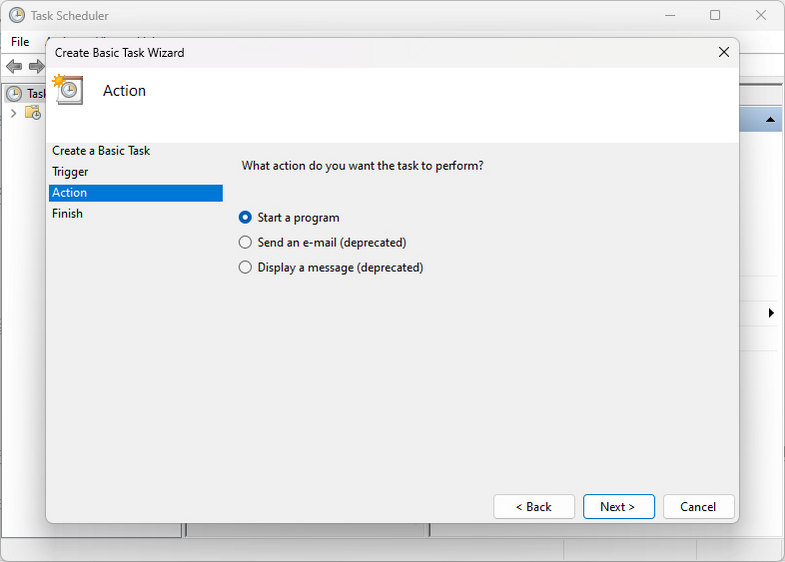
- Step 5: Choose "Start a program" as the action type.
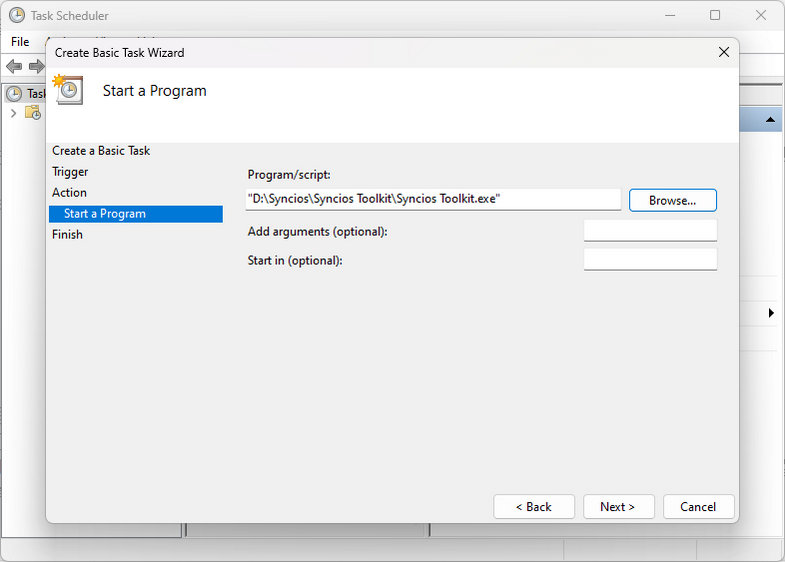
- Step 6: Configure Program Start Details.
-
- Use "Browse" to locate the program you want to run at startup.
- If necessary, enter command-line arguments in the "Add arguments (optional)" box.
- Specify the program’s working directory in the "Start in (optional)" box, if applicable. - Step 7: Click "Finish" to save the task.
- Step 8: In the Task Scheduler Library, right-click the task you creatd and select "Run". The program should start immediately, and you should see the app or script running as expected.
NOTE: Some programs require administrator privileges to run. Ensure the task is configured to run with sufficient permissions. In the "General" tab, check "Run with highest privileges" as needed.
Conclusion
This article provides a very detailed step-by-step guide on how to locate the startup folder in Windows 10/11 and how to add and remove startup items. However, if you have lost some of the startup files due to a system crash or have already deleted them and cannot recover them, it is recommended to use Syncios D-Savior for scanning and recovery as soon as possible before the data on the disk is overwritten.


