How to Recover Deleted Photos on Various Devices

 >
How to >
PC Recovery >
>
How to >
PC Recovery >
How to Recover Deleted Photos on PC/Mac/iPhone/Android
Accidentally deleted precious photos from your computer, SD card, or USB drive? Whether it happened while cleaning up storage, formatting the wrong drive, or dragging files to the Recycle Bin and emptying it too fast.
Don't panic. In this guide, you'll learn how to recover deleted photos step by step, no matter where they were stored. Whether you're a photographer, a student working on a project, or simply backing up family memories, we’ll show you how to restore your lost images quickly on Windows, Mac, iPhone, and Android. Let's dive!
- Part 1: How to Recover Deleted Photos on Windows - 3 Ways
- Method 1. Recover Deleted Photos with Data Recovery Software
- Method 2. Recover Deleted Photos with Recycle Bin
- Method 3. Recover Deleted Photos with File History
- Part 2: How to Recover Deleted Photos on Mac - 2 Ways
- Part 3: How to Recover Deleted Photos from iPhone/Android - 3 Ways
- Method 6. Recover Deleted Photos from iPhone with iOS Recovery Tool
- Method 7. Recover Deleted Photos from Android with Data Recovery Software
- Method 8. Recover Deleted Photos with Default Recycle Feature
- Part 4: How to Recover Deleted Photos from Different Cloud Services
Part 1: How to Recover Deleted Photos on Windows - 3 Ways
If you unfortunately delete your photos on Windows, don’t panic. This part will introduce 3 feasible methods to help you recover deleted photos on Windows. According to the different personal settings on PC, you should choose the suitable one. Among them, utilizing data recovery software is always the most reliable and efficient one. Let’s try to resolve your puzzle.

AnySecura Data Security Software
After recovery, your files are still vulnerable to leaks and misuse. AnySecura adds a layer of proactive defense — monitoring access, blocking risky transfers, and encrypting sensitive content to keep data protected. Learn More >
Method 1. Recover Deleted Photos with Data Recovery Software
There is no denying that the capability of professional data recovery software can’t be underestimated. If you wish to recover deleted photos swiftly and accurately, it is recommended you employ Syncios D-Savior. If you are a Windows layman, not good at performing complicated operations, you can resort to this method. With Syncios D-Savior, a simple operation gives your deleted files back.
Syncios D-Savior can not only recover deleted photos with a few clicks, but can be applied to multiple scenarios. Whether you accidentally empty your Recycle Bin or format your disk by mistake, it can perform a fast scan and deep scan to find your deleted files and recover them. Besides photos, it also supports recovery for diverse files, such as audio, documents, videos, archives, programs, and many more. With this program, you can recover any files in bulk, saving time and energy. The easy tutorial on how to recover deleted photos with Syncios D-Savior is as follows.
 Syncios D-Savior
- Recover data from a formatted disk, hard drive, lost partitions, emptied recycle bin, etc.
- Recover data from an SD card, TF card, SSD card, USB flash drive, other storage media.
- Recover 1,000+ formats of images, videos, audio, folders, archives, documents, etc.
- Save recovered data to any desired location, including external drives.
- Provide detailed file preview prior to recovery.
- Support recovering data while scanning.

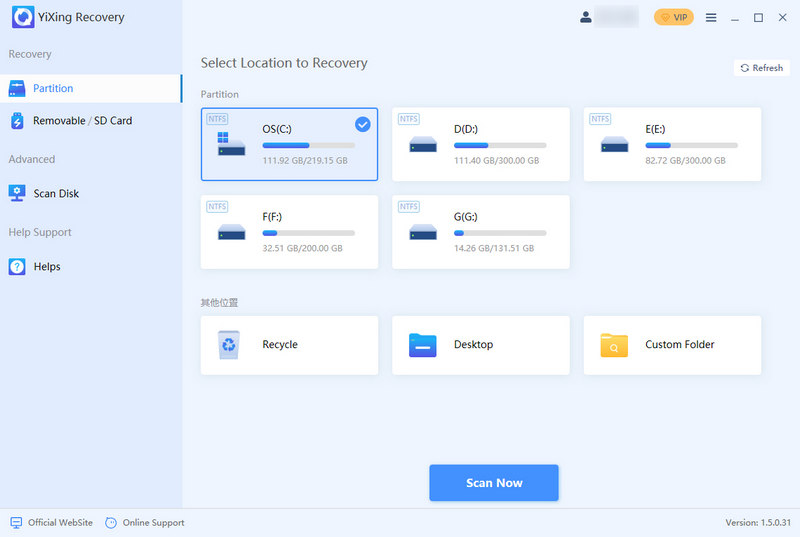
- Step 1: Launch Syncios D-Savior on your PC. In the following main interface, you can see all the available partitions, including the local disk and external devices connected to your PC. Choose one partition and hit the “Scan Now” button to start the scanning process.
- Step 2: When the scanning performs, a progress bar will appear below, informing you of the scanning time. It will finish the Fast Scan soon, with a Deep Scan following. You can directly look up your deleted photos on the left panel without waiting for the scanning to complete.
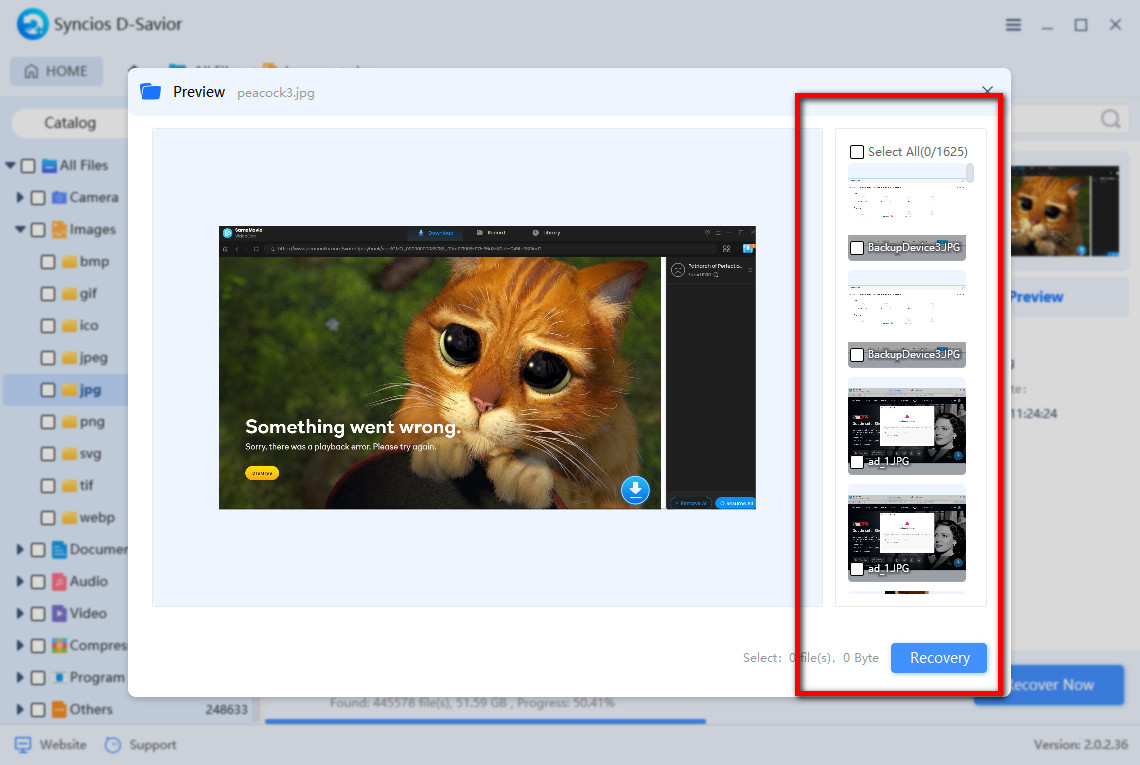
- Step 3: If you are not sure about the deleted photos you want to recover, you can select them and tap the “Preview” button on the right panel. It will show you all the thumbnails that can be recoverable. Preview and confirm which photos you need.
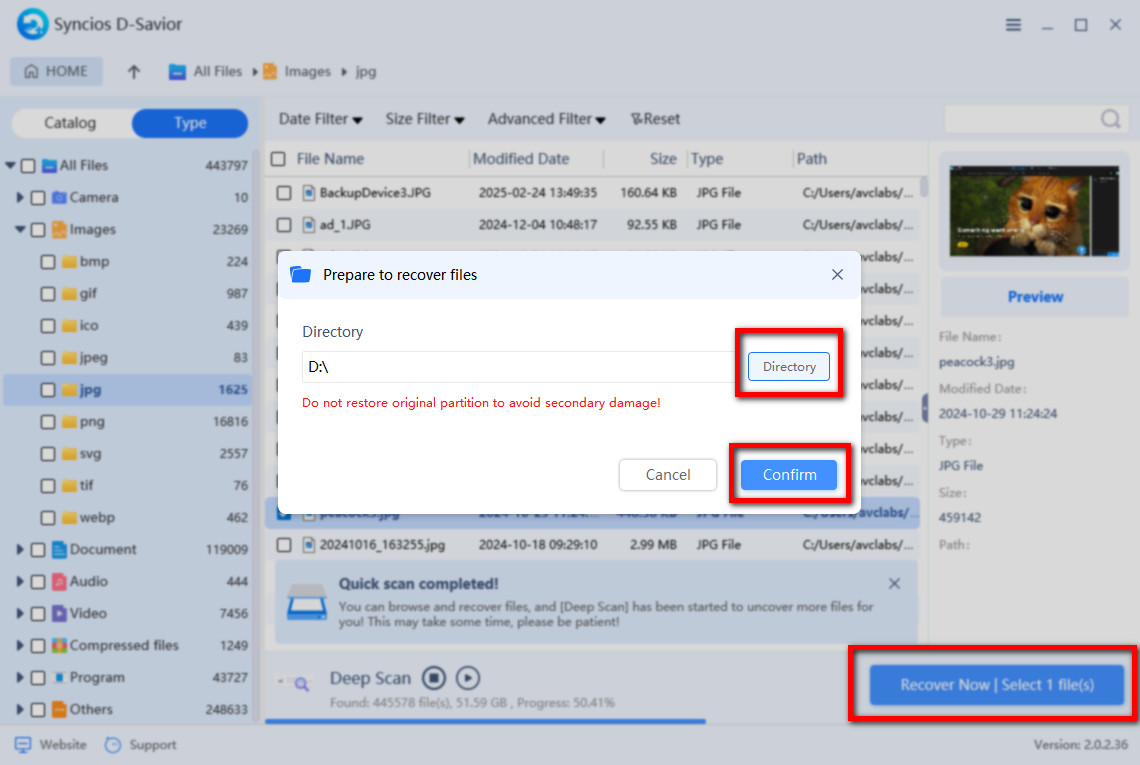
- Step 4: After locating the photos you wish to recover, you can click the “Recover Now” button on the lower right corner to begin the official recovery. Then click “Directory” to choose another available file folder to preserve your files.
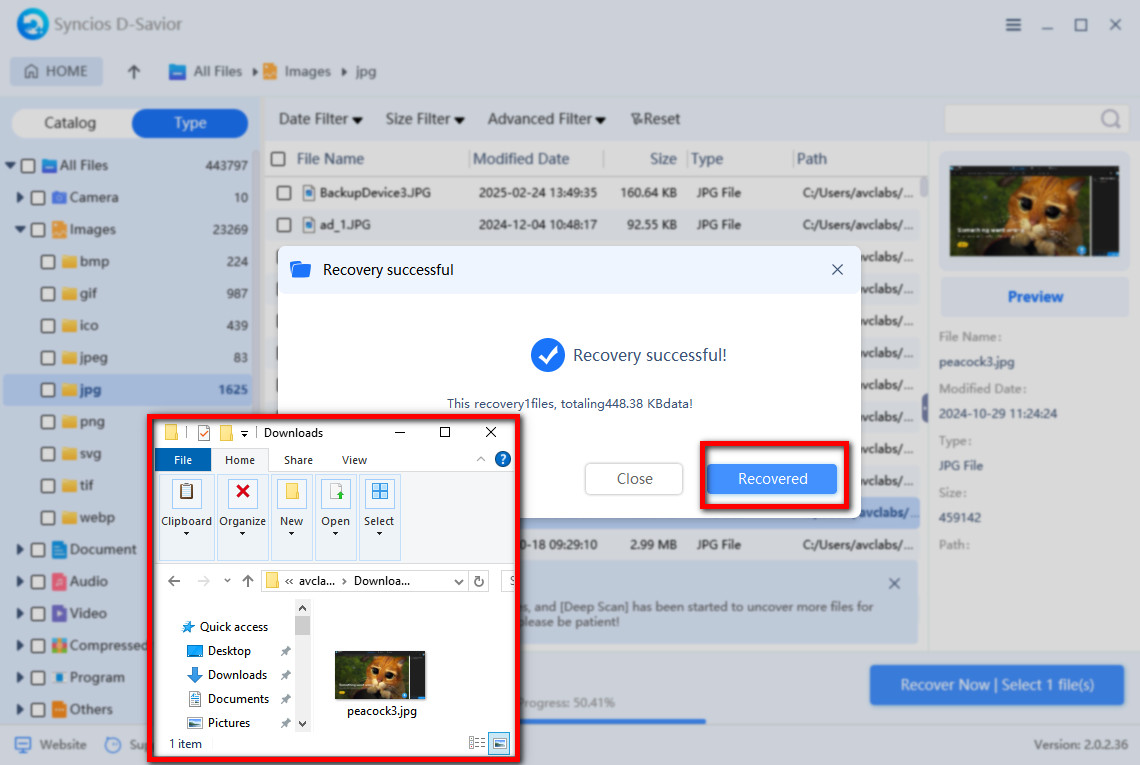
- Step 5: Once the recovery finishes, it will pop up a “Recovery successful” window. Simply clicking the “Recovered” button, it jumps you to the folder you set in the last step. You can verify that the files have been successfully restored and are accessible.

Method 2. Recover Deleted Photos with Recycle Bin
Checking the Recycle Bin is always the immediate measure you should take when you find that something was deleted by mistake. Windows operating system is embedded with the Recycle Bin feature which helps to store your deleted files temporarily. Once you delete a file, it will move to the Recycle Bin. It just lie down there until you empty the Recycle Bin to permanently erase. Retrieving deleted photos with Recycle Bin is effortless as follows.
- Step 1: Find the Recycle Bin on your desktop or in the File Explorer. Then double-click the icon to open it.
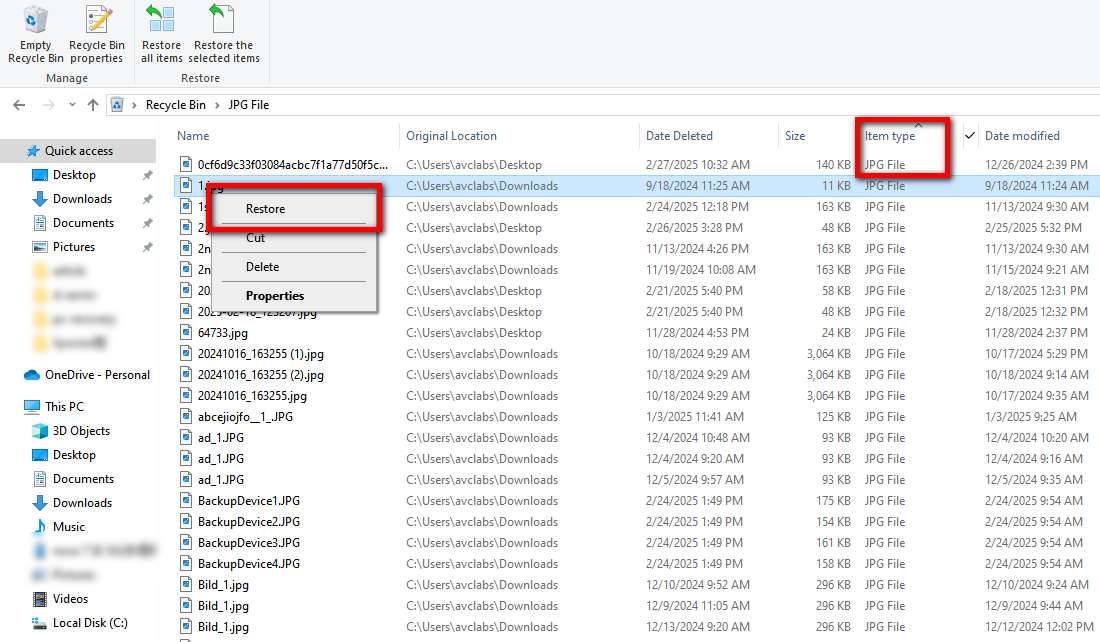
- Step 2: Quick look for your deleted photos by the “Date Deleted” or the “Item Type” filter.
- Step 3: Once you locate the deleted photos, right-click the target file you want to recover and hit the “restore” button. Alternatively, you can also click the target item and then tap the “Restore the selected items” option in the above option card.
- Step 4: Recycle Bin helps to recover files to the original path. Now you can go to your file folder storing photos to check if your deleted photos have been recovered successfully.
❗❗❗ Note: This method is suitable for the circumstance when you haven’t emptied the Recycle Bin. If you can’t find your photos in the bin or your bin is accidentally emptied, it is suggested to adopt the data recovery tool mentioned in Method 1. Additionally, if you delete photos from an external drive, Recycle Bin may not retrieve them for you, you can only resort to the data recovery software for Windows.
Method 3. Recover Deleted Photos with File History
File History is another helpful Windows feature that allows you to recover deleted photos without much hassle. It will automatically back up your personal files such as documents and photos on your PC with regular frequency, keeping your important files from accident deletion. However, only if this feature is enabled, can you recover files by reverting to the earlier versions.
👉To check if you set up File History feature, go to “Settings” then “Update & Security”. Find the File backup option to see if your File History is turned on. If not, it is recommended to skip this method. Or in case you need to recover files next time, you can set to turn on File History now, and toggle on “Automatically back up my files”.
- Step 1: Make sure that your File History is enabled. Then you can directly open the file folder where your deleted photos were stored before.
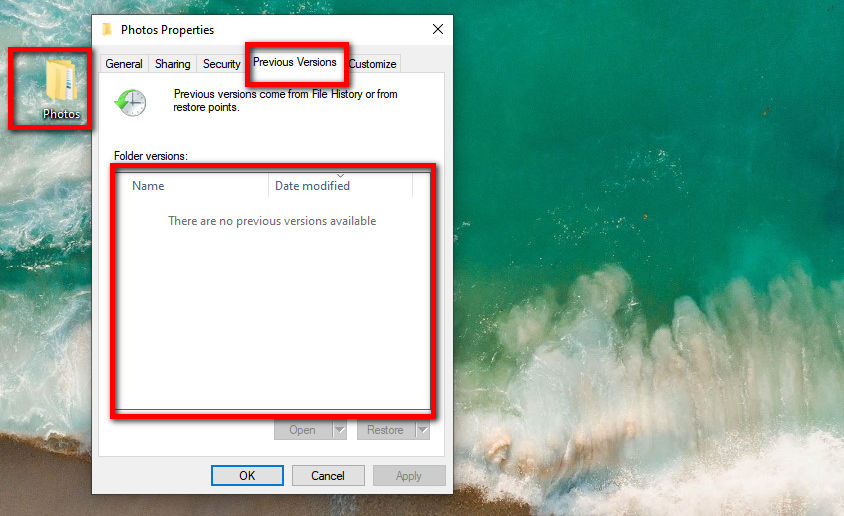
- Step 2: Right-click this file folder and select “Restore previous version” from that menu.
- Step 3: In the popup window, you can see all the available previous version of this file folder. Tap one version to reverse it before your photos were deleted.
- Step 4: Before the restore, you can open your selected version of this file folder. Check and ensure that this version contains your deleted photos.
- Step 5: Once confirm your needed version, simply click the “Restore” button to recover your deleted photos.
❗❗❗ Note: This method can be applied only when your File History is enabled. If you haven’t switched on this feature, unfortunately, you can’t recover deleted photos on Windows through its version reversion. Method 1 is universal, though.
Part 2: How to Recover Deleted Photos on Mac - 2 Ways
This part shows you 2 effective ways on how to recover deleted photos on Mac. Like the recovery process on Windows, when you delete photos accidentally, you should check your Trash first, then Time Machine (if enabled). Your ultimate choice is to ask the data recovery tool for a favor. Here we only explore two simple recovery methods for you.
Method 4. Recover Deleted Photos with the Trash
Acting a similar function as Recycle Bin in Windows, Trash can temporarily store your deleted files including photos, programs, documents and many more. To prevent accident loss, Trash allows you to recover files to their original path, unless you manually empty the Trash to erase your files forever. Here are simple steps for you to recover deleted photos with the Trash.
- Step 1: On the bar at the bottom of your Mac screen (Dock), find the Trash icon and open it.
- Step 2: It will appear a window showing the entire files that you performed deletion. Look for the target photos you want to recover inside the Trash. Or, you can use its search bar in the upper right corner to locate the deleted photos quickly.
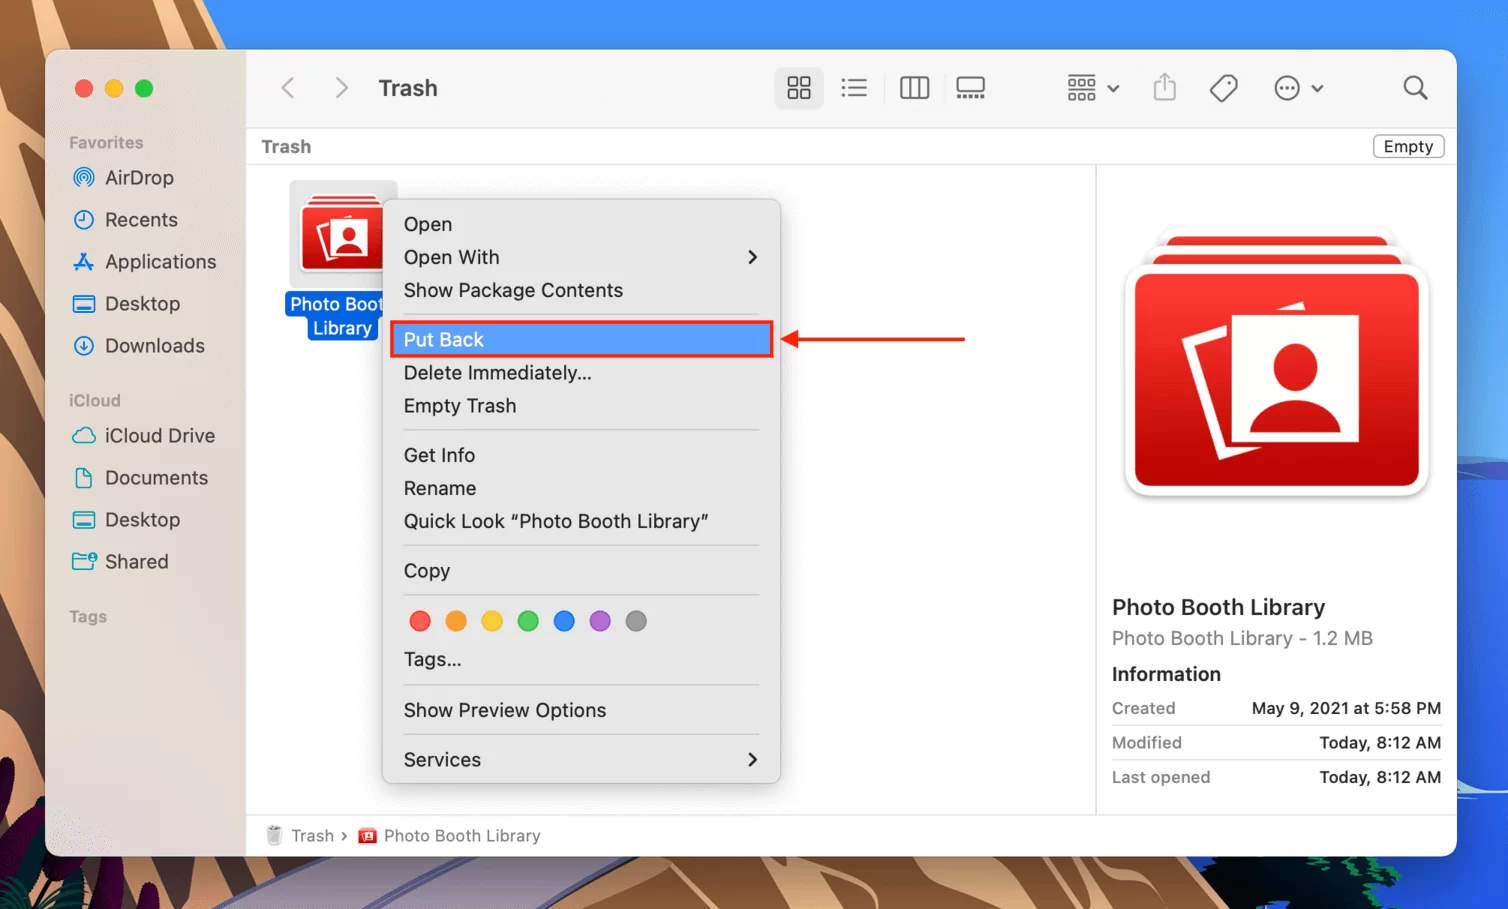
- Step 3: Once you find the photos you want to recover, simply right-click it and tap the “Put Back” option from the context menu.
- Step 4: Visit the location that you store photos to check if your deleted photos are recovered to the original path successfully.
Method 5. Recover Deleted Photos with Time Machine
Time Machine enables to automatically back up your files on Mac, copying multiple versions. With this built-in backup feature in Mac, you can reverse your Mac or specific files to its previous version, so as to retrieve the files you need. Nevertheless, before you use this method, you should make sure that your Time Machine is turned on. You can go to the “System Settings” then “General” to check if your Time Machine is started.
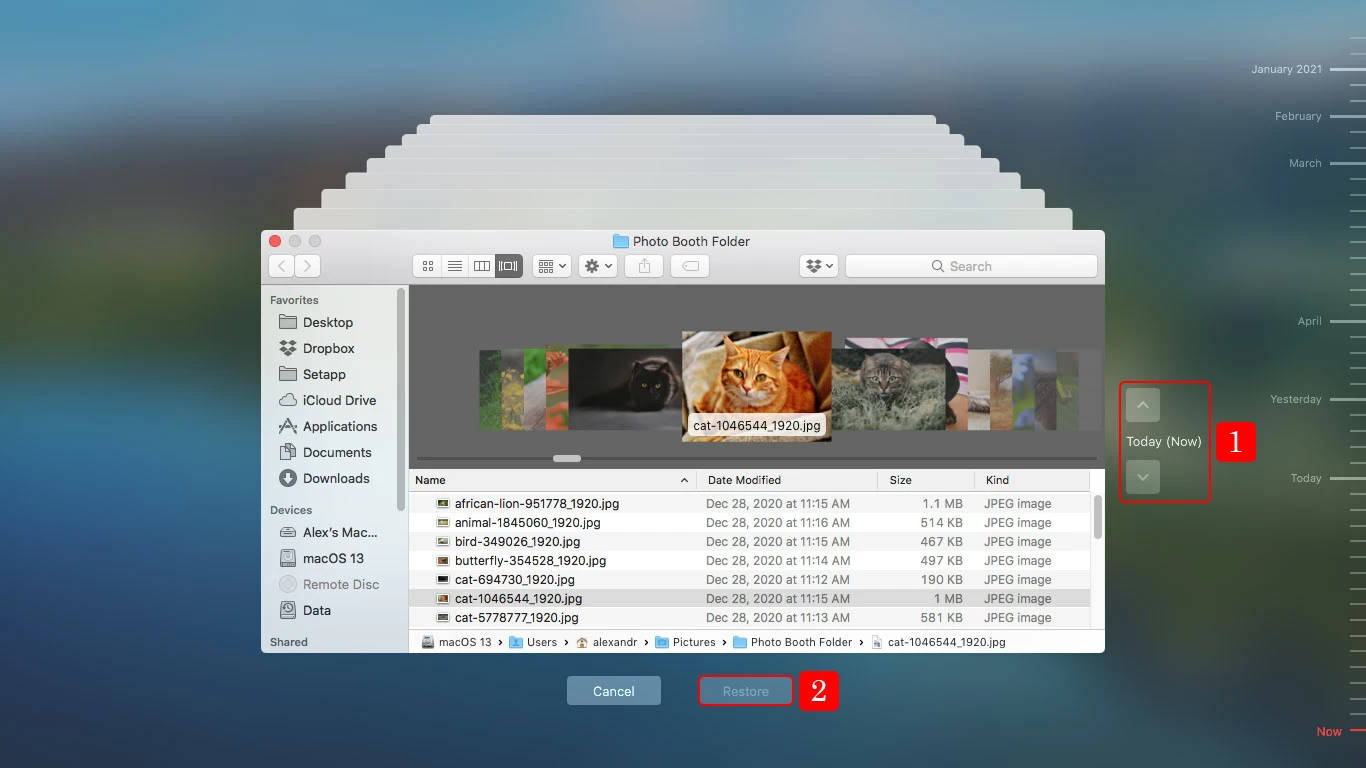
- Step 1: Open the original file folder where you stored the deleted photos.
- Step 2: In the same file folder window, tap the “Time Machine” icon on the top bar of your screen. Then, select “Enter Time Machine” option from the context menu.
- Step 3: After entering the Time Machine, it displays you all the versions of this file folder. And you can see a timeline on the right side of the screen edge. Browse through these different versions by timeline and locate the photos you need.
- Step 4: Select the photos you want to recover and click the “Restore” button. You will find that your deleted photos have been recovered to their original file folder.
Part 3: How to Recover Deleted Photos from iPhone/Android - 3 Ways
The following part provides you with the three effective ways to recover deleted photos from iPhone or Android without hassle. One general method is to check your "Recently Deleted" feature to see if your valuable photos are still kept there or not. If unfortunately, this folder has been emptied accidentally, you still have a high chance of recovering deleted photos through the recovery tools we tested, whether you are an iOS or Android user. Let's check the magic tools!
Method 6. Recover Deleted Photos from iPhone with iOS Recovery Tool
Syncios iOS Data Recovery is designed for iOS users to recover a wide range of data, including photos, camera roll, music, video, contacts, messages, call history, and beyond. It can not only directly recover from your iPhone, iPad, or iPod Touch, but to recover data from iTunes and iCloud. Its preview feature allows you to choose exactly what you want to recover, selectively or one-click for all. Syncios iOS Data Recovery is the top choice when it comes to a reliable recovery process and wide compatibility for the latest iOS 18. Let's see how to use it to recover deleted photos from iPhone, whether you have backups or not.
6.1 Recover Deleted Photos from iPhone without Backups
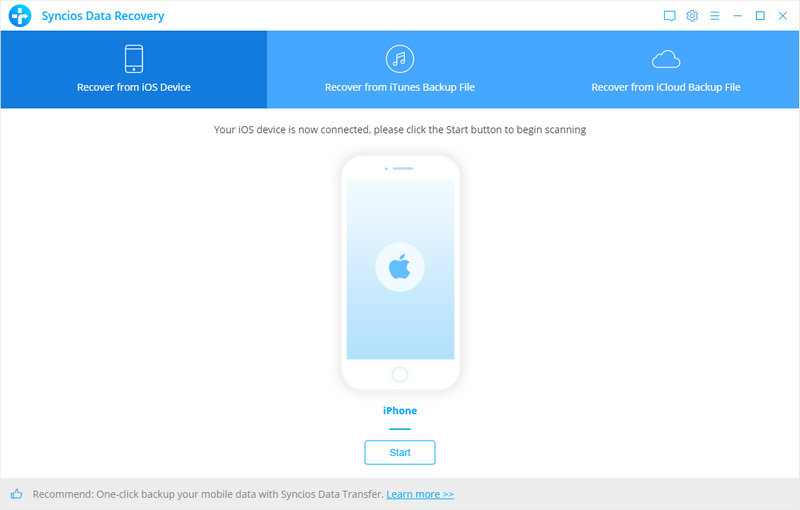
- Step 1: Connect. Connect your iPhone/iPad/iPod Touch to your PC by using a USB cable. Then select the mode "Recover from iOS Device" inside the Syncios iOS Data Recovery program.
- Step 2: Scan. Next, when connected well, simply click the "Start" button to let Syncios scan all the deleted files from your iOS device. Wait patiently to complete this scanning.
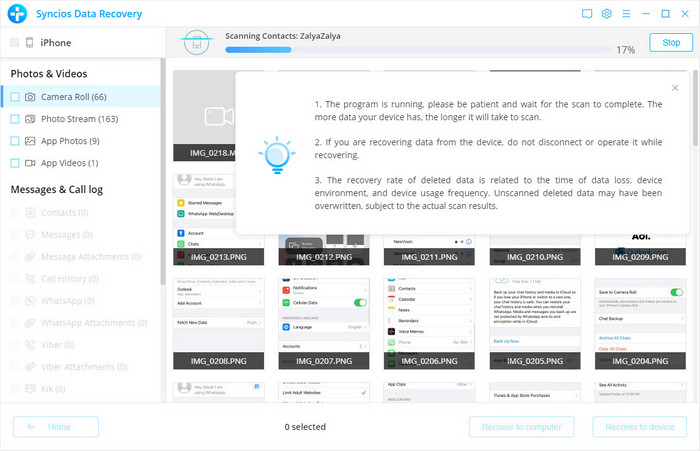
- Step 3: Preview. Once finished, you can filter and preview all the found data from the left panel. To recover deleted photos from iPhone, you can click the "Photos & Videos" option.
- Step 4: Recover. Select the photos, Syncios empowers you to choose either to recover deleted photos to computer or recover them to the device. Confirm and you can get your lost data back within a few minutes.
6.2 Recover Deleted Photos from iPhone with iTunes Backup
For those who have backed up their device with iTunes before losing photos, you can also easily recover those images with Syncios iOS Data Recovery. The best part lies in you don’t have to overwrite your entire iPhone just to retrieve a few lost pictures. Instead, this iOS recovery tool allows you to extract and preview deleted photos directly from an iTunes backup, letting you selectively recover only the files you need. Whether your iPhone is lost, damaged, or reset, Syncios makes photo recovery fast without device connection. Simple steps are as follows.
- Step 1: Launch Syncios iOS Data Recovery and navigate to the mode Recover from iTunes Backup Files.
- Step 2: Select one backup file from the provided list to scan all the backup data.
- Step 3: Preview and locate the deleted photos on your iPhone.
- Step 4: Choose to recover deleted photos to computer or the device.
6.3 Recover Deleted Photos from iPhone with iCloud Backup
In addition, if your photos were deleted but your iPhone was backed up to iCloud beforehand, Syncios iOS Data Recovery empowers you to recover them from iCloud backup as well. Syncios makes it possible to recover what you want without restoring the entire device. Simply sign in to your iCloud account within the program, download the backup file, and preview the deleted photos before recovery. You can selectively restore only the photos you need. No data loss and no factory reset required. Such a convenient and robust iOS data recovery tool is worth giving a try.
Method 7. Recover Deleted Photos from Android with Data Recovery Software
Is there any safe and powerful data recovery tool for Android users? We got you. If you happen to use an Android device with an SD card, such as Samsung, Xiaomi, and Motorola, professional tools like Syncios D-Savior can retrieve your accidentally lost photos or other important files effortlessly. Syncios D-Savior can not only recover deleted photos on Windows, but also expand its capability of recovering data from SD cards. Even if your SD card is formatted or corrupted, there is still a high success rate in recovering photos for you. Take out your SD card from your Android and have a try. Just a few clicks to recover your lost data.
👉 How to Recover Deleted Photos from SD Card: Step-by-step tutorial.
Method 8. Recover Deleted Photos with Default Recycle Feature
Both iPhone and Android devices are equipped with the built-in storage feature for photos. Your deleted photos will not be erased permanently, removing to its default place to store deleted photos for a limited time, instead. Hence, you can easily recover deleted photos through the “Recently Deleted” folder. Here is how you operate.
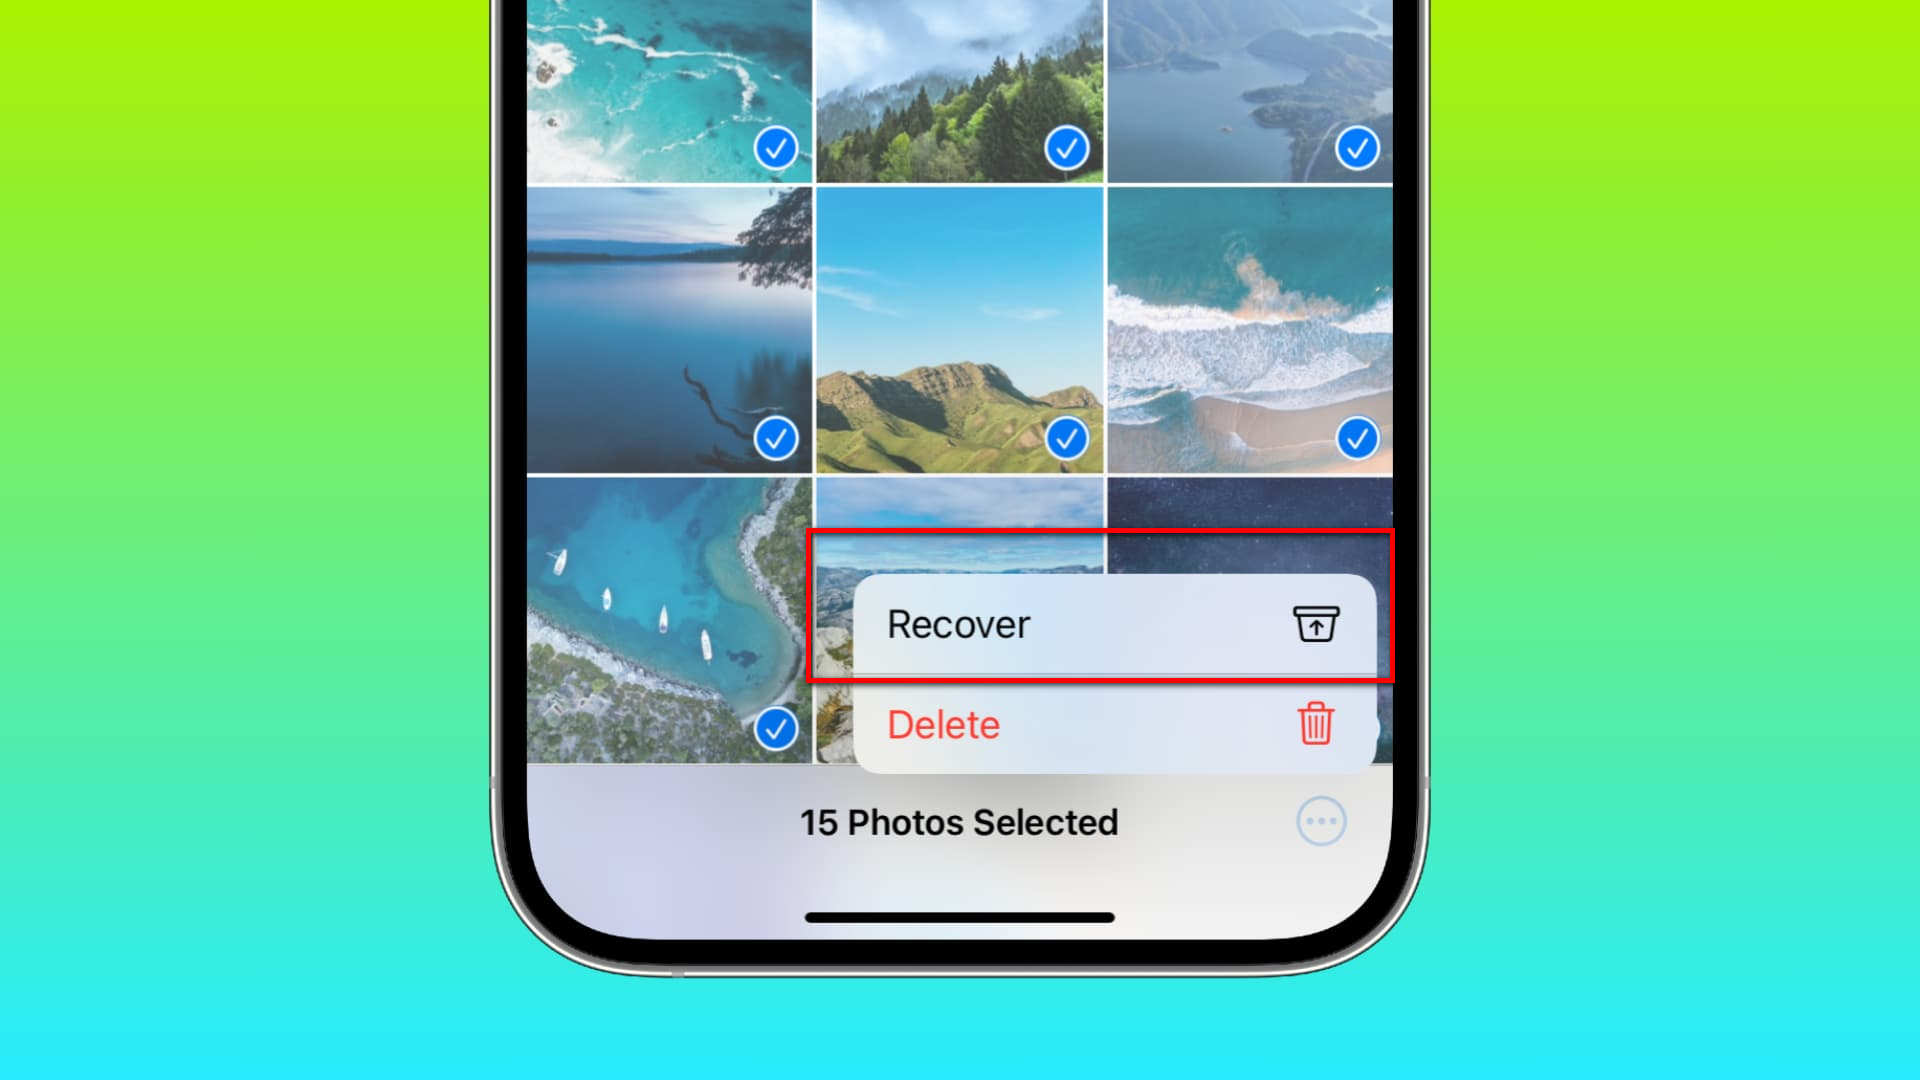
- Step 1: Open your Photos or Gallery app on your iPhone or Android.
- Step 2: Scroll down and find the “Recently Deleted” folder.
- Step 3: Enter this folder and browse to select the photos you need to recover. Simply tap the “Recover” button to recover your deleted photos immediately.
If you can’t find anything on the built-in backup feature of your system, or if you exactly know that you enable other cloud services like Google Photos, Dropbox, OneDrive or iCloud, then you can check if your deleted photos are synced there.
Part 4: How to Recover Deleted Photos from Different Cloud Services
What if you delete photos from cloud services? Focus on this part, it teaches you how to recover deleted photos from different cloud backups. Most cloud services keep your deleted photos for 30 days, and you can recover before they are erased forever. The operation may have slight discrepancies between mobile app and the web version, but it does not influence on the recovery process.
1. Google Photos App - for All Users
- Step 1: Open the Google Photos App on your mobile device, or you can go to the official website.
- Step 2: Find the “Trash” option. If you are using the mobile app, you should hit “Library” on the bottom bar first, then select “Trash” on the screen. If you are using the web, you can locate the “Trash” in the left side panel.
- Step 3: Browse the photos you wish to restore.
- Step 4: Select your target photos and tap the “Restore” button.
2. Dropbox - for All Users
- Step 1: Launch the Dropbox app on your mobile device, or visit the official website on the browser.
- Step 2: Look for the “Deleted Files”. You can find this option after entering the bottom Home interface. As for web users, you need to click “All Files” on the left sidebar, then click “Deleted Files” below that menu.
- Step 3: Browse through and confirm what are the photos you need to recover.
- Step 4: Select the photos and tap “Restore” to move deleted photos back to their original path.
3. OneDrive - for All Users
- Step 1: For mobile app users, you need to start OneDrive on you device and tap the “Me” option at the bottom of the screen. As for desktop users, go to onedrive.com and sign in to your account.
- Step 2: Tap the “Recycle Bin” on the left sidebar.
- Step 3: Search for the photos you want to recover.
- Step 4: Choose the photos and hit “Restore” button.
4. iCloud - for Mac/iOS Users
- Step 1: Visit iCoud.com and sign in with your Apple ID.
- Step 2: Hit “Photos” and then click the “Recently Deleted” in the sidebar.
- Step 3: Look up these deleted photos.
- Step 4: Locate the photos you wish to recover and click on the “Recover” tab.
Conclusion
To sum up, to recover deleted photos, step 1 is to resort to your embedded backup features on your system, step 2 is to check your cloud service to see if you have any backups there, and step 3 is also the most effective and reliable one, to employ a data recovery software. Whether you are using Windows, Mac, iPhone or Android devices, you can always follow the principle.
If you don’t want to waste time in checking if your deleted photos are backed up somewhere, or just can’t restore them from an internal backup feature, try Syncios D-Savior. Your best partner to recover 1,000+ file types with a few clicks: install, scan, preview and recover!
What's next? Download Syncios D-Savior now!
Ethan Mercer | Senior Writer
Related Articles
Related Solutions
Recover permanently 1000+ types of deleted files from both PC and 2000+ external devices.