Recover Deleted/Unsaved/Overwritten Excel

 >
How to >
PC Recovery >
>
How to >
PC Recovery >
12 Ways to Recover Deleted/Unsaved/Overwritten Excel Files
When your Excel file disappears, your data is embarking on an adventure. Have you ever experienced such a heart-stopping moment: just finished filling out a spreadsheet but didn't save it, accidentally deleted crucial data, or even had the entire file overwritten beyond recognition? Don't panic! Whether it's accidental deletions, overwrites, or corrupted files, all can be recovered through this data rescue mission. Below, we reveal 12 verified methods to recover the deleted Excel files based on authentic tests, from 'one-click undo' to 'deep repair,' to bring your spreadsheet back to life!

- Part 1: Tactical Map - Select the Optimal Excel Files Recovery Methods
- Part 2: 12 Ways to Recover Excel Files
- Method 1: Recover Excel Files via Undo Delete (Ctrl+Z)
- Method 2: Restore Excel Files from Recycle Bin
- Method 3: Recover Excel Files Use Syncios D-Savior
- Method 4: Recover Excel Files Use AutoRecover for Unsaved Files
- Method 5: Recover Excel Files from Temporary Files Folder
- Method 6: Recover Excel Files from Microsoft 365/OneDrive
- Method 7: Restore Excel Files Previous Versions
- Method 8: Restore Excel Files from System Backups
- Method 9: Recover Excel Files via Command Prompt
- Method 10: Recover Excel Files Use Windows File Recovery Tool
- Method 11: Recover Excel Files Use Recuva Data Recovery for free
- Method 12: Repair Corrupted Excel Files
- Part 3: Prevention Tips to Avoid Excel File Loss
- Part 4: FAQs About Excel Files Recovery
Tactical Map - Select the Optimal Excel Files Recovery Methods
First of all, let's lock in the approach based on the problem. Just like switching baits based on fish activity when fishing, there are corresponding "golden solutions" for lost Excel files. The table below helps you quickly match Excel recovery scenarios to methods, saying goodbye to blind searching!
| What's happened? | Solutions |
|---|---|
| Recover Deleted Excel Files: Files may be deleted due to unexpected reasons and need to be recovered before the data is permanently overwritten and erased. |
|
| Recover Unsaved Excel Files: If Excel closes unexpectedly, crashes, freezes, or if there's a sudden power outage, the file might not be automatically saved. |
|
| Recover Overwritten Excel Files: Accidentally deleted data in Excel and saved the changes, you need to recover its previous version or old backup. |
|
| Repair Corrupted Excel Files: Can't open Excel properly. Need to fix damaged Excel files and restore your data. |
|
| Advanced Recovery Methods (No Backups): Address any crisis. Perform a thorough and deep scan of all partitions to recover the permanently deleted Excel file even without backups. |
Part 2: 12 Ways to Recover Excel Files
Now open our Excel file rescue treasure chest. From beginner-friendly to expert-only full guide. No matter what the reason is that your Excel table is accidentally deleted or the data disappears, there is always one of these 12 methods that is suitable for you!
Method 1: Recover Excel Files via Undo Delete (Ctrl+Z)
Applicable scenario: The Excel file or data in the Excel table has just been accidentally deleted, and no other operations have been performed.
- Delete data in unclosed Excel: Immediately press Ctrl+Z (Windows) or Command+Z (Mac). If you perform multiple operations, you can repeatedly undo until the target file is restored.
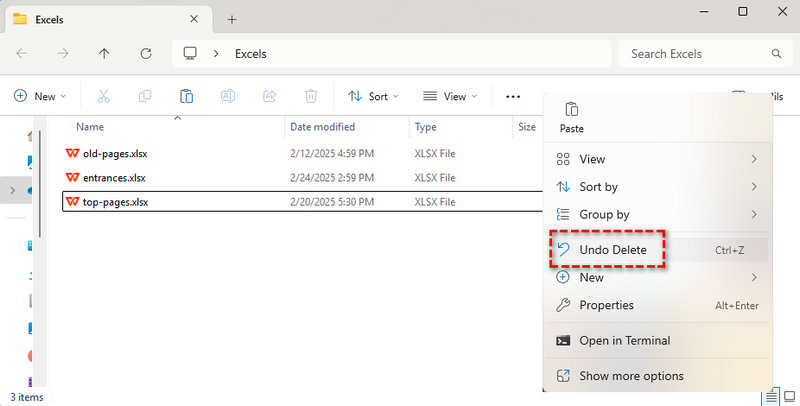
- Delete closed Excel: Open the folder where the source file is located, right-click a blank area, and select "Undo Delete".
Method 2: Restore Excel Files from Recycle Bin
Applicable scenario: Local deletion and the Recycle Bin is not emptied.
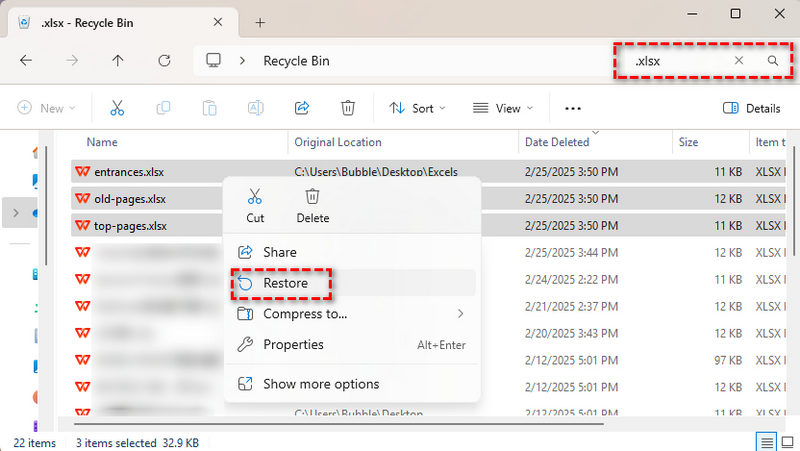
- Step 1: Open the Recycle Bin and search for .xlsx or .xls.
- Step 2: Right-click the target file and select "Restore".
Method 3: Recover Excel Files Use Syncios D-Savior
Applicable scenario: Deeply recover permanently deleted or formatted Excel files without backup.
When your Excel file gets lost due to formatting errors or even when your system crashes and you can't find it in the Recycle Bin, it's time to call on Syncios D-Savior! This reliable data recovery tool acts like a digital archaeologist, meticulously scanning your hard drive to recover lost files. Whether your file was accidentally deleted, overwritten, or corrupted, Syncios D-Savior can help retrieve your important data. It can restore not just the content but also the original format of your Excel files, ensuring you get back exactly what you need.
 Syncios D-Savior
- Recover data from a formatted disk, hard drive, SSD, lost partitions, emptied recycle bin, etc.
- Recover data from an SD card, TF card, CF card, USB flash drive, other storage media.
- Recover 1,000+ formats of images, videos, audio, folders, archives, documents, etc.
- Save recovered data to any desired location, including external drives.
- Provide detailed file preview prior to recovery.
- Support recovering data while scanning.

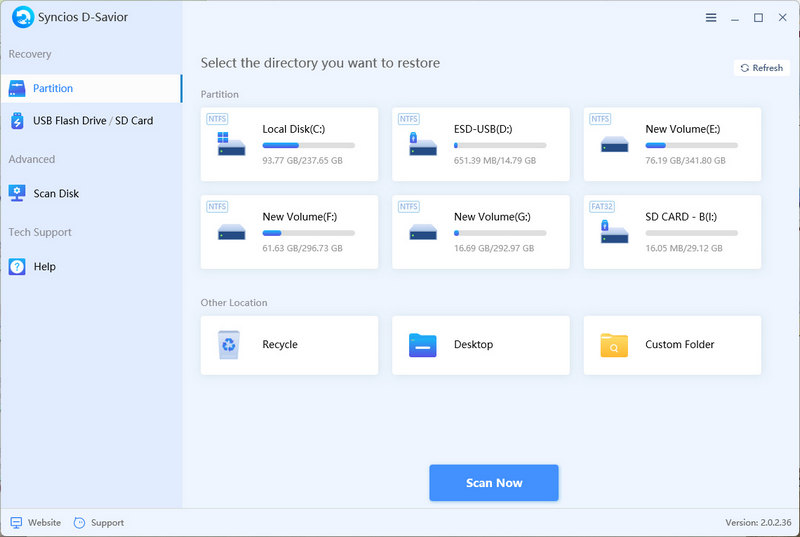
- Step 1: After installing Syncios D-Savior, launch the software and navigate to its main interface.
- Step 2: On the primary screen, all available drives, including SD cards, USB flash drives, and other external storage devices, are listed. Identify which drive or folder contained the Excel files you wish to recover. Once selected, simply press the "Scan" button to begin the process.
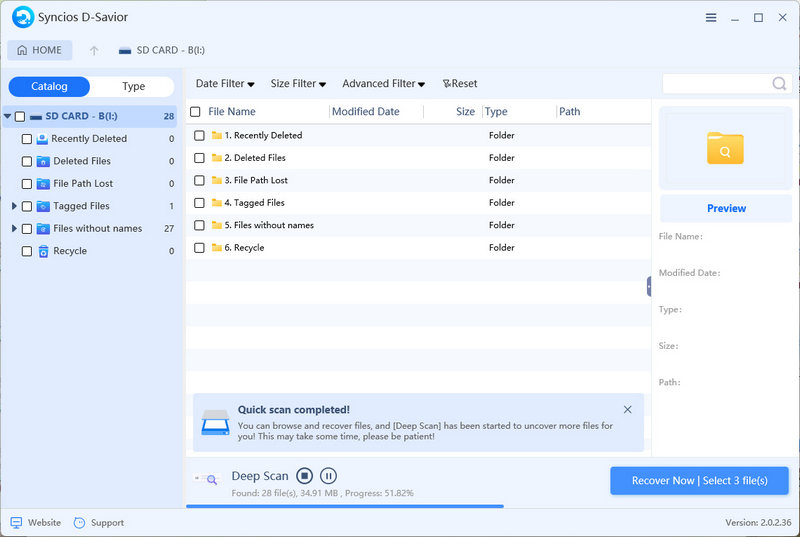
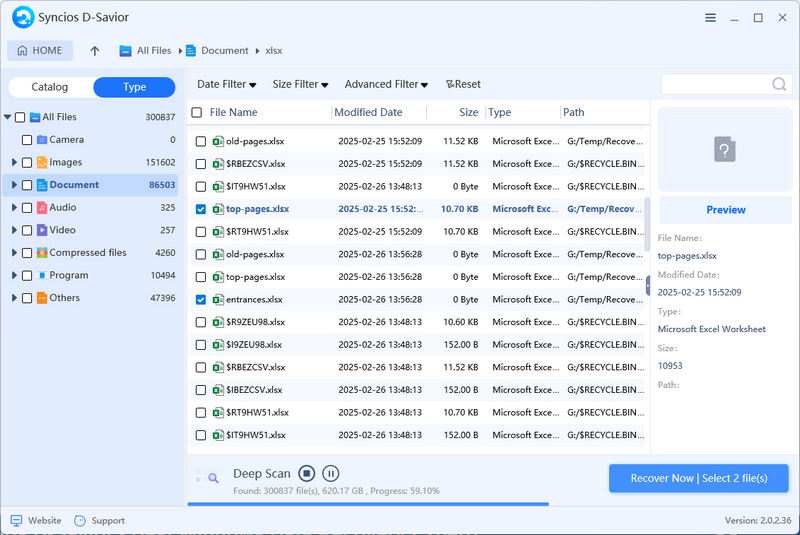
- Step 3: Following a swift scan, you can locate previously deleted files either by their file path or type. As soon as the missing files appear, you have the option to recover them immediately without waiting for the entire scan to complete.
- Step 4: Select the files you need and use the "Preview" function on the right panel to ensure they are the correct ones for restoration. Be aware that formatting issues may cause some information to be corrupted, potentially leading to lost filenames. However, you can still identify the files based on their size, type, modification date, and original location.
- Step 5: To recover Excel files, go to the "Documents" section and open the "xls" or "xlsx" folder. After selecting the necessary Excel files, click "Recover Now".
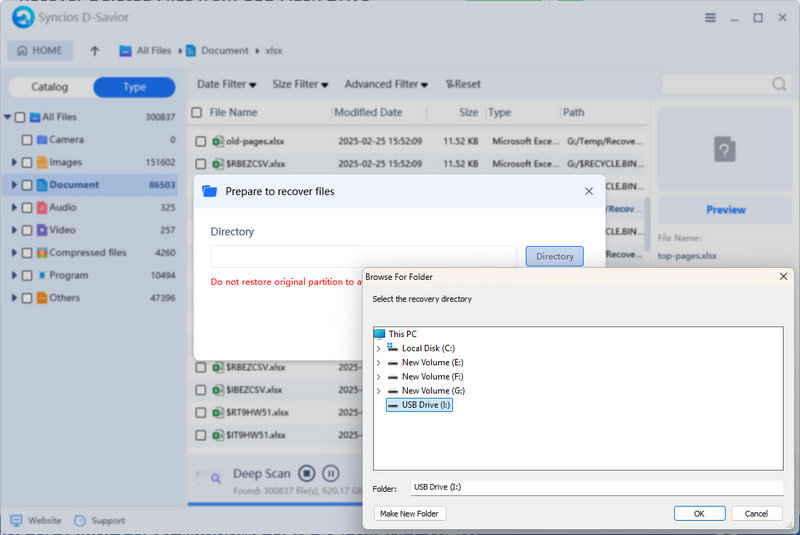
- Step 6: Next, select "Directory" to choose a destination folder where the recovered files will be saved. You can save the files to any device, including an external drive. Click "Confirm" to initiate the recovery process.
- Step 7: Upon completion of the recovery process and receiving confirmation, click the "Recovered" button to open the folder and verify that the Excel files have been successfully restored and are ready for use.


Method 4: Recover Excel Files Use AutoRecover for Unsaved Files
Applicable scenario: Excel crashed or was not saved manually.
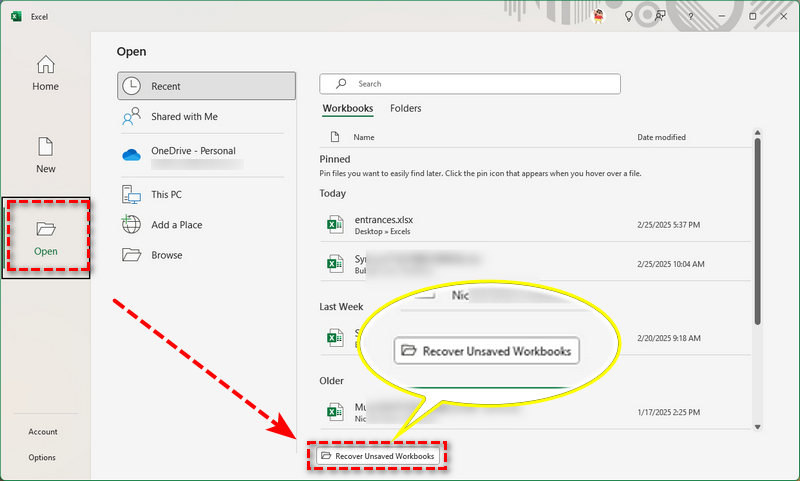
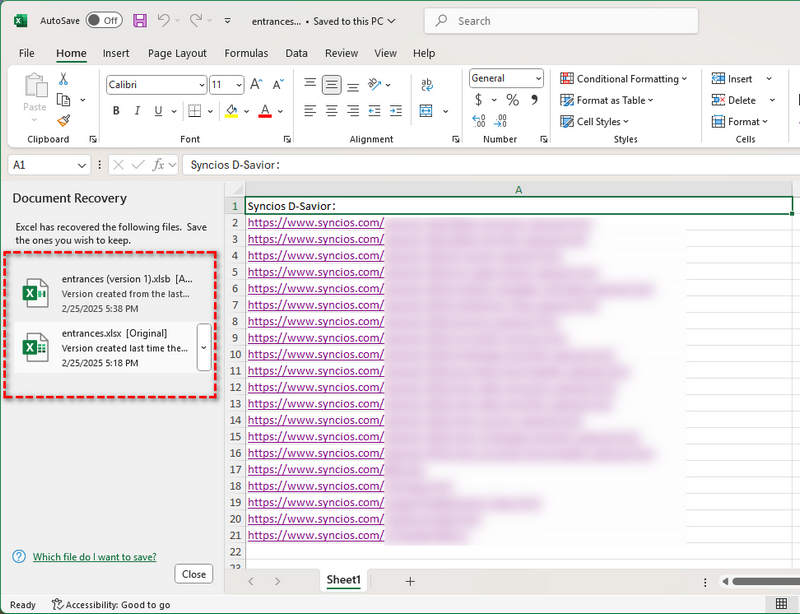
- Step 1: Open the Office Excel app, and directly go to "Recover Unsaved Workbooks".
- Alternatively, open the Excel file you need to recover, then go to "File > Open > Recover Unsaved Workbooks".
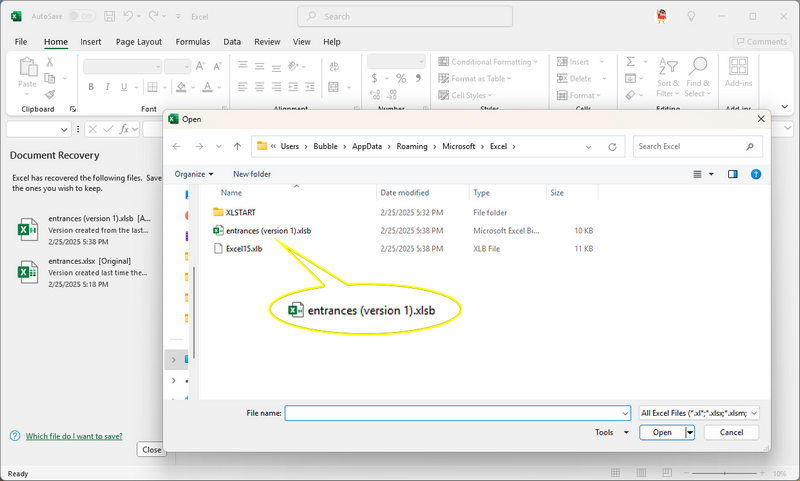
- Step 2: The unsaved temporary file folder will then pop up. The unsaved file will be named "xxxx (version 1).xlsb".
- Step 3: You will be presented with both the original Excel version and the modified version (the unsaved Excel file). Select the file you need to save.
Method 5: Recover Excel Files from Temporary Files Folder
Applicable scenario: Excel crashed or was not saved manually and unintentionally deleted data in Excel and saved the changes.
- Step 1: Open Windows Explorer, then enter
%AppData%\Microsoft\Excel\in the search bar to open the Excel temporary file path. - Step 2: In this folder, check if there are any recent temporary Excel files that you need.

Method 6: Recover Excel Files from Microsoft 365/OneDrive
Applicable scenario: Unintentionally deleted data in Excel and saved the changes. Need to recover a deleted Excel file or its old version.
Requirements: The file has been synchronized to the cloud.
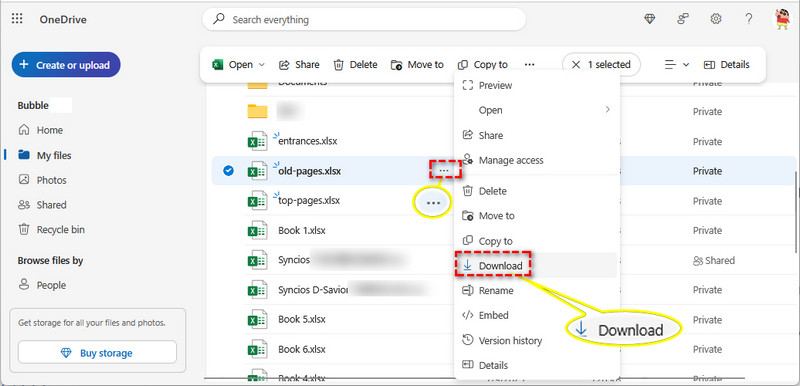
- Step 1: Log in to OneDrive on https://onedrive.live.com/
- Step 2: Check all recently opened files and also check the uploaded backups in "My Files".
- Step 3: Search its name or judge by the Modified data to locate the Excel file you want to recover.
- Step 4: Click the "three dots" and choose "Download" to recover the old backups of the Excel workbook.
Method 7: Restore Excel Files Previous Versions
Applicable scenario: "Applicable for restoring Excel files that have been accidentally deleted or incorrectly modified to an earlier version.
Requirements: Previously, the backup feature was turned on in Windows PC's Control Panel → File History.
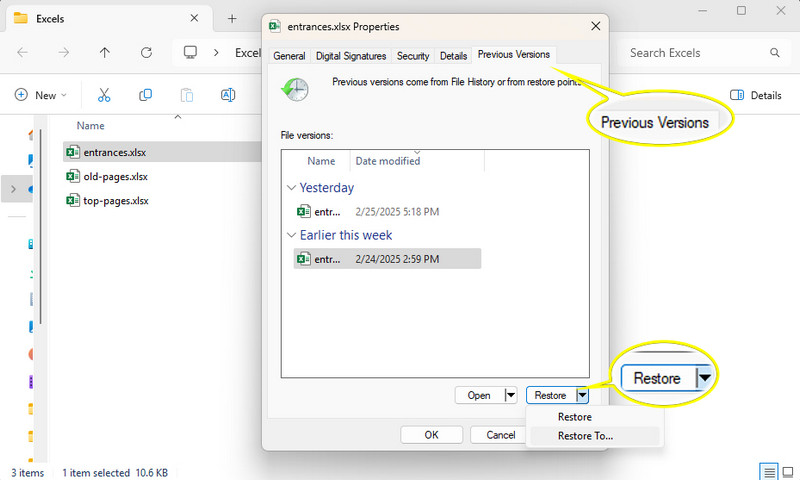
- Step 1: Locate the Excel file you need to restore, then right-click on it.
- Step 2: Select "Properties" from the context menu, then navigate to the "Previous Versions" tab.
- Step 3: Choose the version you need and click "Restore" to replace the current file, or select "Restore to" to save the previous version to a specific location.
Method 8: Restore Excel Files from System Backups
Applicable scenario: When an Excel file has been accidentally deleted or saved with incorrect content, you need to retrieve a historical version from a backup to restore the data.
Requirements: If you have previously turned on the Windows system backup feature via System and Security > Backup and Restore (Windows 7).
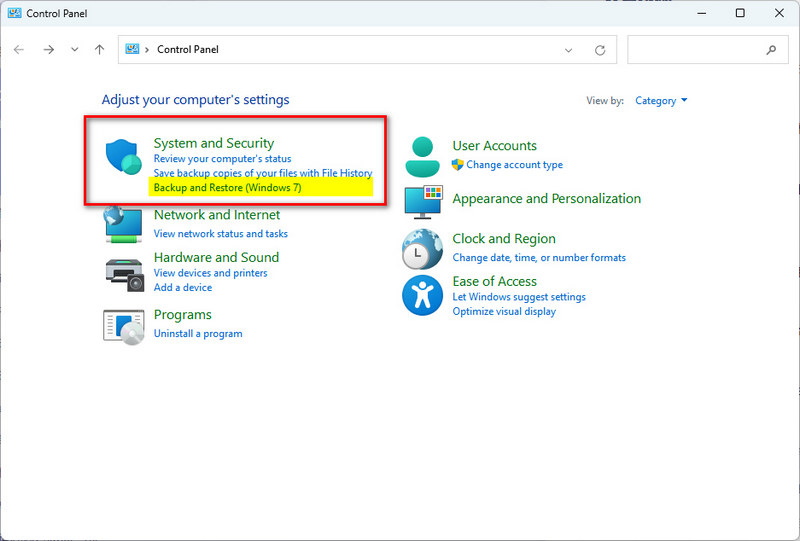
- Step 1: To open the Control Panel, click on the search icon located in the taskbar or press the Windows key + S to bring up the search box. Type "Control Panel" into the search field and select the appropriate result from the list to launch the Control Panel application.
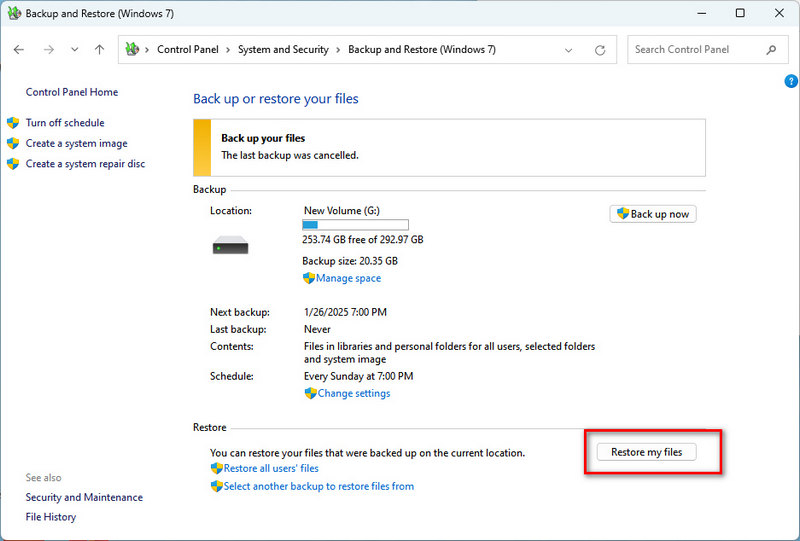
- Step 2: Within the Control Panel, scroll down to find the "System and Security" category. Click on it to expand the options. Look for and click on "Backup and Restore (Windows 7)". This will open the Backup and Restore interface where you can manage your backups.
- Step 3: In the Backup and Restore window, locate the "Restore my files" option. Click on this button to initiate the file restoration process. Follow the on-screen instructions (refer to more detailed steps here) to finish restoring the Excel files from the backup.
More Recovery Tips:
If you have enabled the "File History" backup feature on your Windows PC, you can also use File History to restore additional files. Please note that the System Backup feature and the File History feature are different. So, if you were unable to find the desired data using System Backup, you can try using File History.
Similarly, Mac has a system backup feature called Time Machine. If you want to restore an Excel file on a Mac, you can use Time Machine Backup to recover the files you need.
Method 9: Recover Excel Files via Command Prompt
Applicable scenario: If an Excel file displays 'cannot open' or 'file is corrupted' messages due to a hard disk logical error, you can try to repair the underlying storage structure using Command Prompt. This process may help recover lost files or fix the corrupted file.
Requirements: Ensure that the target Excel file is stored in an NTFS-formatted partition and that you have the complete file path (e.g., D:\data\file.xlsx).
- Step 1: Press the "Win + R" key combination to bring up the Run dialog box. In it, type "cmd" and hit Enter to open the Command Prompt.
- Step 2: At the Command Prompt, input
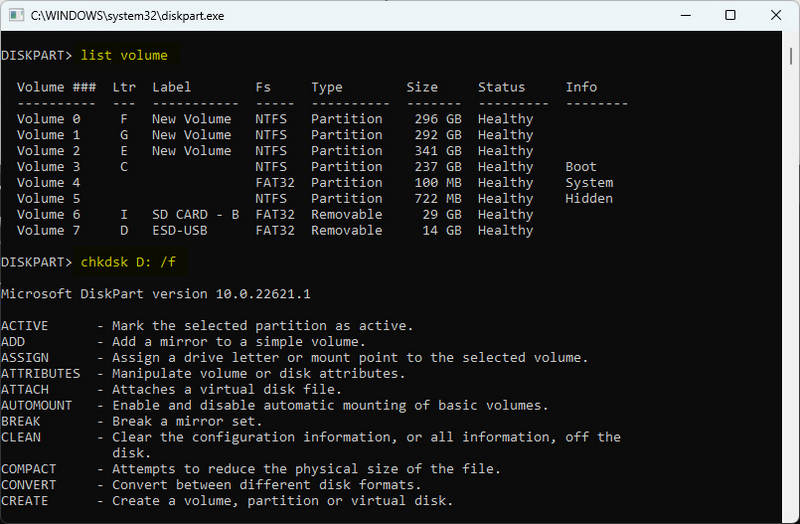
diskpartand press Enter to proceed. - Step 3: To see all the drives connected to your computer, type
list volumeand press Enter. Identify the drive letter of your USB flash drive, such as D: or E:. - Step 4: Now, enter the command
chkdsk D: /f(make sure to substitute D: with the drive letter of the original Excel file's location) and press Enter. The "/f" switch tells chkdsk to fix any errors it finds. - Step 5: Chkdsk will start scanning your drive and attempt to correct any errors detected. This may take a while, depending on the drive's size and the number of errors.
- Step 6: Once the scan is done, navigate to the folder where your original Excel files were stored and check if the deleted files have been recovered.

Method 10: Recover Excel Files Use Windows File Recovery Tool
Applicable scenario: Need to free recover the permanently deleted Excel files without backups.
Requirements: Have installed the Windows File Recovery tool.
Note: This tool does not provide a graphical user interface. The recovery process is performed via command-line instructions. Additionally, the process can be time-consuming, often taking several hours. If you need faster results or more advanced features, consider using a more professional and efficient data recovery tool such as Syncios D-savior.
- Step 1: Head over to the Microsoft Store to download and install Windows File Recovery onto your computer.
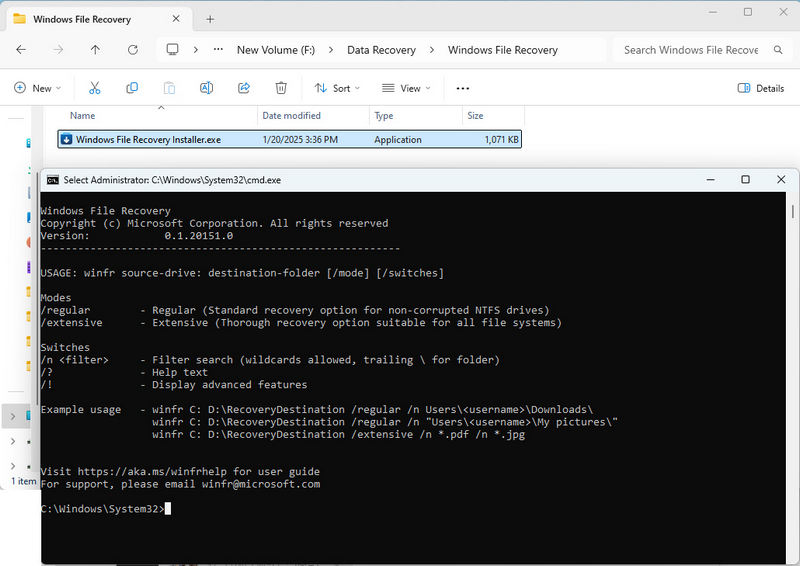
- Step 2: To open Windows File Recovery, simply click the installer file post-installation or search for "Windows File Recovery" in the Start menu and double-click the app icon. For swift future access, pin it to your taskbar or start menu.
- Step 3: Windows File Recovery boasts two modes: Regular and Extensive. The Regular mode is perfect for retrieving recently deleted files with intact file system metadata. The Extensive mode, on the other hand, conducts a deeper scan and may uncover files missed by the Regular mode. Neither mode allows recovery by path; instead, they scan the entire drive and restore files to a designated location. Here’s a quick guide to get you started.
- For instance, let’s walk through scanning the I: drive and recovering data to G:\Temp.
- For a swift scan and recovery, type in the following command and hit Enter:
- winfr D: G:\Temp /regular
- For an in-depth scan and recovery of your entire I: drive, enter:
- winfr D: G:\Temp /extensive
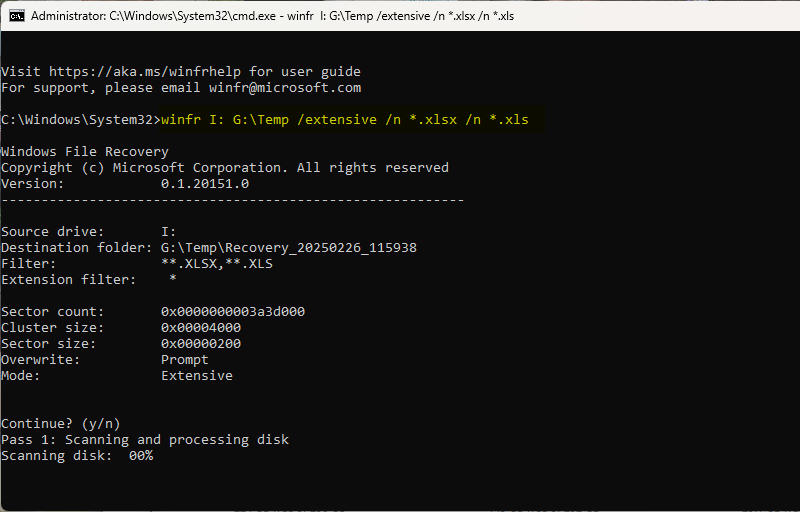
- To deeply scan and recover specific file types (e.g., xlsx and xls) from the drive, input:
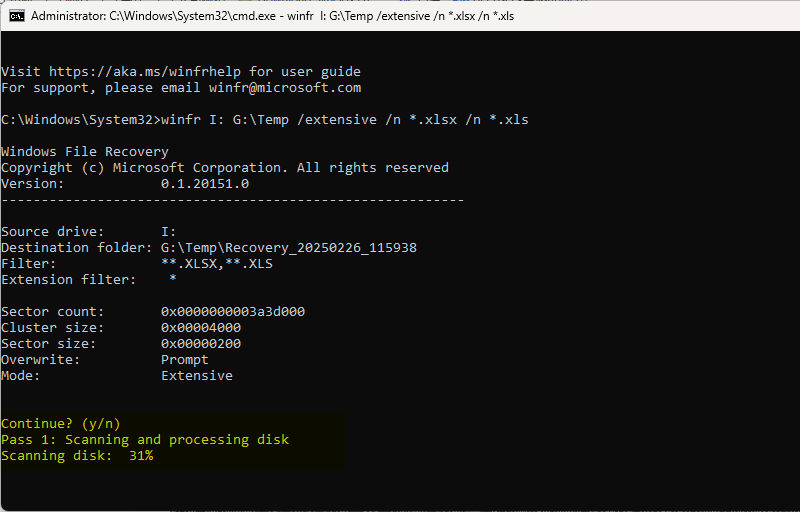
- winfr I: G:\Temp /extensive /n *.xlsx /n *.xls
- Step 4: When prompted with
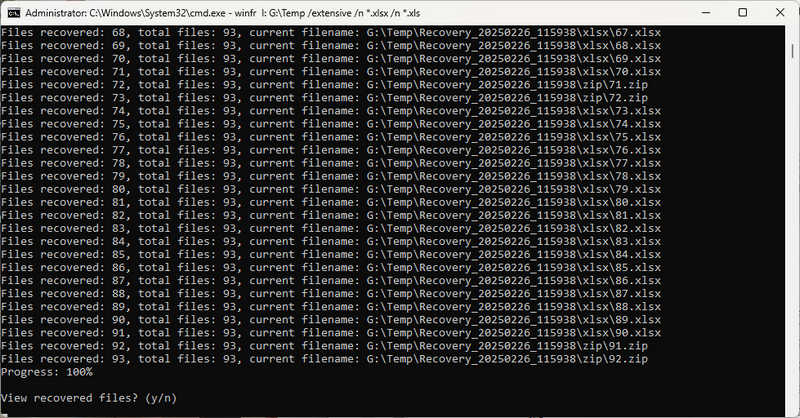
Continue? (y/n), typeyand press Enter to start scanning the drive . The recovery process may vary in duration, depending on your drive's size and the number of deleted files. (PS: It takes me 6 hours to scan a 30GB drive.) - Step 5: Upon completion, you’ll encounter
View recovered files? (y/n). Typeyand press Enter. - Step 6: Windows File Recovery will automatically open the folder housing your recovered files. It creates a folder named "Recovery_(date_time)" on the destination drive, categorizing files by type.
- Step 7: Go to "Documents" and open the "xlsx" or "xls" folder to check the Excel workbooks are recovered. Some files will lose their original names, you need to open every file and check specifically.
Remember to replace I: with the drive letter of the drive you'd like to scan. Besides replace G:\Temp with the location you'd like to store the recovered files later.

By adhering to these steps, you’ll maximize your chances of retrieving Excel files using Windows File Recovery. However, for more intricate cases or if you’re unsure, consider reaching out to professional data recovery services.
Method 11: Recover Excel Files Use Recuva Data Recovery for free
Applicable scenario: Need to free recover the permanently deleted Excel files without backups.
Requirements: Have installed the Recuva app.
Note: This tool lacks a graphical user interface. If your files were deleted a long time ago or if your hard drive has been formatted, it may not be able to recover them. Furthermore, it does not support data recovery from external hard drives or other devices. For these features, you will need to use professional data recovery software such as Syncios D-savior.
- Step 1: Go visit the Microsoft Store and download the data recovery tool Recuva for free.
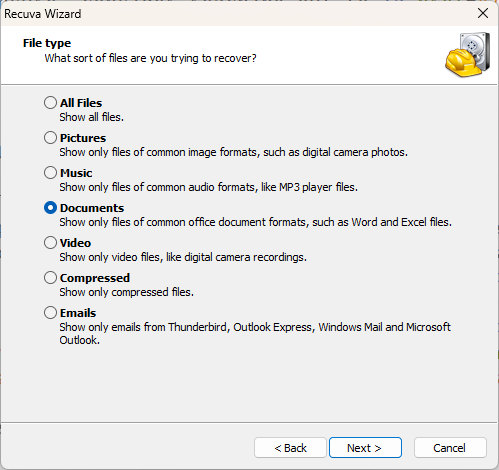
- Step 2: After completing the installation steps, select a recovery type. If you need to recover all files, this will take almost an entire day. Simply check the types you need. For example, if you want to recover Excel files, just check "Documents", and then click "Next".
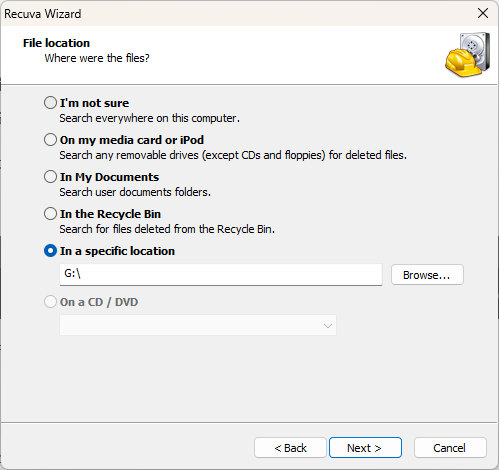
- Step 3: If you know the original path of the deleted Excel file you need to recover, check "In a specific location" and fill in the exact location. If you are unsure, check "I'm not sure", or select another option based on your situation. Then click "Next".
- Tips: If you have enough time, it is recommended to scan all drives by ticking off "I'm not sure" or scan a specific drive instead of certain folder. Because your deleted files may have been copied or moved to different locations on the hard drive, a full scan ensures that every corner of the drive is searched, increasing the chances of finding your Excel files.
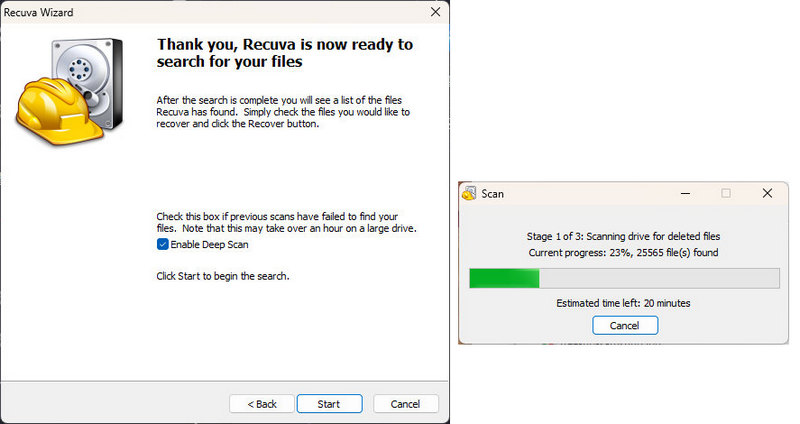
- Step 4: If you need a deep scan, check "Enable Deep Scan". Then click "Start" to trigger the scan immediately.
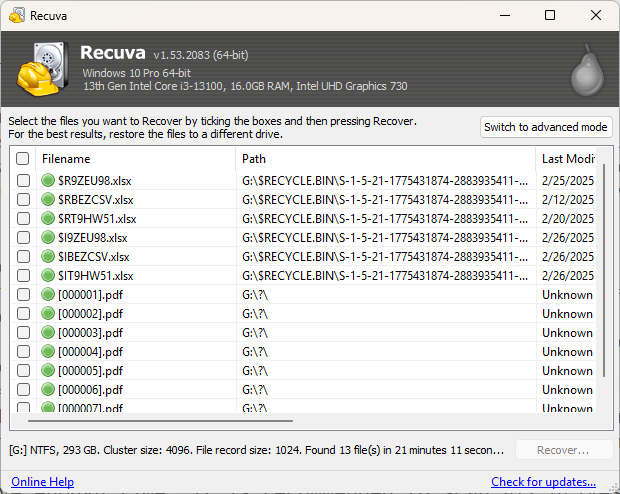
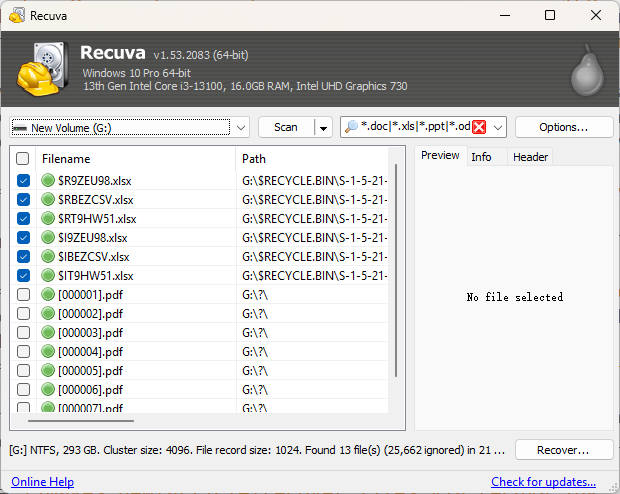
- Step 5: Once the scan is complete, click "Switch to advanced mode" in the top right corner and filter the files you need to recover by file type or name.
- Step 6: If the files have lost their names, you can use the original file path and the modification date to locate the specific files you need. Select the required files from the results and click "Recover" and choose a proper restoration path.
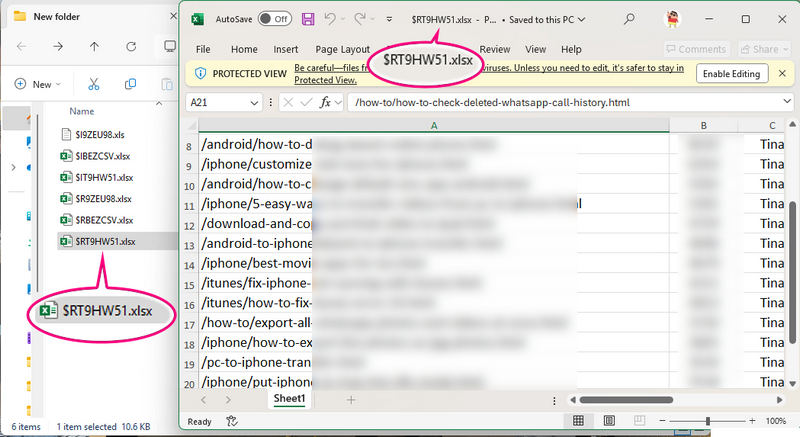
- Step 7: The deleted Excel files will be restored to the designated folder.
Method 12: Repair Corrupted Excel Files
Applicable scenario 1: Minor File Structure Corruption. When file saving is interrupted due to software crashes, power outages, or when the file header/metadata is corrupted but the core data remains intact, the "Open and Repair" function can be used for recovery. For instance, Excel prompts "The file is corrupt and cannot be opened", but the file size appears normal.
Applicable scenario 2: Version Compatibility Issues. Compatibility errors caused by conversion between different Excel versions (such as .xls and .xlsx formats) can be attempted to be repaired by renaming the file extension or using built-in repair tools. For instance, Excel prompts "Excel cannot open the file 'xxx.xlsx' because the file format or file extension is not valid.", but the file size appears normal.

Requirements: Ensure that the file is not completely corrupted and that the storage medium has no physical damage (such as bad sectors on the hard drive). The file should retain at least part of its valid data structure (check if the file size is normal).
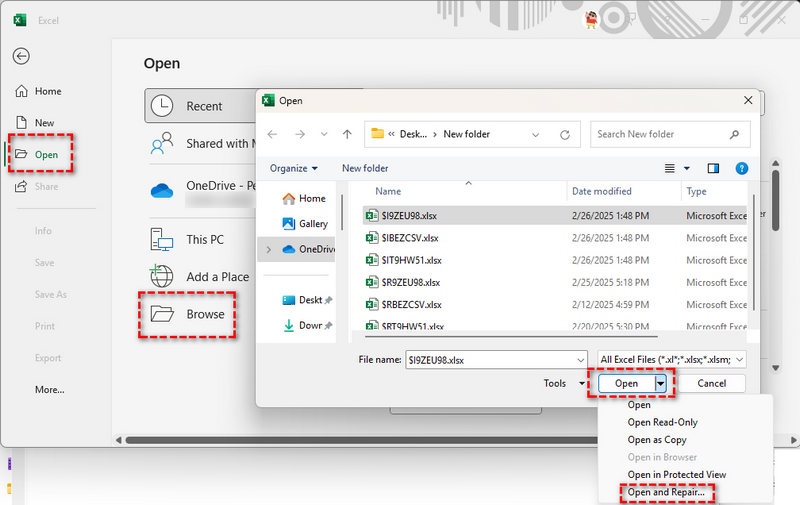
- Step 1: Start the Excel app and go to "Open > Browse".
- Step 2: Select the corrupted Excel file and click "Open", then "Open and repair".
- Step 3: When prompted, choose "Repair". If it fails, repeat the previous steps and choose "Extact Data" this time.

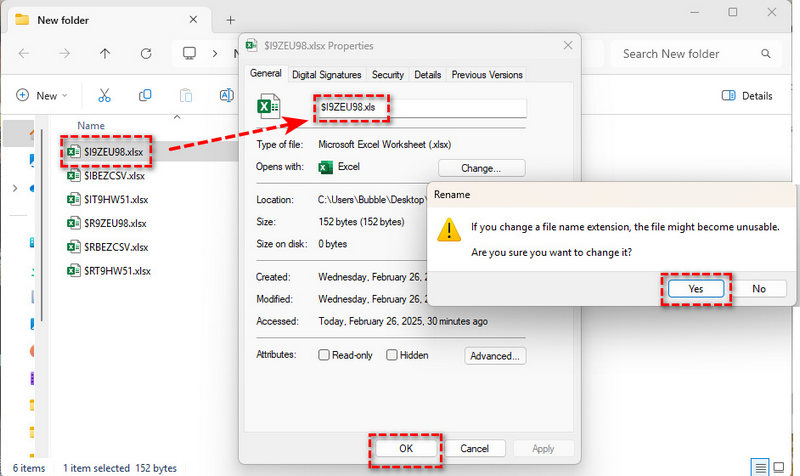
Altenative Solution: Change the Extension
- Right-click on the Excel file, change 'xxx.xlsx' to 'xxx.xls' and see if it can be opened properly.
If the damaged file still cannot be repaired, it is recommended to consult the other methods mentioned in the aforementioned article, or restore the file from a backup or a previous version.
AnySecura Data Loss Prevention 
After recovering your data, keep it safe from leaks and unauthorized access. AnySecura offers advanced monitoring, file tracking, and leak prevention to protect sensitive information in real time.
Part 3: Prevention Tips to Avoid Excel File Loss
Recovering deleted data is a very time-consuming process. If you don't want to go through such a predicament again, it's best to regularly back up important files.
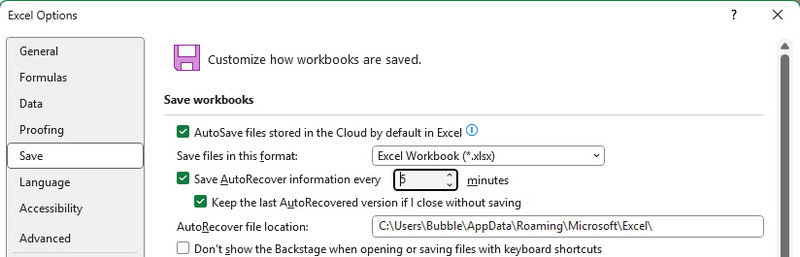
Configure Excel's Auto-Save and Recovery Feature
- Launch Excel, click on "File > More > Options". Select "Save".
- Check "Save AutoRecover information every [interval] minutes", and set it to 5 minutes.
- Check "Keep the last AutoRecovered version if I close without saving".
Enable Cloud Sync Services (such as OneDrive or Google Drive)
- Install and log in to the OneDrive or Google Drive client.
- Upload your Excel files within the cloud sync folder (e.g., the "Documents" folder in OneDrive).

Advantages: Enables real-time file synchronization, traceable editing history, and recovery of accidentally deleted files from the cloud recycle bin.
Enable Windows/macOS System File History Backup Features
On Windows:
- Enter "Control Panel" into the Windows search box, open it.
- Connect an external hard drive, go to "System and Security" > "Backup and Restore (Windows 7)" > "Backup up Now".
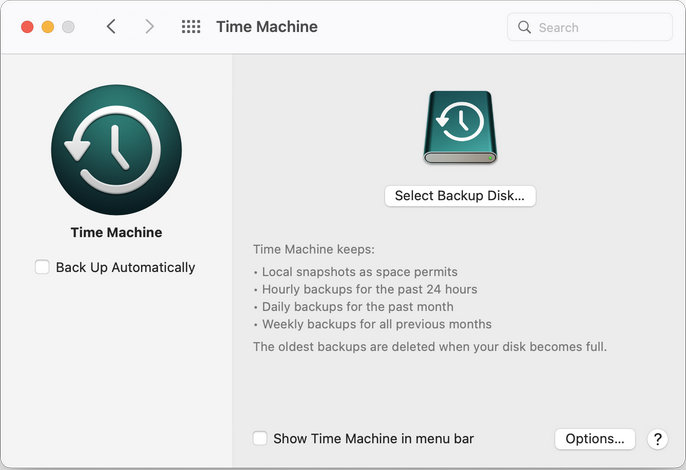
On macOS:
- Connect an external drive via USB or connect Thunderbolt to Mac.
- Click the "Apple icon" in the upper left, choose "System Preferences > Time Machine".
- Tick off "Back Up Automatically. Time Machine will perform hourly, daily, and weekly incremental backups as scheduled.
Regularly Backup Manually to External Storage Devices
- At a fixed time each month, copy important Excel files to a USB flash drive or external hard drive.
Part 4: More Questions About Excel Files Recovery
Tried Several Methods but Still Can't Find the Deleted Excel Files?
If you are using a Windows data recovery tool, such as Syncios D-Savior, Windows File Recovery, or Recuva (as mentioned above), scan additional drives with these tools in case you copied or moved old versions of the deleted Excel files to different locations.
Why Can't I Recover Excel Workbooks from the Emptied Recycle Bin?
The Windows data recovery tool, Syncios D-Savior, supports recovering data from the emptied Recycle Bin. However, over time, the data may be overwritten, resulting in the loss of some information, such as file names. If you cannot recover anything you need from the emptied Recycle Bin after scanning with Syncios D-Savior, you can search your memory and scan the drive where the Excel files were once stored. This will significantly enhance the chances of successful recovery.
Can't Open the Recovered Excel Files?
Follow Method 12 to repair the Excel files. If that doesn't work, try securing all possible backups to locate the deleted Excel files.
If a Recovered Excel File Opens with Garbled Text or Misaligned Data?
If the file is partially damaged or not fully recovered, try using Excel's "Open and Repair" feature (see Method 12 for details). You can also attempt to save the file as a .csv format to extract plain text data.
Temporary Files Folder is Empty, How to Recover an Unsaved Excel File?
The unsaved file might not have generated temporary files if Excel had not crashed, or system cleanup tools may have deleted these temporary files. Try recovering from Microsoft 365 drafts: log into the OneDrive web version > My Files > Unsaved Documents. Alternatively, use data recovery software (such as Syncios D-Savior) to scan the original storage location.
Desperate Because There Are No Chances of Recovering the Excel Files?
Calm down and recreate the Excel workbook. Additionally, follow Part 3 to establish a regular backup routine to prevent future accidents.
The Final Thoughts About Efficient Recovery
Through the aforementioned 12 methods, you have mastered comprehensive recovery strategies for files from accidental deletion to damage. However, when facing deep overwriting deletions or complex damage scenarios, you may need more specialized tool support. For this purpose, we recommend using Syncios D-Savior - its intelligent scanning algorithms and built-in Excel file repair module can locate 99% of lost data and fix logical errors within 5 minutes. Download this powerful tool to immediately experience the simplicity of recovery!
What's next? Download Syncios D-Savior now!
Ethan Mercer | Senior Writer
Related Articles
Related Solutions
Recover permanently 1000+ types of deleted files from both PC and 2000+ external devices.