How to use built-in tools of Syncios
Syncios not only features as great iOS & Android Manager, but also easy-to-use Audio/Video Converter and iPhone, Android Ringtone Maker. From the page you would know how to convert audio and video files to iOS, Andrid supported formats and how to make iPhone/Android ringtone.
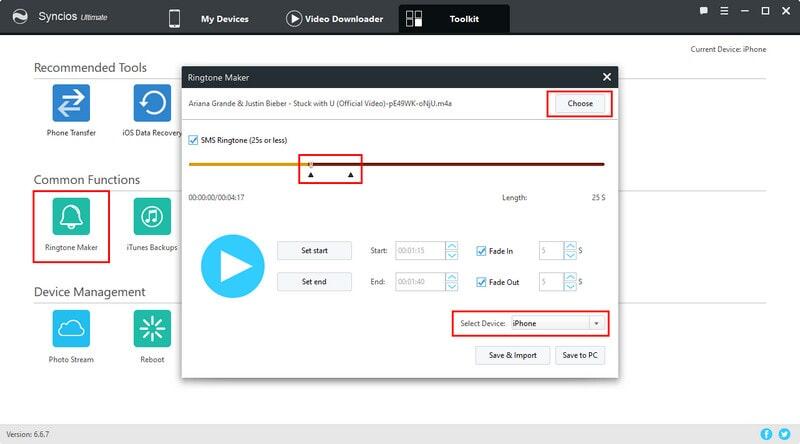
Step 1: Click Toolkit > Ringtone Maker to start the ringtone maker tool.
Step 2: Choose a music file on your PC or drag and drop file to Syncios directly.
Step 3: Set start and Set end to the ringtone and choose effect from Fade In and Fade Out. If you would like to make SMS tone, just simply check the SMS Ringtone option.
Step 4: Choose Save & Import button Syncios would convert your ringtone and then import to current device shown on the upper right corner automatically. Choose Save to PC button you can simply save the output ringtone to your local computer.
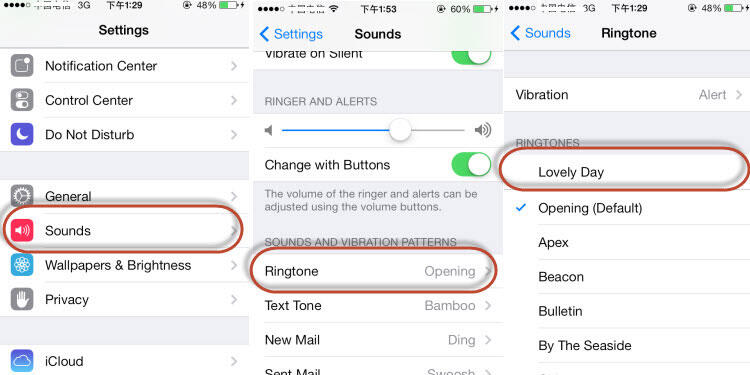
Step 5: Go to your iOS device, click Settings > Sounds > Ringtone, where you would find the ringtone.
If you have downloaded *.m4r ringtone on your PC and would like to import, click here.
iTunes Backup Management
Under Toolkit, go to Common Functions and click the iTunes Backups icon. Now you can simply extract files from iTunes backup.
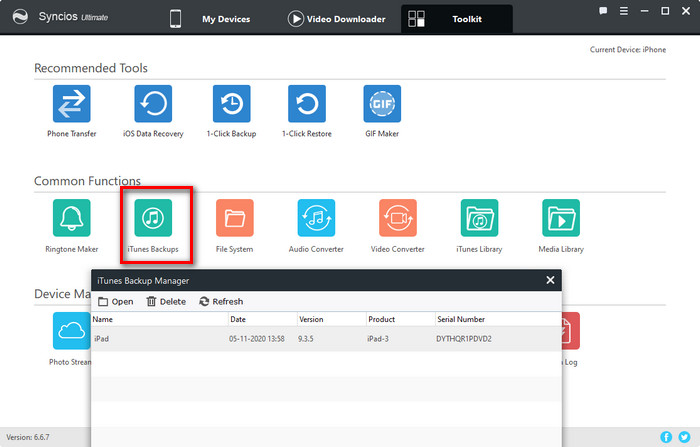
Step 1: Select the iTunes backup file in your PC and click Open button.
Step 2: Select one item from DCIM, SMS, Contact, Call History and choose operation from Refresh and Export. Now you can simply export files from iTunes library to PC.
You can also simply Delete unwanted iTunes backup files from your computer or Refresh the iTunes backup list.
Refresh: Refresh current list.
Export: For DCIM, you can choose photos and Export selected photos to PC. Hold down Ctrl/Shift key to select multiple photos. You can simply expot SMS, Contact, Call History list from iTunes backup to PC, as *.csv file.
File System Management
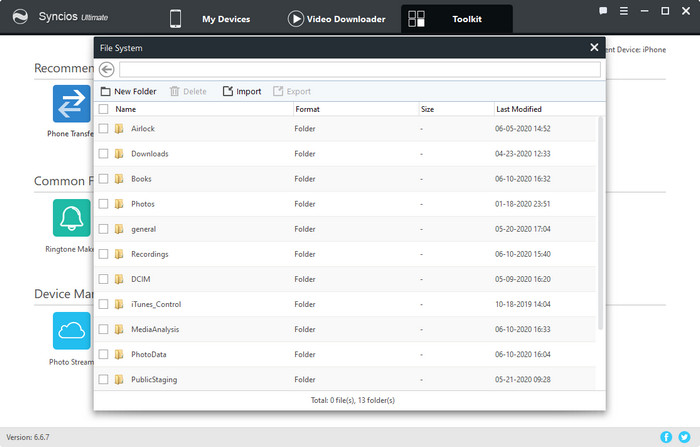
Under Toolkit, go to Common Functions and click File System icon. You can view file system on your device.
Choose operation from New Folder, Delete, Import and Export.
New Folder
1. Click "New Folder" button to create a new folder to your iPad/iPhone/iPod.
2. Name the new folder.
Delete
1. Choose unwanted files/folders. Hold down the Ctrl/Shift key to select multiple items.
2. Click "Delete" button to remove selected items.
Import
1. Click "Import" button.
2. Selected files in your computer and import to current folder.
Export
1. Choose files/folders in your device. Hold down Ctrl/Shift key to select multiple items.
2. Click "Export" button.
3. Browse output location and export files/folders to PC.
Rename files or rename folder
Right click the folder or file to Rename the seleted item.
Audio Converter
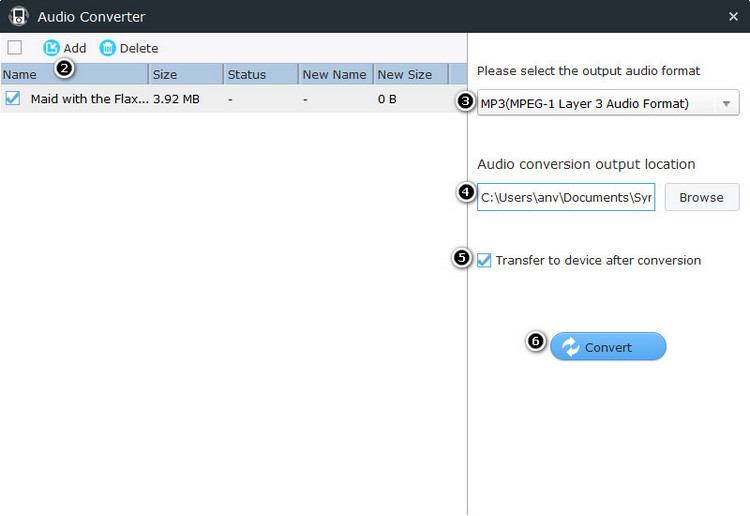
Step 1: Click Tools > Audio Converter to start the audio converter tool.
Step 2: Click Add button and choose audio files you want to convert.
Step 3: Choose output audio format supported by iOS device, including MP3, M4A, M4R and CAF.
Step 4: Click Browse and select an output folder for the converted audio file.
Step 5: If you would like to transfer output audio file to current device shown on the upper right corner automatically, please simply check the option: Transfer to device after conversion.
Step 6: Click Convert button to start the audio conversion process.
Please Note: You can open and change the audio conversion output location under Settings > Conversion.
Video Converter

Step 1: Click Tools > Video Converter to start the video converter tool.
Step 2: Click Add button and choose audio files you want to convert.
Step 3: Choose output video format supported by iOS device, including MP4, M4V and MOV.
Step 4: Click Browse and select an output folder for the converted video file.
Step 5: If you would like to transfer output video file to current device shown on the upper right corner automatically, please simply check the option: Transfer to device after conversion.
Step 6: Click Convert button to start the video conversion process.
Please Note: You can open and change the video conversion output location under Settings > Conversion.
iTunes Library Management
Under Toolkit, go to Common Functions and click the iTunes Library icon. Then Syncios would display iTunes library in the local iTunes. Choose operation from Transfer to device and Export to PC. You can simmply import files in iTunes library to any connected iPad/iPhone/iPod, or export files from iTunes library to computer.
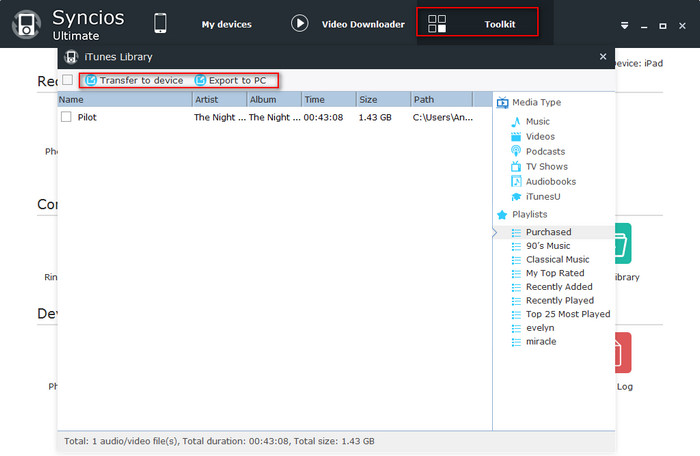
Transfer to device
1. Choose media type from the right panel.
2. Choose files in the iTunes library you would like to transfer to device. Hold down Ctrl/Shift key to select multiple media files.
3. Click "Transfer to device" button.
4. Select the target device and then click Transfer button to import iTunes library to device.
Export to PC
1. Choose media type from the right panel.
2. Choose files in the iTunes library you would like to export to PC. Hold down Ctrl/Shift key to select multiple media files.
3. Click "Export to PC" button.
4. Select the location and then click Export button to import iTunes library to device.
Please Note: If you would like to transfer files from iPad/iPhone/iPod into iTunes Library, simply click here.
Media Library Management
Under Toolkit, go to Common Functions and click the Media Library icon. Then it would display audio, video and ringtone files you can ever converted with Syncios. Choose operation from Transfer to device and Delete. You can simmply import files to any connected iPad/iPhone/iPod, or simply delete the files located in your computer. You can also find the media files under Settings > Conversion.
Transfer to device
1. Choose media type from the top interface, including Audio, Video and Ringtone.
2. Choose files in the media library you would like to transfer to device. Hold down Ctrl/Shift key to select multiple media files.
3. Click "Transfer to device" button.
4. Select the target device and then click Transfer button to import media library to device.
Delete
1. Choose media type from the top interface, including Audio, Video and Ringtone.
2. Choose unwanted files in the media library. Hold down Ctrl/Shift key to select multiple media files.
3. Click "Delete" button to delete files from your computer.
One-Click Backup
Under Toolkit, go to Recommend Functions and click the 1-Click Backup icon.
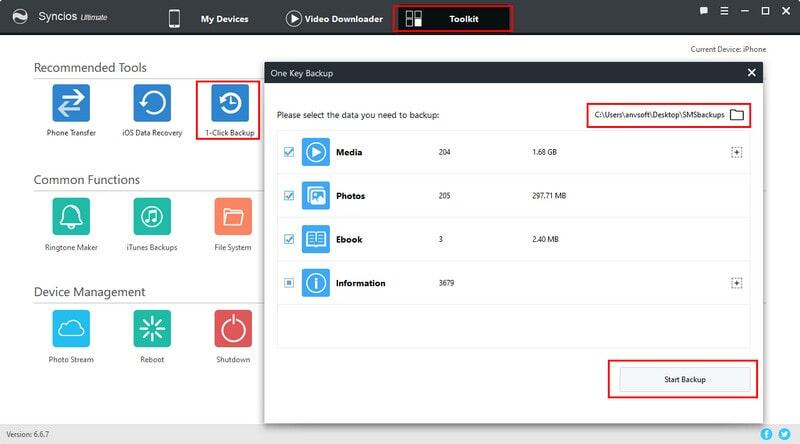
Step 1: Click Toolkit > 1-Click Backup to start the one key backup tool.
Step 2: Click Change backup path button to customize your backup path.
Step 3: Choose files to backup, including Media, Photos, Apps, Ebook,Contacts, Notes and Bookmarks.
Step 4: Click Start Backup button to backup all of the data.
One-Click Recovery
Under Toolkit, go to Recommend Functions and click the 1-Click Restore icon.
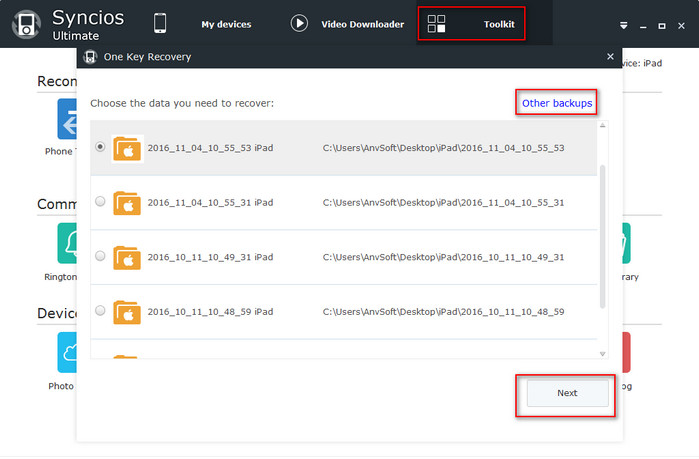
Step 1:Click Toolkit > 1-Click Restore to start the one key restore tool.
Step 2: Click Other Backups button to select other backup files to restore.
Step 3: Choose files to restore. All of the available backups will be listed on the checkbox.
Step 4: Click Next button to restore of the data.
Note: For one click phone to phone transfer, please use Data Transfer (only for Ultimate version) on the homepage to backup your mobile data. Why Ultimate >>
Tips what's next? Download Syncios Mobile Phone Management now!
Getting Started
Mobile Management
Tools
Online Download
More Functions
FAQ
- Is Syncios completely free?
- Can I get free updates?
- Does Syncios support jailbroken iOS devices?
- Do I need to install iBooks to transfer PDF or ePub?
- What to do if Syncios says to "turn off iCloud"?
- What to do if Syncios crashes while clicking Ebook tag?

- What to do if Syncios fails to display Bookmarks?
- What to do if Syncios fails to display Notes?
Guide & Tips
- Free download YouTube videos
- Transfer Photos between PC and Android
- Sync Outlook Contacts to iPhone
- Sync samsung contacts to iPhone
- Free up Android phone storage
- How to delete iPhone contacts
- Transfer everything from iPhone to iPhone
- PC to iPhone transfer
- Sync iPhone contacts to outlook
- Make custom ringtone on Samsung Galaxy S10
- iPad to iPad transfer
- Backup iPhone to Mac
User Say
Louis White, Canada
"Pretty easy to use. All the items are well categorized like iTunes, but offering choice to transfer all my files to my own PC. It can manage different files in iPad like my movie, TV shows, music videos, photos, songs, ebooks, etc. I can select the wanted items for backup with few clicks. Or add movie and songs from my PC. Very convenient!"


